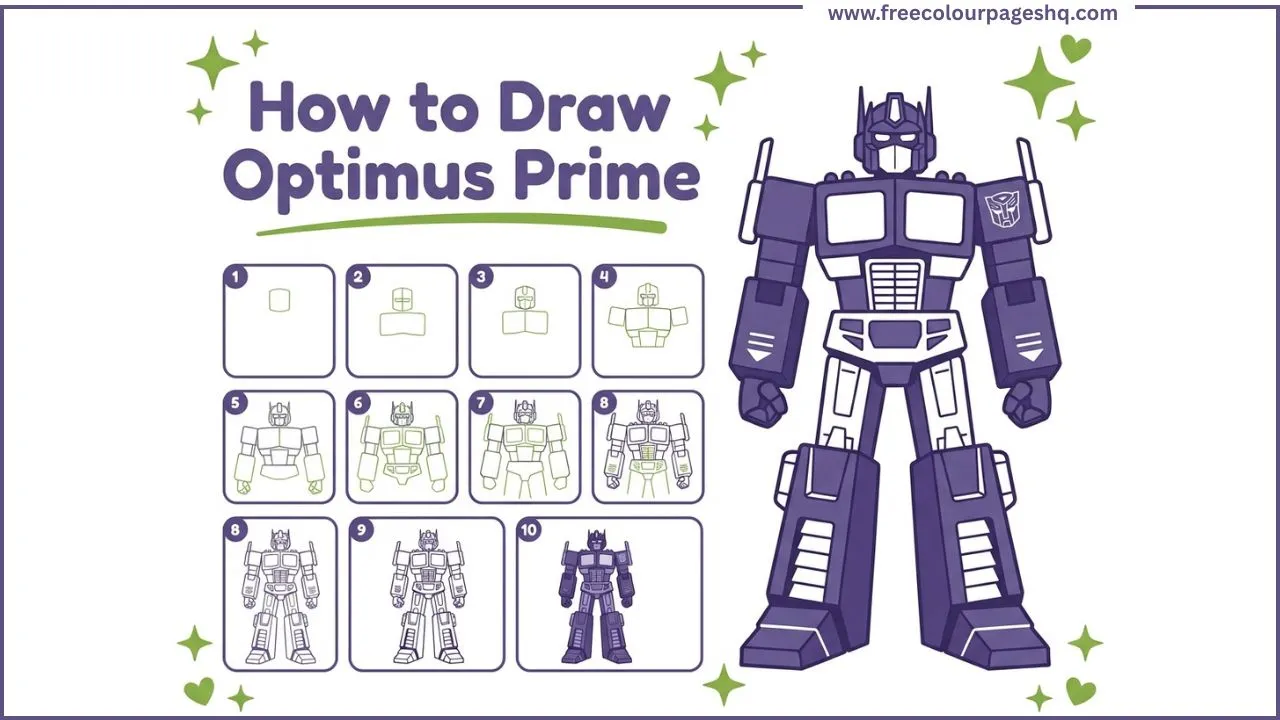
There is a reason Optimus Prime has been the face of the Transformers franchise for over forty years. He is not the most powerful Autobot. He is not the fastest or the most technically advanced. What he is, consistently and across every version of the character from the original 1984 cartoon to the 2023 Rise of the Beasts film, is the most morally clear. He protects. He sacrifices. He leads. And he does all of this while looking genuinely magnificent, which is no small achievement for a character whose core design is essentially a large blue and red truck that stands upright.
This tutorial shows how to draw Optimus Prime from Transformers step by step in ten stages. The method builds from the head downward through the chest, shoulders, arms, waist, legs and feet, producing a front-facing standing Optimus Prime in his classic robot mode. It works for complete beginners, for kids who love the Transformers series and for anyone who wants a reliable method for drawing one of animation’s most iconic robot characters. All you need is a pencil, an eraser and coloured pencils or markers for the final step.
Who is Optimus Prime
Optimus Prime is the leader of the Autobots, the heroic faction in the Transformers franchise. He is a Cybertronian robot, meaning he is a member of a race of intelligent mechanical beings from the planet Cybertron, and his alternate mode is a large semi-truck, specifically a Peterbilt or Kenworth depending on the film or series. The name Optimus Prime translates loosely as Best Leader or Supreme First, which is admirably on-the-nose as character names go.
The original Optimus Prime appeared in the 1984 Transformers animated series produced in the United States based on the Japanese toy line created by Takara and licensed to Hasbro. His character design has evolved significantly across different series and film adaptations. The classic Generation 1 design, abbreviated G1 by fans, uses a simpler, more blocky form with clearly recognisable truck cab elements forming the chest.
The Michael Bay film series Optimus, which appears in the live-action Transformers films beginning in 2007, is considerably more complex with layered panels, mechanical detail and a more angular silhouette. The Transformers Prime animated series uses a sleeker design between these two extremes. Transformers One, the 2024 animated film, introduces a younger Orion Pax before he became Optimus Prime.
The drawing method in this tutorial is closest to the simplified G1 and Transformers Prime approach, using blocky rectangular forms that make the character recognisable without requiring the extreme mechanical complexity of the Bay film designs.
What You Need
A pencil and eraser. Drawing lightly in the early steps makes adjustment easier before committing to final outlines. Coloured pencils or markers for the finished colouring.
How to Draw Optimus Prime Step by Step
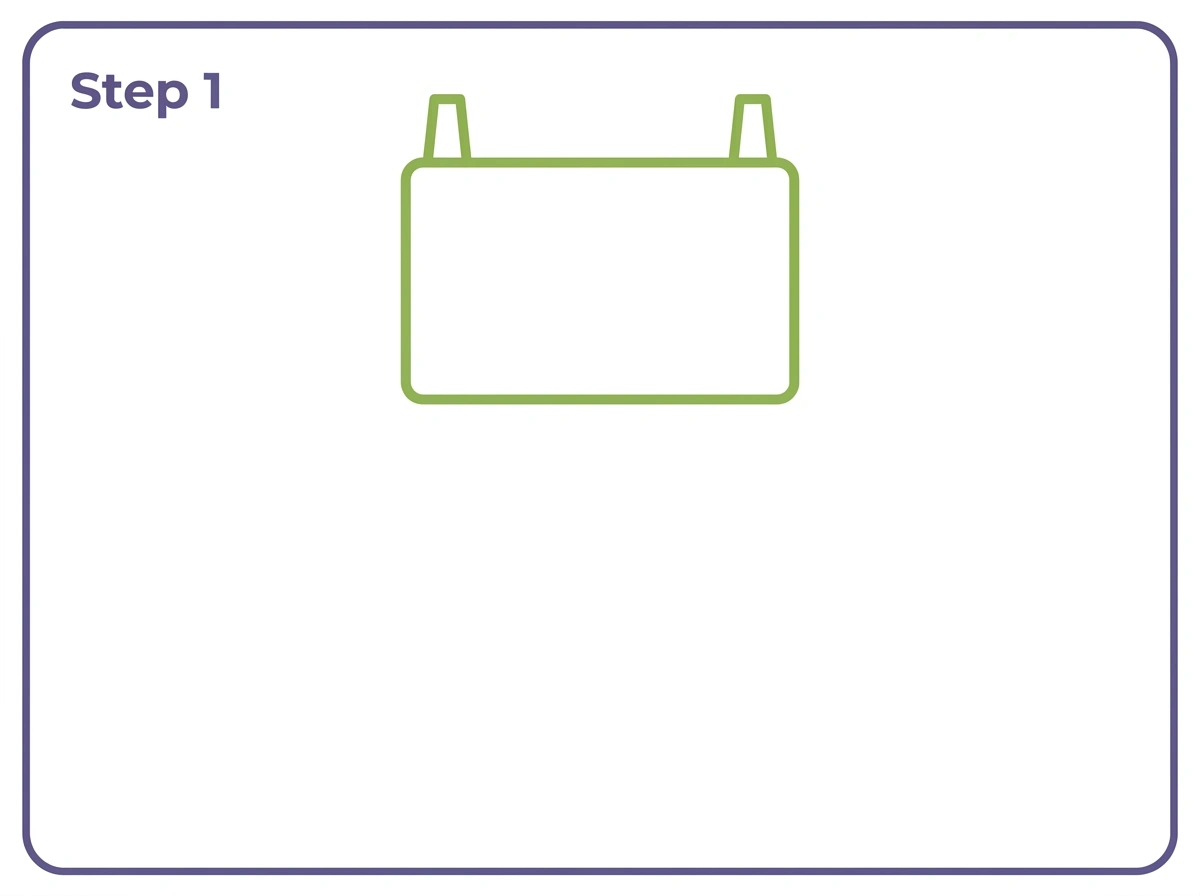
Step 1 — Draw the Head Shape and Antenna
Start at the upper center of the page and draw a rectangular head shape with slightly rounded corners. This rectangle should be tall enough to accommodate the face features that will be added in Step 2. Leave the majority of the page below the head for the much larger body.
From the top-left and top-right corners of the head rectangle, add two short, blocky rectangular antenna shapes pointing upward. These antenna are one of the most immediately recognisable features of the classic Optimus Prime design. They are not thin radio antenna like those on a real vehicle. They are short, solid, architectural shapes that read as part of the helmet structure.
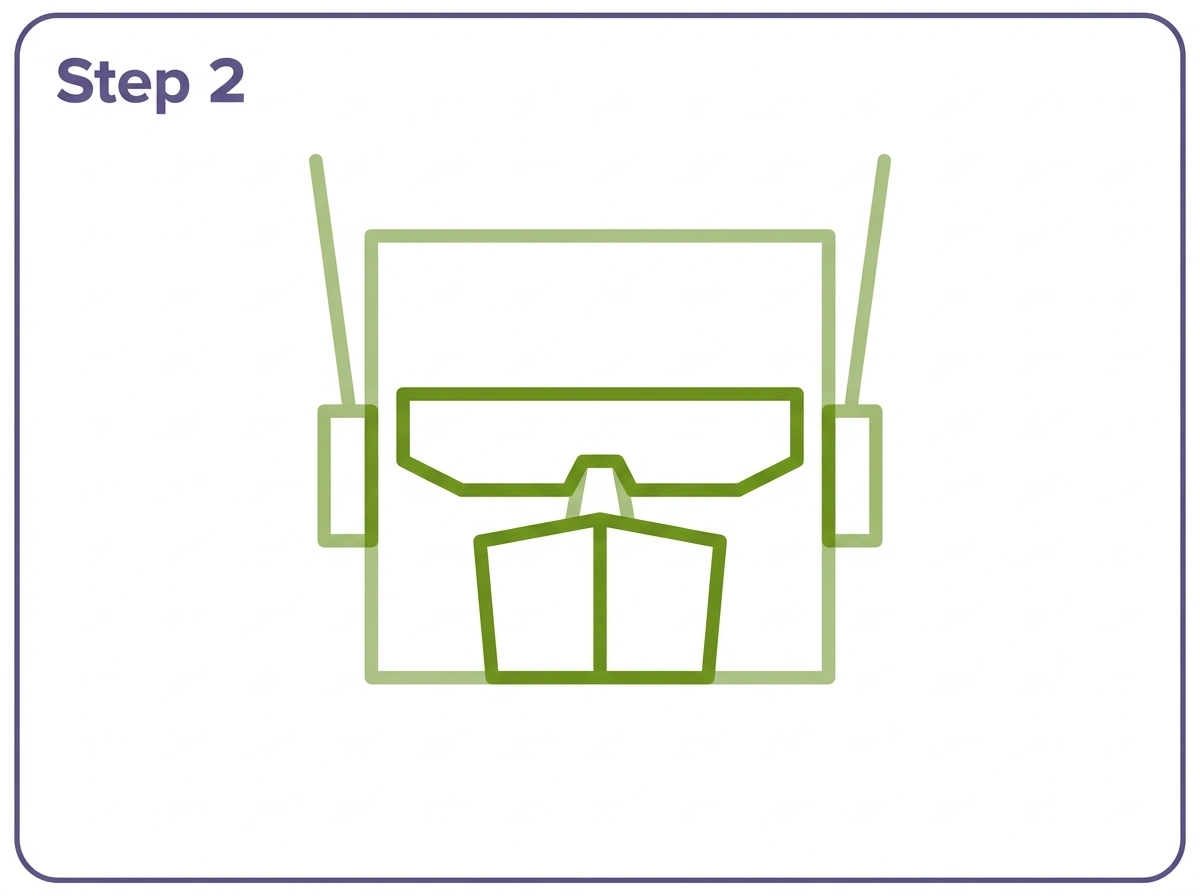
Step 2 — Draw the Face Details
Inside the head rectangle, add the face features that define the Optimus Prime look. Draw a wide horizontal visor shape spanning across the upper half of the face. This visor is a single rectangular strip rather than two separate eyes, which is characteristic of the classic Optimus Prime design and distinguishes him from other Transformers characters.
Below the visor, draw a rectangular lower face plate covering the area where a nose and mouth would be on a human face. This face plate is the mouthguard that has become as associated with the character as the visor itself. Add two small rectangular panel shapes on either side of the head at the visor level, suggesting the earmold structure of the helmet.
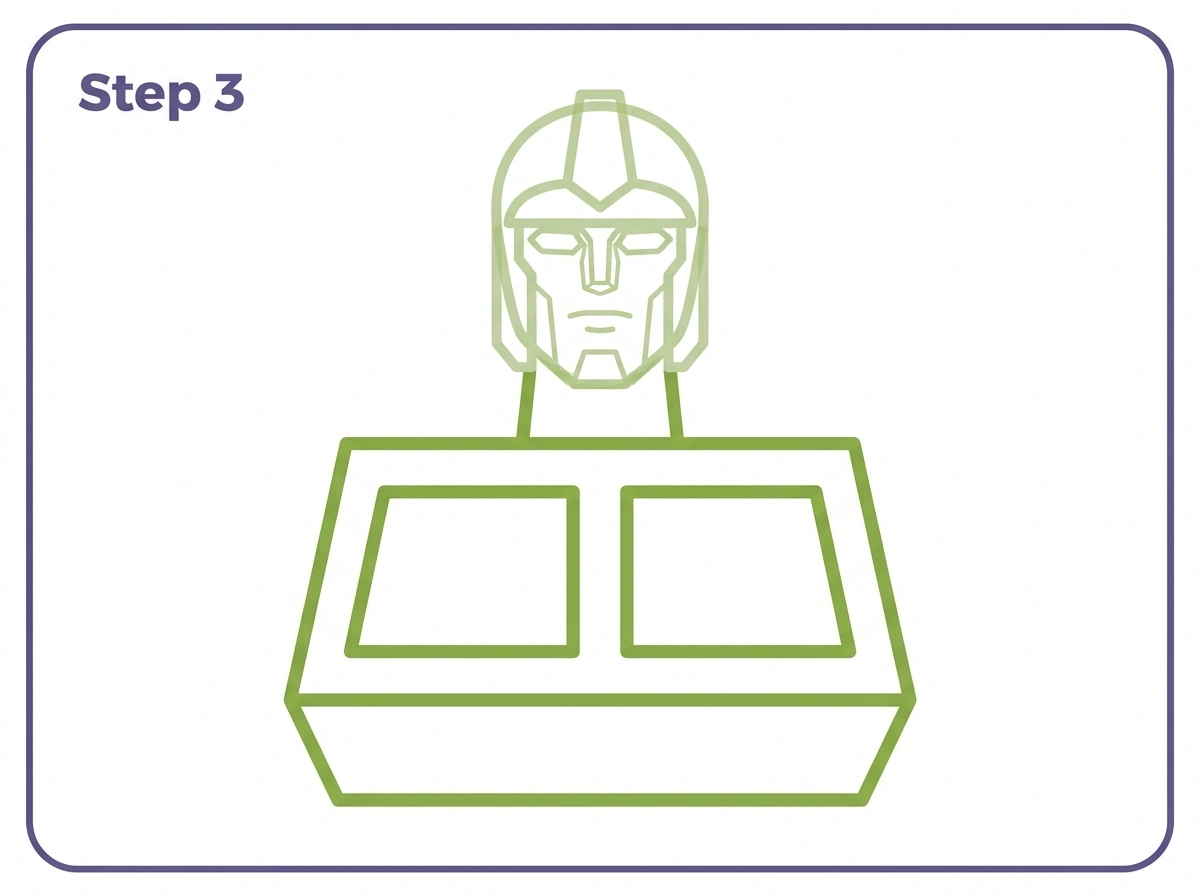
Step 3 — Draw the Neck and Chest Plate
Add a short rectangular neck connecting the base of the head to a large broad chest plate below. The chest plate is a wide trapezoidal shape, noticeably wider at the bottom than at the top where it meets the neck.
Inside the chest plate, draw two symmetrical rectangular window shapes side by side in the center. These represent the truck cab windshield that forms Optimus Prime’s chest in robot mode and are one of the signature identifying details of the character across all versions of his design. Below the window shapes, add a horizontal line suggesting the bottom edge of the chest panel and a small central detail element between the two window shapes.
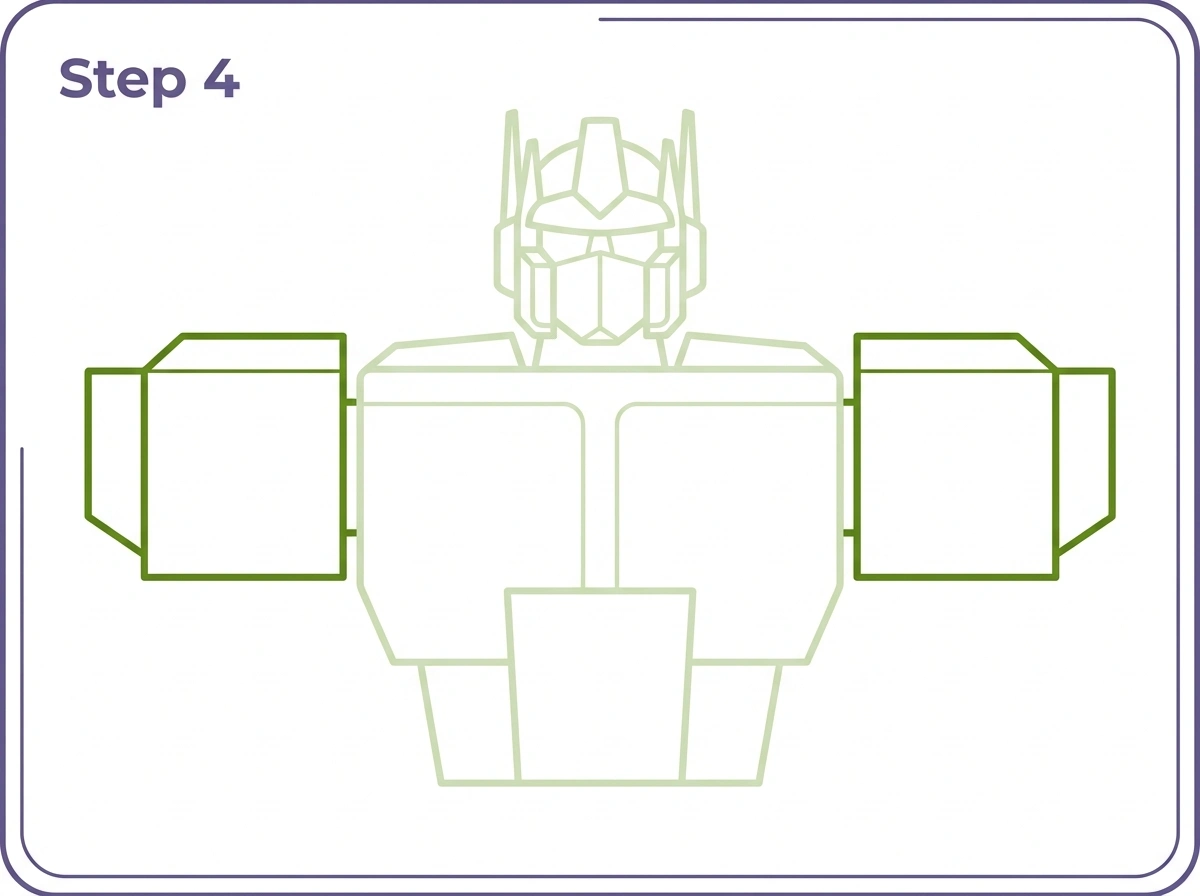
Step 4 — Draw the Shoulder Armor
Add two large broad shoulder armor pieces extending outward from both sides of the upper chest. Each shoulder armor is a wide blocky rectangular shape that extends noticeably further outward than the width of the chest. The shoulder pieces are flat on top with a slight angular cut at the outer lower edge.
The shoulder armor is what gives Optimus Prime his characteristic top-heavy, powerful silhouette. The width of the shoulders relative to the waist is a key proportion in making the drawing immediately recognisable as Optimus rather than a generic robot. Draw the shoulders broad, broader than might feel natural at first, because this is the proportion that makes the character work visually.
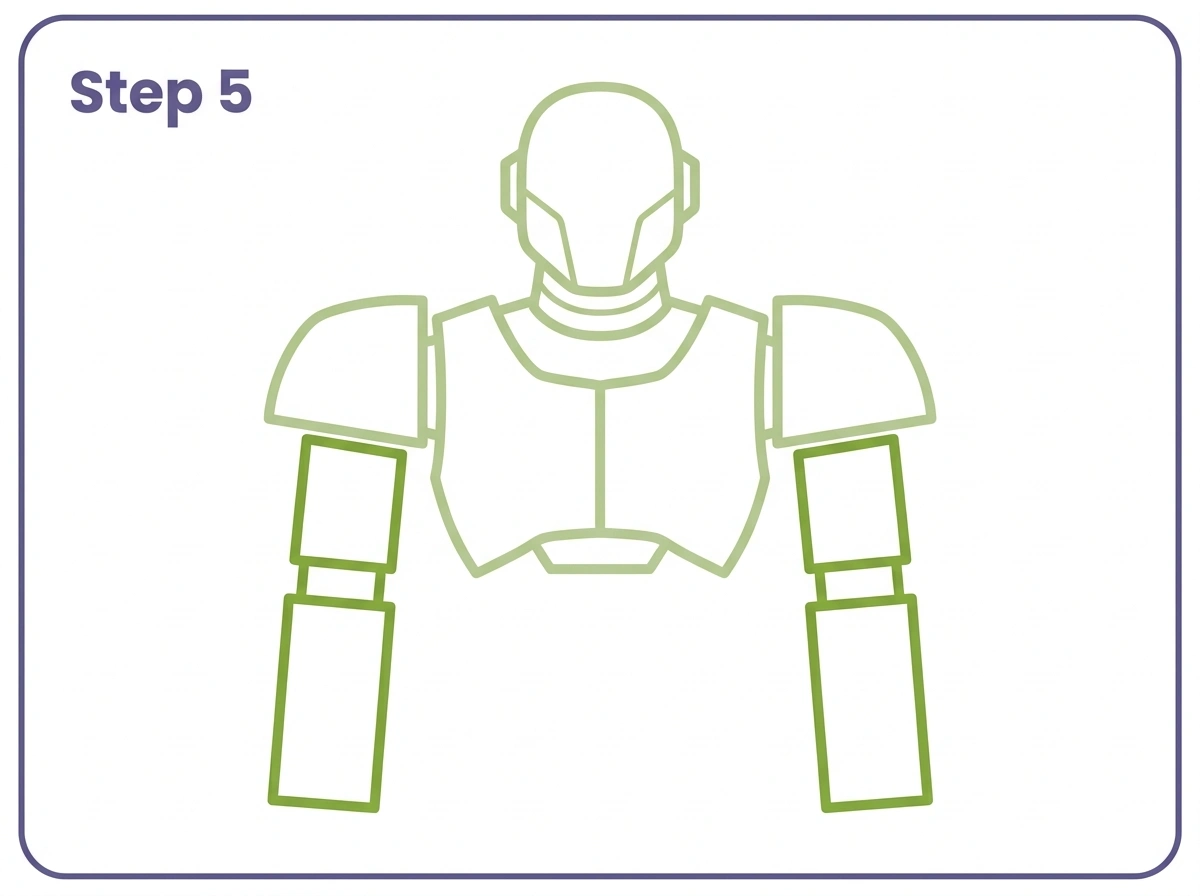
Step 5 — Draw the Upper Arms
Below each shoulder armor piece, add thick rectangular upper arm shapes hanging downward. The upper arms are narrower than the shoulder pads but still substantial, maintaining the overall impression of a powerfully built robot rather than a slender one.
Add a horizontal panel line dividing each upper arm into an upper and lower section. This panel division suggests the layered mechanical structure of the character’s body and is one of the simplest details that makes a robot drawing feel more articulated and mechanical rather than like a series of plain geometric shapes.
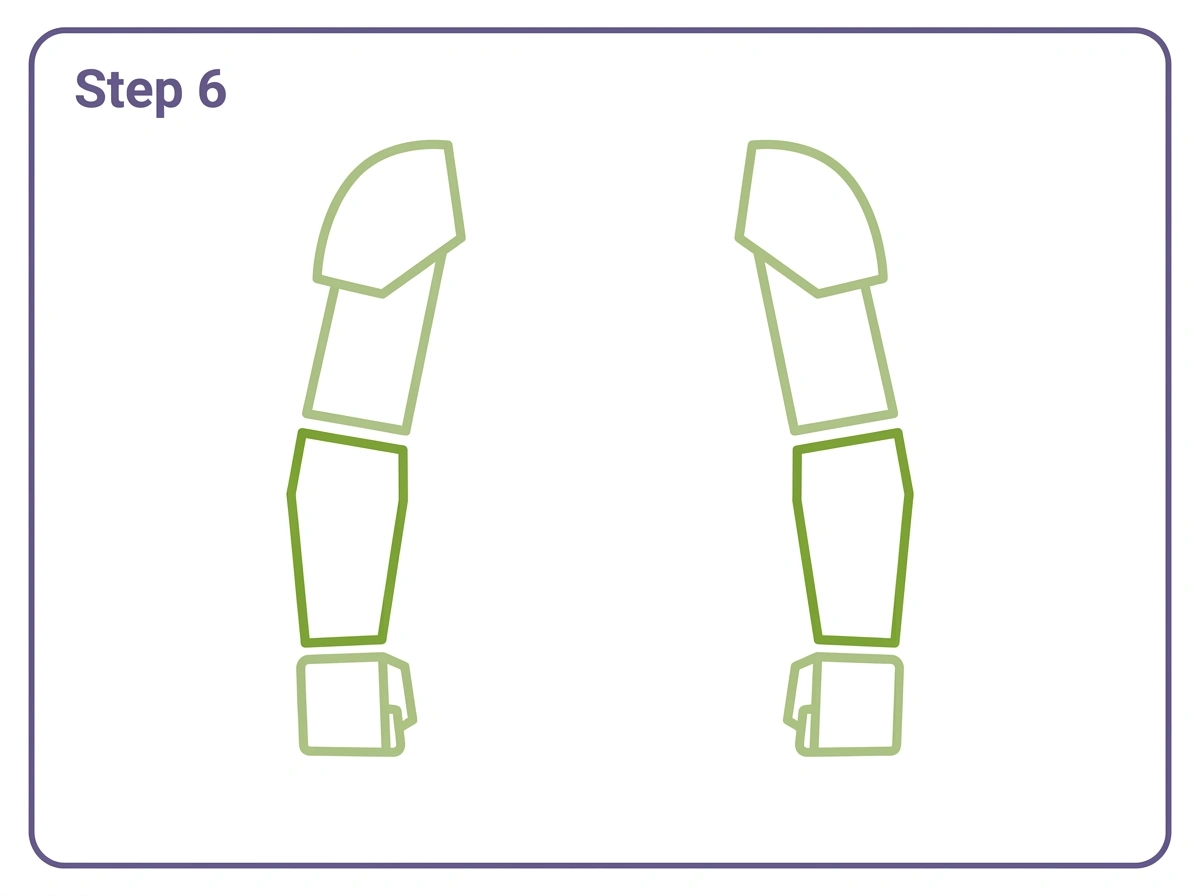
Step 6 — Draw the Forearms and Fists
Below the upper arms, add forearm sections on both sides. Each forearm is a slightly narrower rectangle than the upper arm, creating a slight taper from shoulder to fist that gives the arm a more natural mechanical proportion.
At the base of each forearm, draw a compact blocky fist shape. The fist is a roughly square form showing the fingers as a flat front surface. Add a slight thumb indication on the outer side of each fist. The fists are the most important expressive element of the arms in a standing neutral pose because they establish whether the character reads as relaxed, alert or ready for combat. Closed fists at the sides read as contained power, which is appropriate for Optimus Prime in his most iconic standing poses.
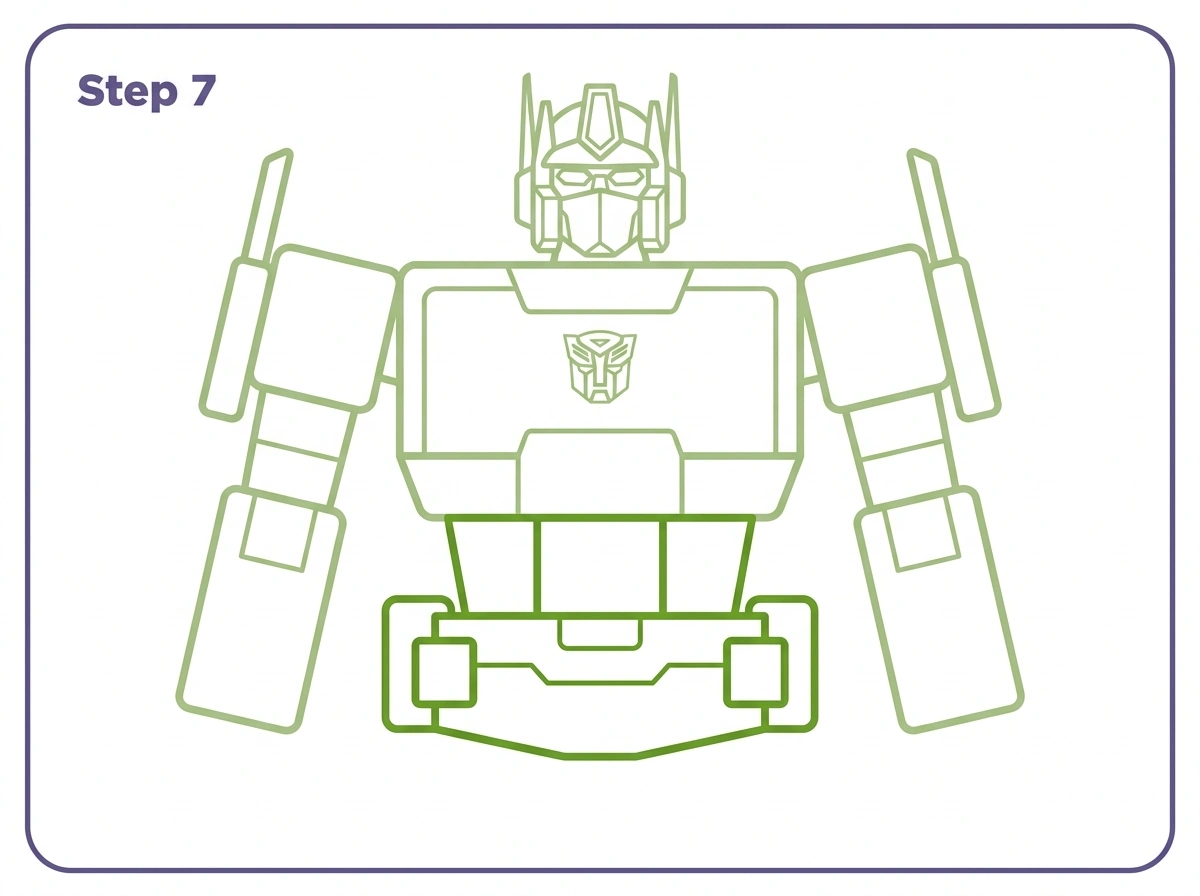
Step 7 — Draw the Waist and Hip Plates
Below the chest, add a narrow rectangular waist section connecting the chest to a wider hip plate area below. The waist should be noticeably narrower than both the chest above and the hips below, creating the hourglass proportion that gives the robot torso a clear structural logic.
The hip plate is a wider rectangular block with two small square hip joint covers on either outer side. Add a horizontal panel line across the center of the hip plate and a small Autobot symbol outline in the center of the chest plate. The Autobot logo is a stylised face shape, a horizontal visor at the top and a pointed lower section suggesting a chin and mouthplate, and even a very simplified version of this logo in the center of the chest immediately reinforces the character’s identity.
Step 8 — Draw the Thighs and Knee Guards
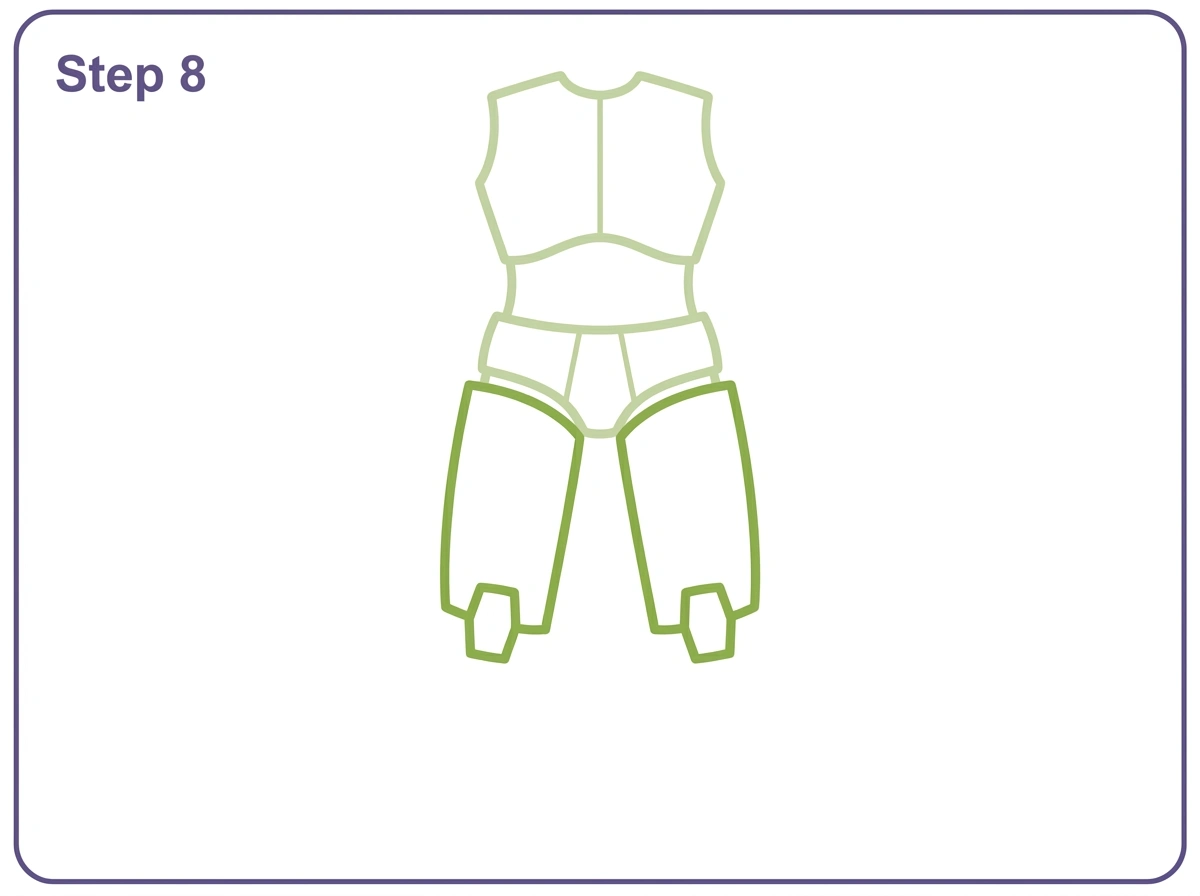
From the hip plate, add two thick rectangular thigh shapes extending downward on both sides. The thighs should be wide and substantial, roughly as wide as the hip joint covers they connect to.
At the lower end of each thigh, add a small knee guard shape as a slight outward bulge or small rectangular extension at the knee joint position. The knee guard is a small detail but it does important work in breaking up what would otherwise be a plain rectangle and suggesting the jointed mechanical structure of the leg. Both thighs should be symmetrical and positioned at the same height.
Step 9 — Draw the Lower Legs and Feet
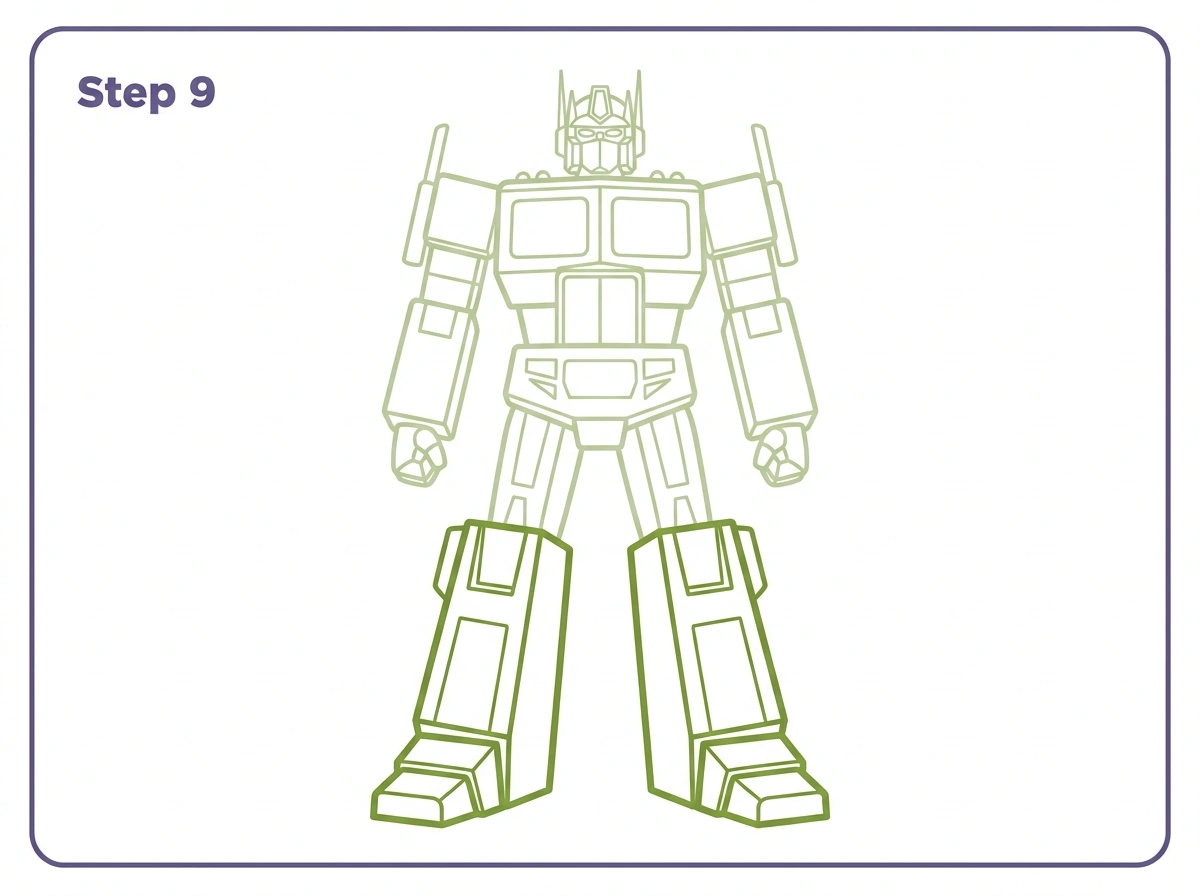
Below the knee guards, add lower leg sections. Each lower leg is a blocky rectangular shape with a flat panel front. Add a horizontal line near the ankle area of each lower leg to suggest the ankle joint structure.
At the base of each lower leg, draw a large flat rectangular foot extending forward, wider than the leg above it. The feet extend forward with a squared-off toe area, giving Optimus Prime his characteristic stable wide-footed stance. The size of the feet relative to the legs is important. Large feet on a blocky robot read as stable and powerful. Small feet read as fragile, which is not the impression a character like Optimus Prime should create.
The complete Optimus Prime figure is now fully outlined from antenna tips to feet.
Step 10 — Colour the Drawing
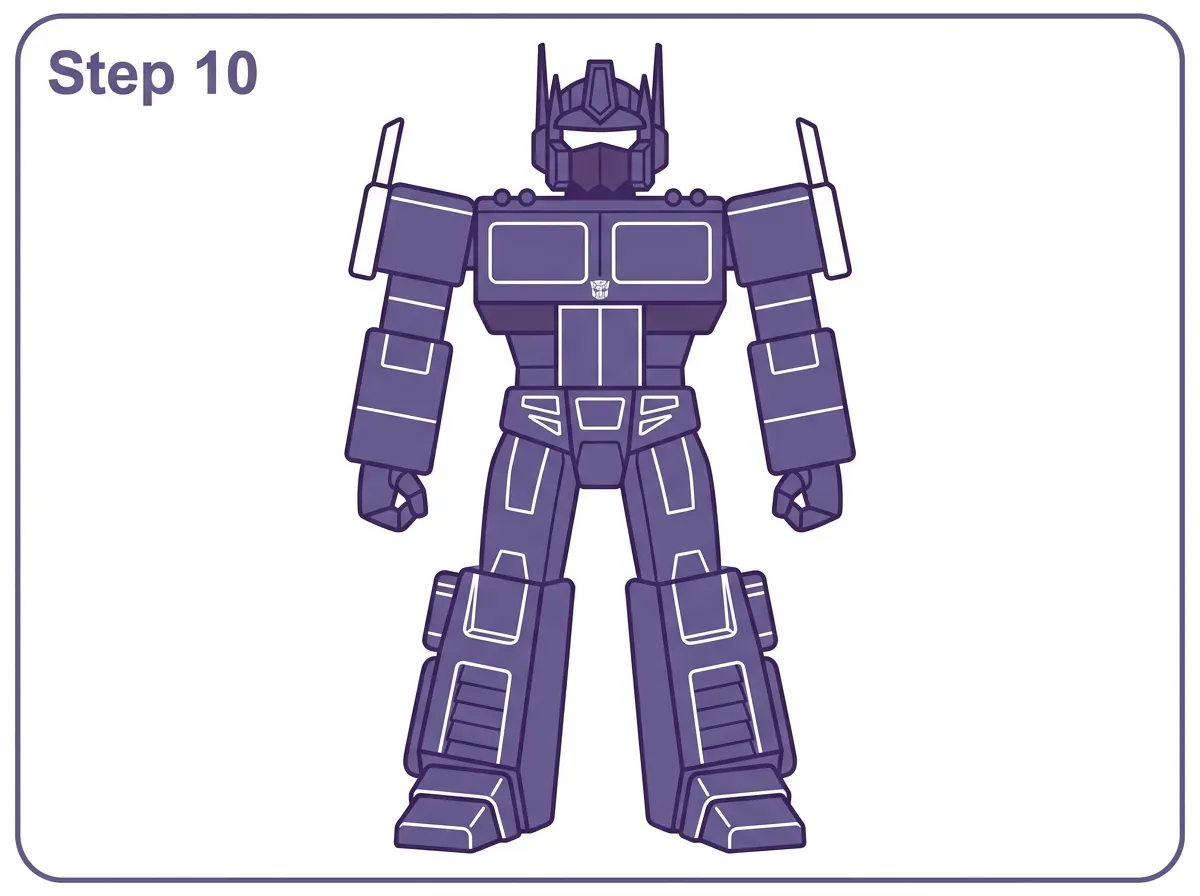
Optimus Prime’s classic colour scheme is one of the most recognisable in all of animation. The chest, forearms, lower legs and feet are red. The head, shoulders, upper arms, waist, hips and thighs are dark blue or navy. The window shapes on the chest are a lighter blue or grey suggesting glass. The visor eye is a bright blue or cyan. The Autobot logo on the chest is red on a silver or grey background.
The red and blue combination was established in the original 1984 series and has remained the character’s primary visual identity across most subsequent versions, including the Transformers film series, Transformers Prime and Rise of the Beasts, with variations in the specific shades and the distribution of the colours between them.
For a simplified cartoon colouring, flat red and dark blue with no shading produces a clean, graphic result. For a more detailed version, adding a slightly darker shade of each colour on the side and lower surfaces of each panel suggests the three-dimensional form of the robot body.
Optimus Prime Across Different Eras
The classic Generation 1 Optimus Prime has the simplest and most geometric design. His chest is formed directly from the front of the truck cab, clearly showing the windshield, headlights and grille. His body is blocky and symmetrical. His face has the characteristic blue visor and silver face plate. The G1 design is the one most closely approximated by the drawing method in this tutorial.
The live-action film Optimus Prime, appearing in the Michael Bay directed films from 2007 through 2017, has considerably more surface complexity. The panels are layered, the edges are angular and serrated, and the overall silhouette is less geometric and more organic. Drawing the film version of the character requires much more attention to the specific shape of each panel and is significantly more challenging than the simplified version in this tutorial.
Transformers Prime, the 2010 CGI animated series, uses a design between these two extremes. The body is more streamlined than the G1 version but cleaner and less complex than the Bay film version. The head design in Transformers Prime is particularly distinctive, with a more pronounced chin and a blue visor that glows.
The Last Knight Optimus Prime, from the 2017 film, introduced a darker colour scheme and additional battle damage elements that made the character look significantly different from the bright red and blue of previous versions.
Transformers One, the 2024 animated prequel film, shows a younger Optimus Prime known as Orion Pax before he adopted the name Optimus Prime and took on the role of Autobot leader. His design in this film is lighter and less battle-hardened than the classic Optimus design.
Optimus Prime and Bumblebee
Optimus Prime and Bumblebee are the two most widely recognised Autobot characters and the most commonly drawn Transformers. They are visual opposites in several ways. Optimus is large, broad and red-and-blue. Bumblebee is smaller, narrower and yellow. Optimus carries the weight of leadership in his proportions. Bumblebee has the lighter, more agile proportions of a scout character.
Drawing Optimus Prime and Bumblebee together creates an immediately engaging scale contrast. Optimus should be significantly taller and broader than Bumblebee. Their colour schemes create a complementary contrast between Optimus’s warm red and Bumblebee’s yellow.
Drawing Tips for Robot Characters
Robot characters like Optimus Prime use a different drawing logic from organic characters like animals or humans. The proportions are deliberately exaggerated for visual impact rather than anatomical accuracy. The chest is too broad. The shoulders are too wide. The feet are too large. These exaggerations are intentional and produce the powerful silhouette that makes the character immediately impressive.
Building the drawing from large forms to small details is especially important for robot characters because the large geometric forms establish the overall silhouette before any detail is added. If the silhouette is wrong, no amount of panel line detail will fix it. Getting the proportions between the chest, shoulders, waist and legs right in the early steps is the most important part of the drawing process.
Panel lines, the structural divisions between robot body sections, are the robot-specific equivalent of fur texture on an animal drawing. They do not change the silhouette but they make the drawing feel mechanical and structured rather than like a collection of plain geometric shapes. Adding a few well-placed panel lines to each major body section takes very little time and produces a significant improvement in the finished result.
Printable Optimus Prime Outline PDF
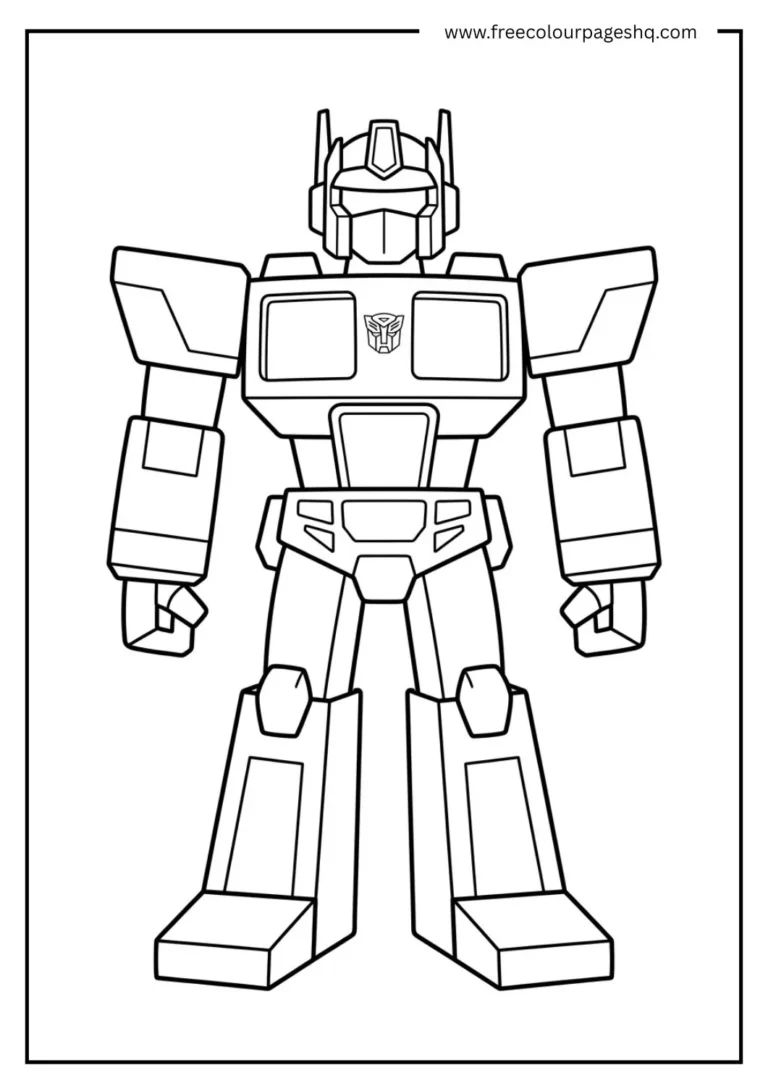
A printable Optimus Prime outline based on the finished Step 10 design is available as a free download below. Print it on plain white paper and use it as a colouring page or a drawing reference guide. The outline includes all the panel line details and the Autobot logo outline from the tutorial.
Explore more Free Printable Coloring Collections
Looking for more engaging activities? Check out these free printable coloring pages fun for kids, useful for teachers, relaxing for adults, and inspiring for designers.
FAQ
What is the easiest way to draw Optimus Prime?
Start with the rectangular head and antenna at the top of the page. Build downward through the chest, shoulders and arms. Add the waist, hips, thighs and lower legs. Finish with the feet. Working from top to bottom through ten clearly defined sections is the most reliable method for keeping the proportions in order.
How do you draw Optimus Prime for kids?
Use the simplified version of this tutorial with slightly larger, simpler geometric forms. Focus on the head with its visor and two antenna, the broad chest with its two window shapes, and the overall body proportion. Skip the finest panel line details and use clear flat colours in the classic red and blue scheme. The result is immediately recognisable without requiring fine motor precision.
What is the classic Optimus Prime colour scheme?
The classic G1 colour scheme uses red for the chest, forearms, lower legs and feet, and dark navy blue for the head, shoulders, upper arms, waist, hips and thighs. The visor is bright cyan or light blue. The Autobot logo on the chest is red on silver or grey.
How do you draw Optimus Prime’s face?
Draw the rectangular head shape with two blocky antenna at the top corners. Inside the head, draw a wide horizontal visor strip across the upper half of the face. Below the visor, draw a rectangular face plate covering the nose and mouth area. Add small rectangular panel shapes on either side of the head at visor level for the helmet earmold detail.
What is the Autobot logo on Optimus Prime’s chest?
The Autobot logo is a stylised robotic face used as the symbol of the heroic Autobot faction in Transformers. It shows a horizontal visor-like shape at the top and a triangular lower section suggesting a chin and mouthplate. It appears on the chest of all Autobot characters, with Optimus Prime displaying it most prominently as the faction leader.
How do you draw Optimus Prime full body?
Work through the ten steps in this tutorial in order: head and antenna, face details, neck and chest, shoulder armor, upper arms, forearms and fists, waist and hips, thighs and knee guards, lower legs and feet, and final colouring. Building from head to feet in this sequence keeps the proportions manageable and produces a complete standing figure in robot mode.