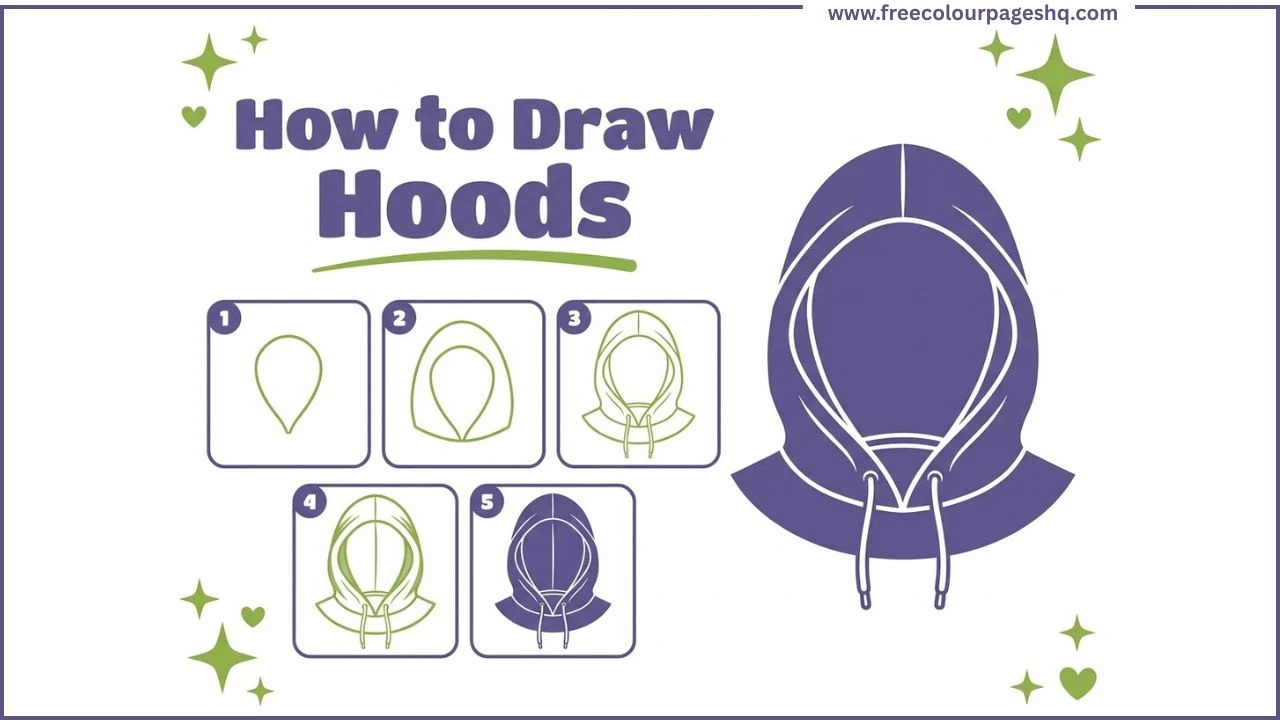
A hood does more for a character than almost any other single piece of clothing. It can make someone look mysterious, cozy, dangerous, wise or vulnerable depending on how it is drawn and how it sits on the head. Fantasy rogues wear their hoods up and forward, leaving the face in shadow. Travelers in medieval stories wear their hoods pushed back as they emerge into daylight. Anime characters have their hoods at half-mast, a visual shorthand for casual cool. Getting the hood right is genuinely worth understanding.
This tutorial shows how to draw hoods step by step in five stages, covering the front-facing hood as a standalone garment element. It also covers how to draw a hood up, hood down, on a character and as part of a hooded cloak.
What You Need
A pencil and eraser. The guide construction lines drawn early in the process benefit from being drawn lightly. Coloured pencils or markers for the finished drawing.
How to Draw Hoods Step by Step
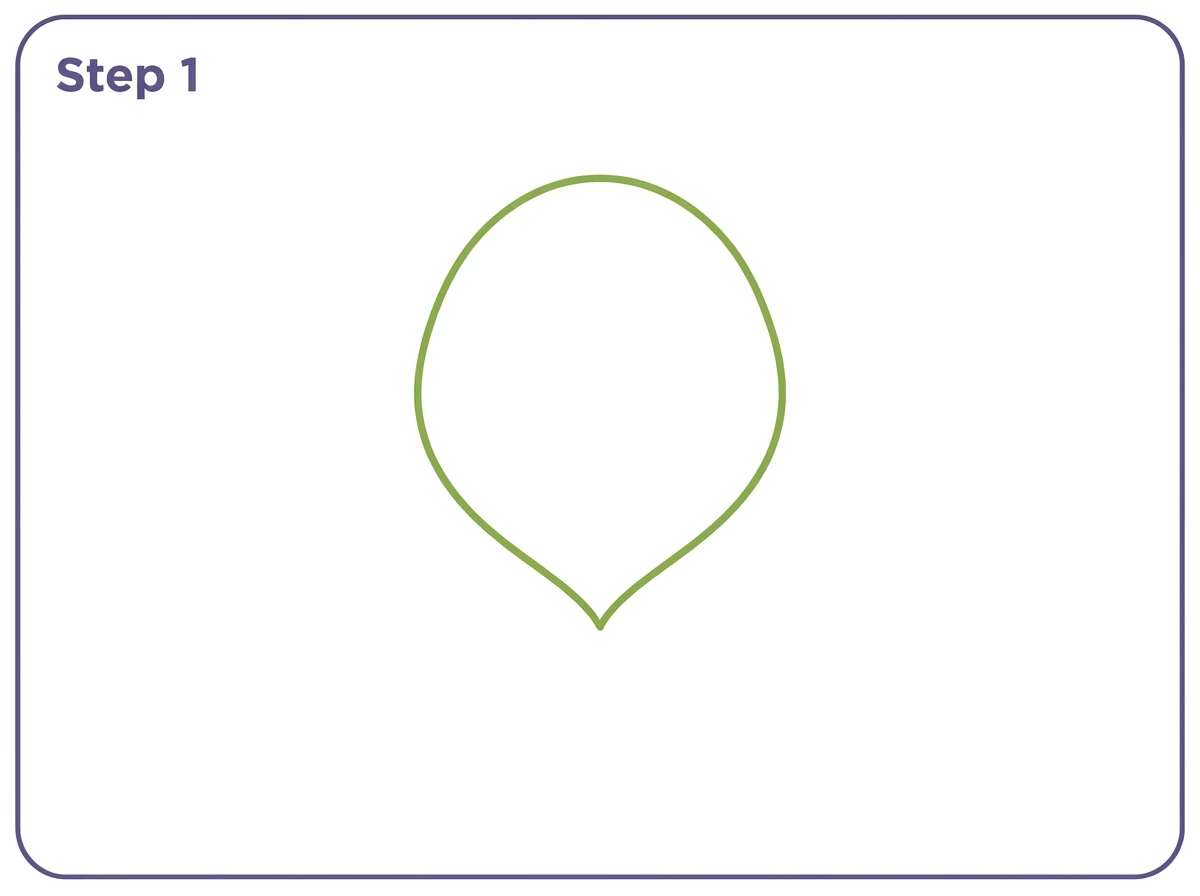
Step 1 — Hood Opening Shape
Start in the upper center of the page. Draw a rounded oval or slightly inverted teardrop shape representing the face opening of the hood seen from the front.
The opening is wider at the top and narrows slightly at the bottom where the drawstrings hang.
This single shape is the most important starting element of the hood drawing because it establishes the perspective and scale of everything that surrounds it. Everything else is built outward from this opening.
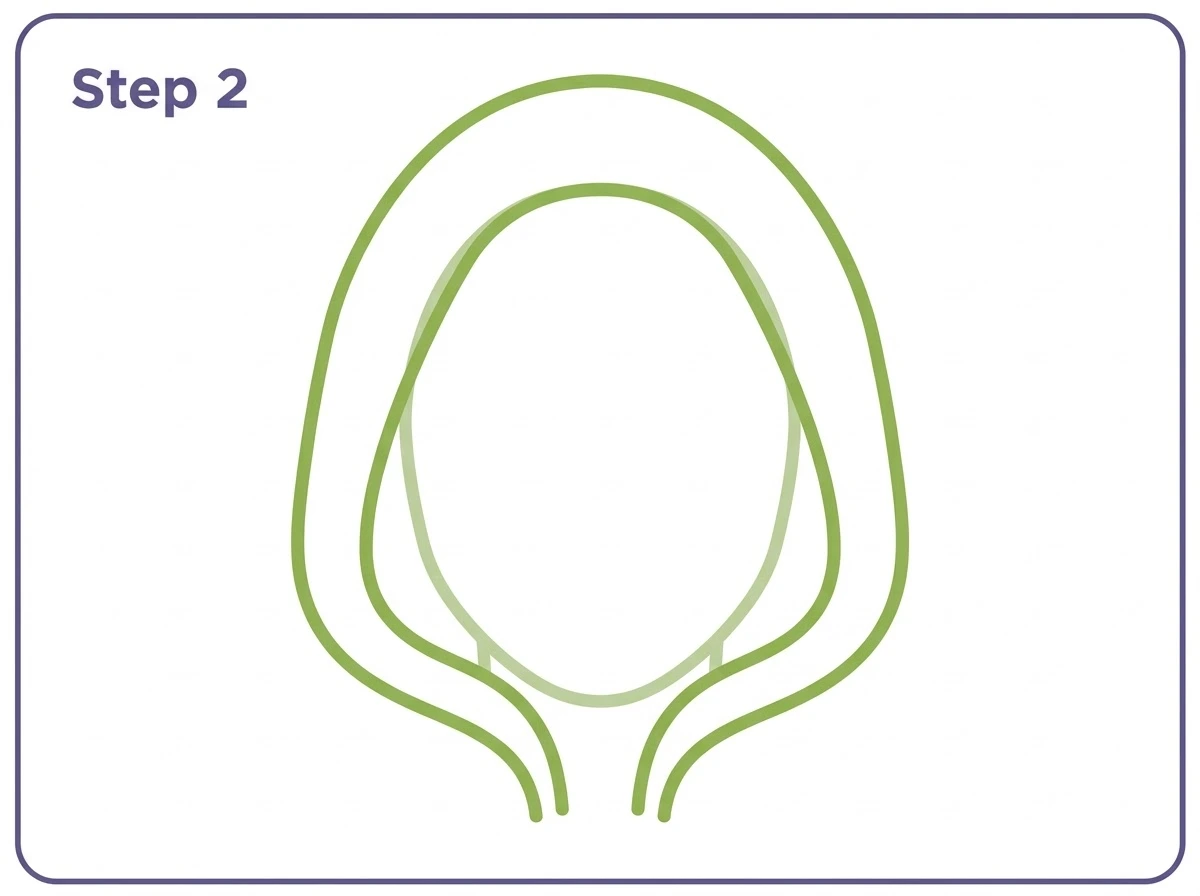
Step 2 — Outer Hood Dome
Draw the outer dome of the hood around and over the opening shape. The dome arches well above and to both sides of the opening, following roughly parallel to the opening edge but at a consistent distance outward.
The dome connects at the bottom on both sides of the opening where the fabric falls toward the collar below.
The gap between the opening edge and the outer dome edge represents the thickness of the hood fabric. A thicker gap produces a more substantial, dramatic hood. A thinner gap produces a lighter, more fitted look.
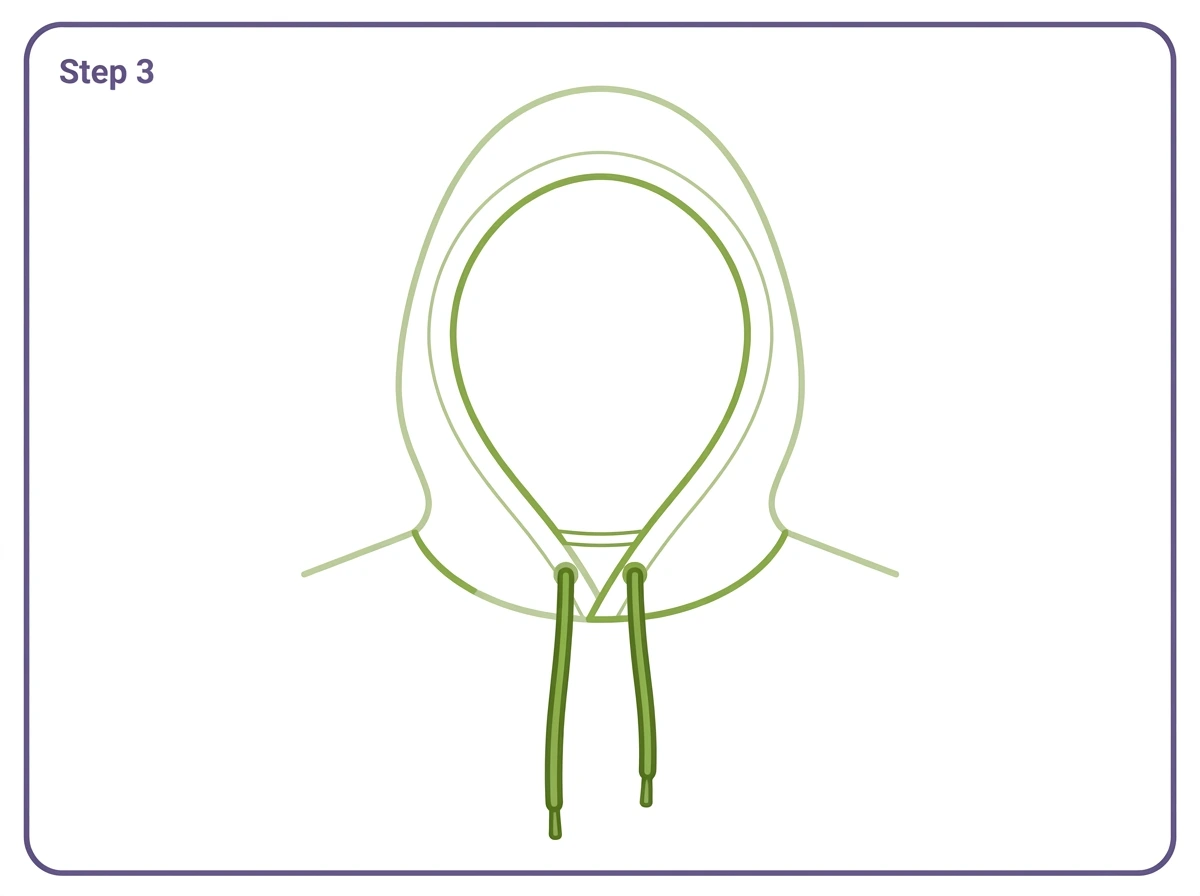
Step 3 — Drawstrings and Collar
Add two thin drawstring cords emerging from the bottom center of the opening hanging downward with small aglet tips at the ends. Give them slightly different lengths for a natural uneven look.
Draw a collar or neckline shape below the hood on both sides showing where the hood connects to the body of the garment. A small tunnel channel line along the inner edge of the opening shows the fabric tube through which the drawstrings pass.
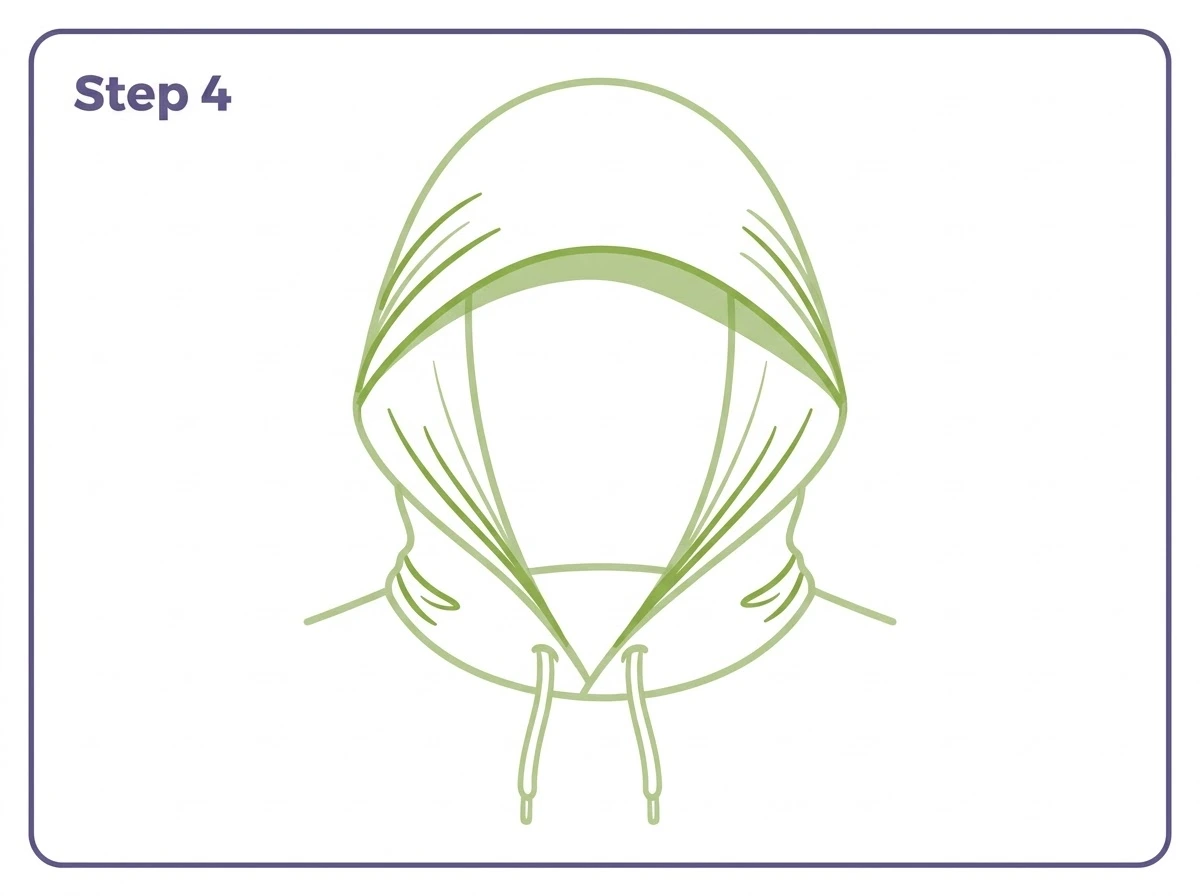
Step 4 — Fabric Fold Lines
Add fabric fold and crease lines that give the hood its three-dimensional quality. Three or four curved lines radiating from the bottom corners of the opening toward the outer dome suggest how the fabric drapes.
Two or three curved parallel lines on the outer sides of the dome show where the fabric bunches when the hood is worn. A subtle shadow curve on the underside of the dome near where it meets the opening suggests depth.
These fold lines are what separate a convincing hood from a flat shape. They do not need to be numerous. Five or six well-placed curved lines are enough.
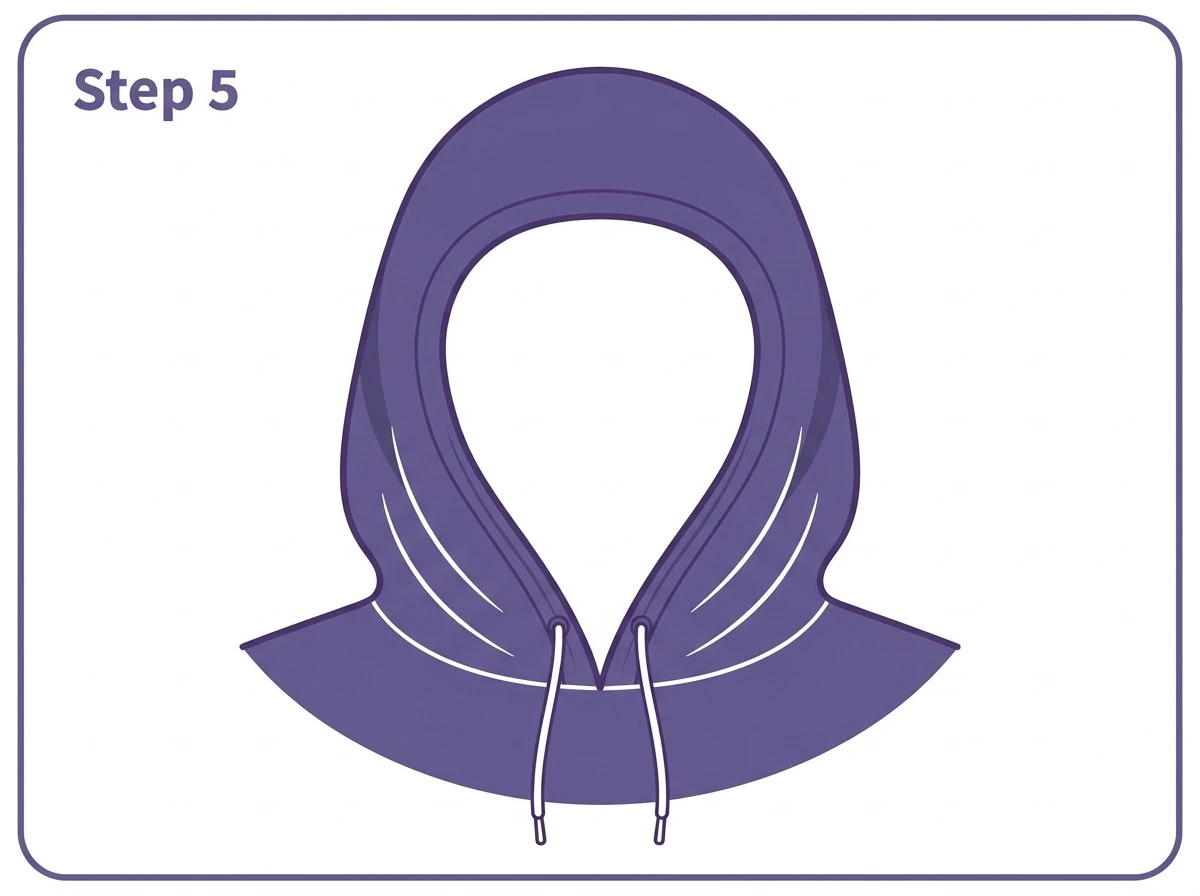
Step 5 — Colour the Hood
Fill the outer dome and collar areas with your chosen colour. The hood opening interior remains white or a very dark colour if the face is in shadow.
The fabric fold lines show as slightly darker areas within the fill, suggesting the shadow that falls in the folds of real fabric. A lighter area on the upper dome surface where light would fall from above gives the hood a sense of three-dimensional volume.
How to Draw a Hood Up
A hood up means the hood is worn over the head. The key difference from the standalone hood drawing is that the opening now frames a face rather than showing an empty oval.
Draw the face first. A simple oval face with eyes, nose and mouth. Then build the hood around the face. The opening edge follows the contour of the face closely at the sides and slightly further out at the top.
The dome rises above the top of the head with a rounded crown shape. The sides of the hood fall along the sides of the face and then downward to the shoulders.
When the hood is worn tight and forward, the face is pushed back slightly within the opening. Only the front portion of the face is visible. The forehead and most of the sides of the head disappear into the shadow of the hood interior.
How to Draw a Hood Down
A hood down means the hood is pushed back off the head and rests on the shoulders behind the neck. This is a more complex shape than hood up because the fabric has collapsed and gathered rather than holding its dome form.
Start with the head and shoulders of the figure. Behind the head at neck level, draw a rounded gathered shape suggesting the fallen hood bunching at the back of the neck and shoulders. This shape is wider than it is tall and has a rumpled, soft quality rather than the crisp dome of a worn hood.
Fabric fold lines in a hood-down drawing are more numerous and less regular than in a hood-up drawing. The fabric is no longer held in shape by the head and instead falls in natural gravity-driven folds.
The opening edge of a hood-down is visible as a curved rim line around the collar area, sometimes slightly visible at the front of the neck where it meets the shirt or jacket collar beneath.
How to Draw a Hooded Figure
A hooded figure combines the hood drawing with a full body figure. The most important decision in a hooded figure drawing is how much face to show.
A figure with a fully shadowed face, just darkness inside the hood opening, reads as mysterious, threatening or anonymous. A figure with a partially visible face, the eyes catching a sliver of light from below the hood, reads as watchful and aware. A figure with the full face visible inside the hood reads as a traveler or a student, someone using the hood practically rather than dramatically.
For the body below the hood, a hooded cloak falls from the shoulders in a roughly triangular silhouette, wider at the hem than at the shoulders. The hood connects to this cloak at the collar line where the fabric gathers at the back of the neck.
A hooded figure drawing works particularly well with minimal body detail and a focus on the silhouette. The hood and cloak shape together create such a strong visual read that extensive figure detail beneath can actually reduce the impact rather than adding to it.
How to Draw Hoods on Characters
When drawing hoods on existing characters, the hood must fit the character’s head and shoulders rather than sitting on top of them as an afterthought.
The inner opening edge should follow the general contour of the character’s face and head closely, leaving a consistent margin of fabric visible between the face and the opening. The dome of the hood should rise naturally from the top of the head rather than floating above it.
The character’s ears, if visible, affect how the hood sits. A hood worn over pointed ears, in a fantasy character, creates a characteristic bump in the fabric at ear level on either side of the dome. This is a small detail but it immediately communicates that the character has non-human ears beneath the hood.
The character’s hair also affects the hood. Thick or voluminous hair creates more volume inside the hood, pushing the dome higher and the sides wider. Flat or short hair allows the hood to sit closer to the head.
How to Draw Anime Hoods
Anime hood drawing uses a different set of conventions from realistic or Western cartoon hood drawing. Anime fabric tends to look slightly heavier and more structured than real fabric. The fold lines are cleaner and more deliberate. The shadows within the hood interior are darker and more dramatic.
For an anime hood up, the opening is often drawn quite large relative to the face, giving the character a characteristic wide-opening hood that frames the face generously. The dome of the hood has a rounder, fuller shape in anime style than in realistic drawing.
Anime character hoods often have decorative ear details, animal ear shapes integrated into the top of the hood dome, a cat ear hood being one of the most common. These are drawn as two pointed triangular bumps on the upper dome surface, one on each side of center.
The drawstrings on an anime hood are often large and prominent with oversized aglet tips, sometimes decorated with small charms or tags.
How to Draw a Hooded Cloak
A hooded cloak is a full-length garment with an attached hood, historically worn as an outer garment for travel and weather protection. Little Red Riding Hood’s garment is the most culturally familiar example. The Jedi robes of Star Wars are a contemporary version of the same form.
The cloak part of a hooded cloak falls from the shoulders in a long triangular silhouette, wider at the hem than at the shoulders, with the front open revealing whatever is worn beneath. The fabric folds of the cloak hang vertically from the shoulder attachment points.
For a simple hooded cloak, draw two long curved lines from the shoulder points on either side falling to the hem. The hem line at the bottom is a gentle irregular curve rather than a straight horizontal line, suggesting the natural movement of heavy fabric. A vertical center line shows the open front of the cloak, which might be closed with a clasp or left open.
The hood attaches at the collar line, which sits about one head-height below the top of the figure. The collar line is a curved band where the hood gathers into the main cloak body.
Hood Drawing Tips for Better Results
The opening edge is the single most important line in any hood drawing. It is the line that frames the face, establishes the perspective and defines the relationship between the hood and the figure wearing it. Spend extra time on this line.
Fabric folds in a hood radiate from the points of stress. In a hood up, the main stress point is where the opening narrows at the bottom, where the drawstrings pull the fabric together. Folds radiate from this gathering point upward and outward. In a hood down, the stress points are the shoulder attachment areas and the back of the neck.
The interior of a worn hood is in shadow. Even when the character’s face is fully visible, the dome above the face should be shown as darker than the exterior dome surface. This darkness is what gives the hood its sense of depth and makes the face appear to be genuinely inside a three-dimensional garment rather than pasted behind a flat arc shape.
Light on a hood dome falls from above. The topmost surface of the dome catches the most light. The sides of the dome are in half-shadow. The area where the dome meets the opening edge is in full shadow where it hangs over the face below.
The Hood in Art and Fashion History
Hoods have been worn as practical garments for thousands of years. In medieval Europe a hood was often a separate garment, worn over the head and shoulders and sometimes attached to a liripipe, a long pointed extension at the top that hung dramatically to one side.
The hooded cloak became associated with mystery and concealment in fairy tale tradition, where characters like Red Riding Hood, sorceresses and forest travelers wore hoods that signalled both journey and disguise.
The modern hoodie dates to the 1930s when Champion sportswear produced the first hooded sweatshirt for warehouse workers in cold New York. It became associated with athletic wear through the 1970s, then with hip hop culture from the late 1970s onward, and has since become one of the most widely worn garments globally.
In fantasy fiction and art the hooded figure has become a shorthand for certain character archetypes. The mysterious stranger. The powerful mage. The rogue. The traveler. The hood does narrative work in a single visual beat that other clothing items rarely manage.
Printable Hood Outline PDF
A printable hood outline based on the finished Step 5 design is available as a free download below. Use it as a colouring page, a practice template for fabric fold practice or a character design reference.
Explore more Free Printable Coloring Collections
Looking for more engaging activities? Check out these free printable coloring pages fun for kids, useful for teachers, relaxing for adults, and inspiring for designers.
FAQ
What is the easiest way to draw a hood?
Draw a rounded oval for the face opening. Draw a larger dome shape around it, parallel to the opening edge. Add drawstrings hanging from the bottom center and a collar shape below. Add five or six curved fabric fold lines within the dome. This five-step method works for standalone hoods and as a starting point for hooded figures and cloaks.
How do you draw a hood up on a character?
Draw the face first. Then build the hood around the face, with the opening edge following the face contour closely at the sides and the dome rising naturally above the top of the head. The character’s hair volume and ear shape affect how the dome sits, so consider these when sizing the dome.
How do you draw a hood down?
Show the hood as a gathered, rumpled shape resting on the shoulders behind the neck. The fabric no longer holds the dome form and instead falls in irregular gravity-driven folds. The opening edge is visible as a curved rim line at collar level. More fold lines and less regular curves than a hood-up drawing.
How do you draw a hooded cloak?
Draw the figure with head and shoulders. Attach the hood at collar level with a curved gathering line. Draw the cloak body as two long curved lines from the shoulders falling to a gentle irregular hem line. Show the open front with a vertical center line. Add fabric fold lines hanging vertically from the shoulder attachment points.
How do you draw anime hoods?
Use a larger opening relative to the face than in realistic drawing. Make the dome rounder and fuller. Darken the interior shadow more dramatically. Use cleaner, more deliberate fold lines. Consider adding animal ear bumps on the dome top for character design. Make the drawstrings and aglets prominent with decorative details.
What makes a hood look three-dimensional in a drawing?
The darkness inside the opening where the dome hangs over the face. The lighter area on the topmost dome surface where light falls from above. The shadow on the underside of the dome where it meets the opening edge. These three tonal decisions, dark interior, light dome top and shadow underside, produce the three-dimensional quality.