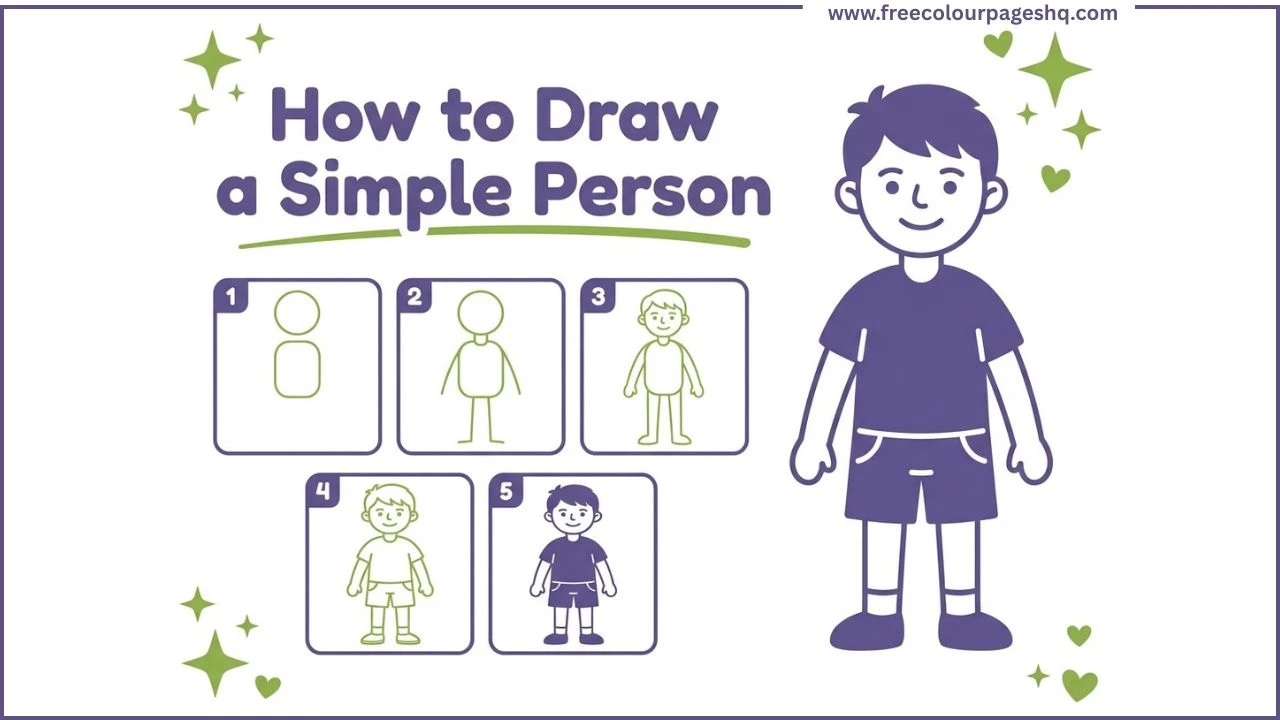
Drawing a person is the thing that most people attempt first and give up on fastest. The proportions feel impossible. One arm ends up longer than the other. The head is too big or the legs are too short. And then the whole thing gets crumpled and thrown away.
The issue is rarely ability. It is method. Without a reliable starting framework, drawing a person is genuinely difficult. With one, it becomes a series of manageable decisions rather than a test of talent.
This tutorial shows how to draw a simple person step by step in five stages using the circle head and oval body guide shape method. It works for kids, for beginners and for anyone who has struggled with figure drawing before.
What You Need
A pencil and eraser. The guide shapes in the early steps are meant to be erased, so drawing them lightly matters. Coloured pencils or markers for the finished drawing.
How to Draw a Simple Person Step by Step
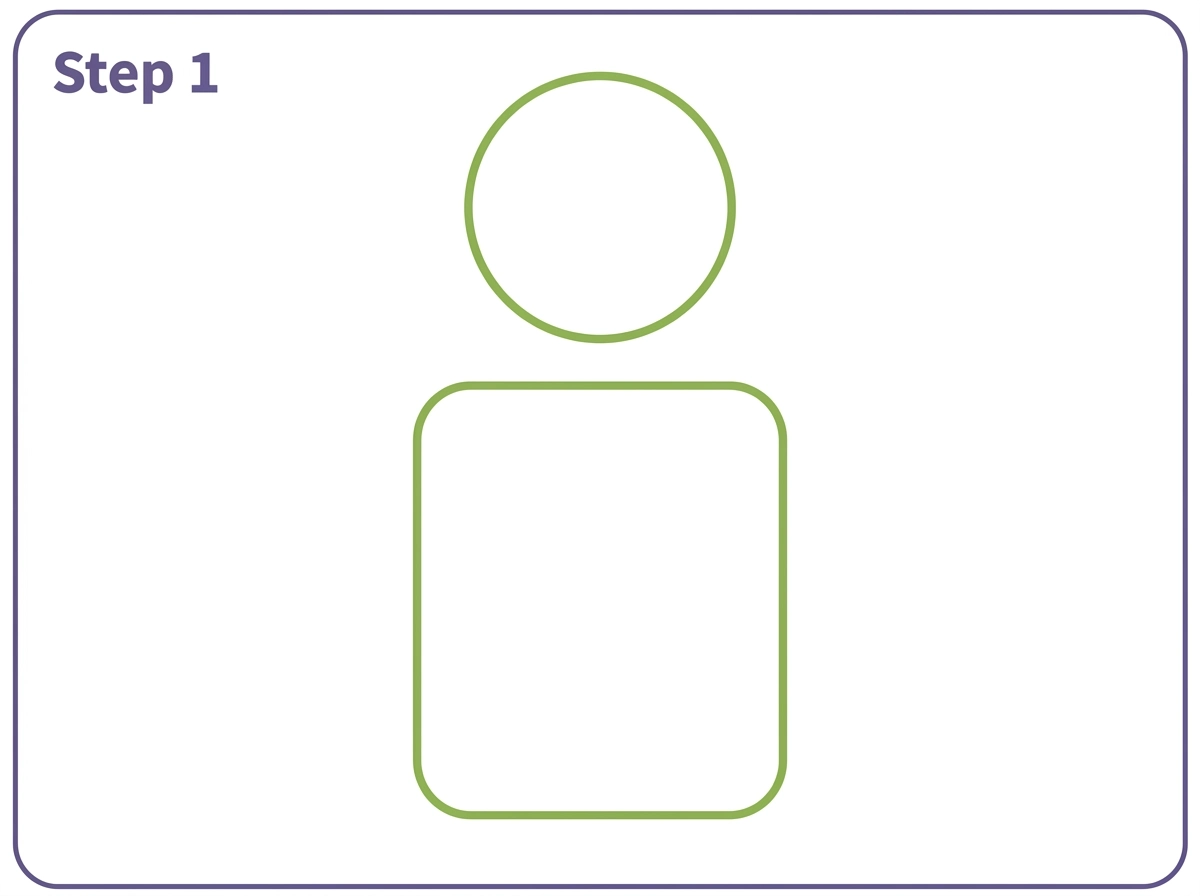
Step 1 — Circle Head and Oval Body Guide Shapes
Start in the upper center of the page. Draw a medium circle for the head and below it a larger rounded oval for the body. Leave a small gap between the two for the neck.
The circle takes up roughly the upper third of the page and the oval takes up the middle section. Leave space below the oval for the legs.
These two shapes are the foundation. Getting their proportions right in this step makes everything that follows much easier.
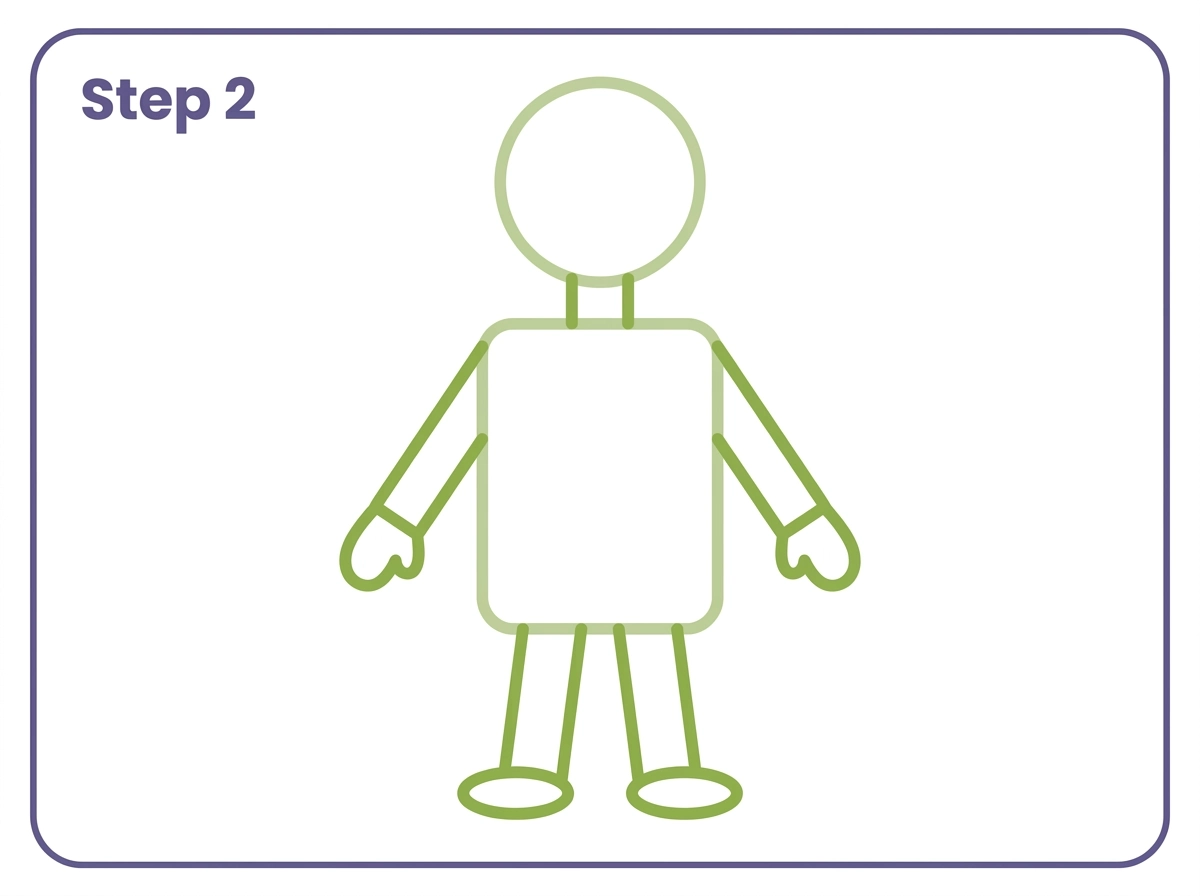
Step 2 — Neck, Shoulders and Arms
Add two short parallel vertical lines connecting the base of the head to the top of the body oval. These are the neck.
Draw two gently sloping shoulder lines outward from the top sides of the oval body. From each shoulder line, draw a simple arm shape extending downward, ending in a small rounded hand.
The arms hang naturally at the sides of the body. Keep them slender rather than thick.
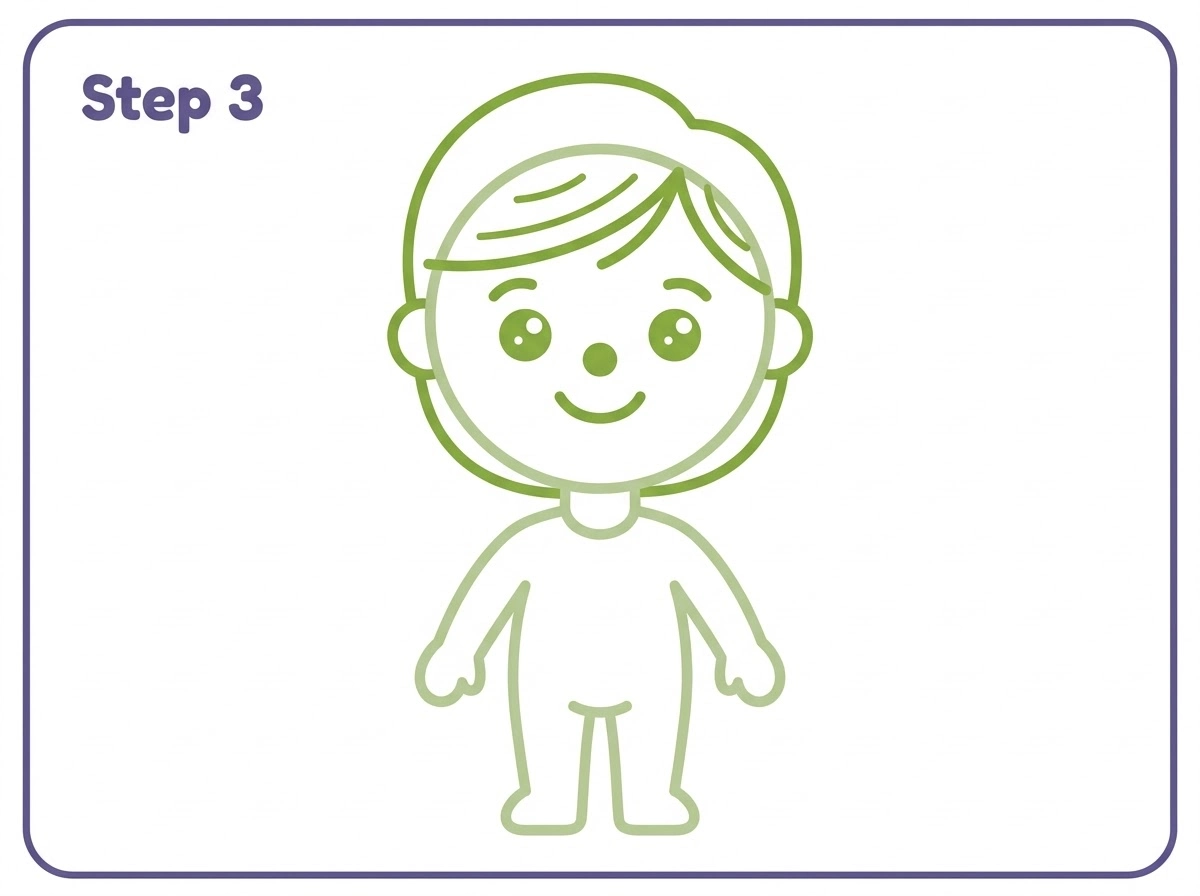
Step 3 — Face Features and Hair
Inside the head circle, draw two medium round eyes in the upper half of the face with small dot pupils and sparkle dots. Below the eyes, add a small round nose and a gentle curved smile.
Two short curved eyebrow lines above the eyes and two small oval ear shapes on either side of the head complete the face.
Add hair around the top and sides of the head. A simple outline of hair sitting on and around the head circle is all that is needed at this stage.
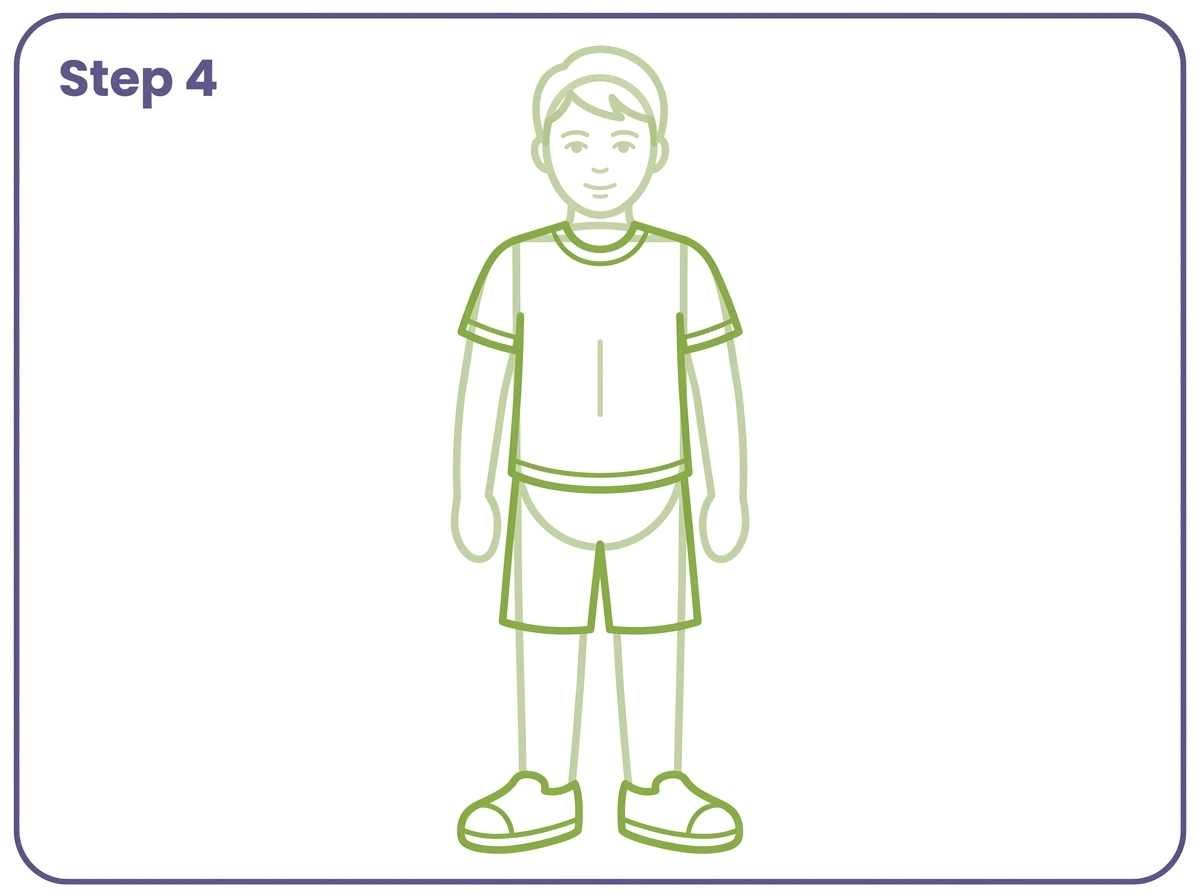
Step 4 — Clothing, Legs and Shoes
Draw a T-shirt outline over the upper body oval with a curved neckline at the collar and a hem line across the lower body. A shorts or skirt shape covers the lower body oval.
Below the clothing, draw two slim legs extending downward from the base of the body, ending in simple rounded shoe shapes.
The legs are proportionally about the same length as the upper body from shoulders to hip, and the shoes point slightly outward in a natural standing position.
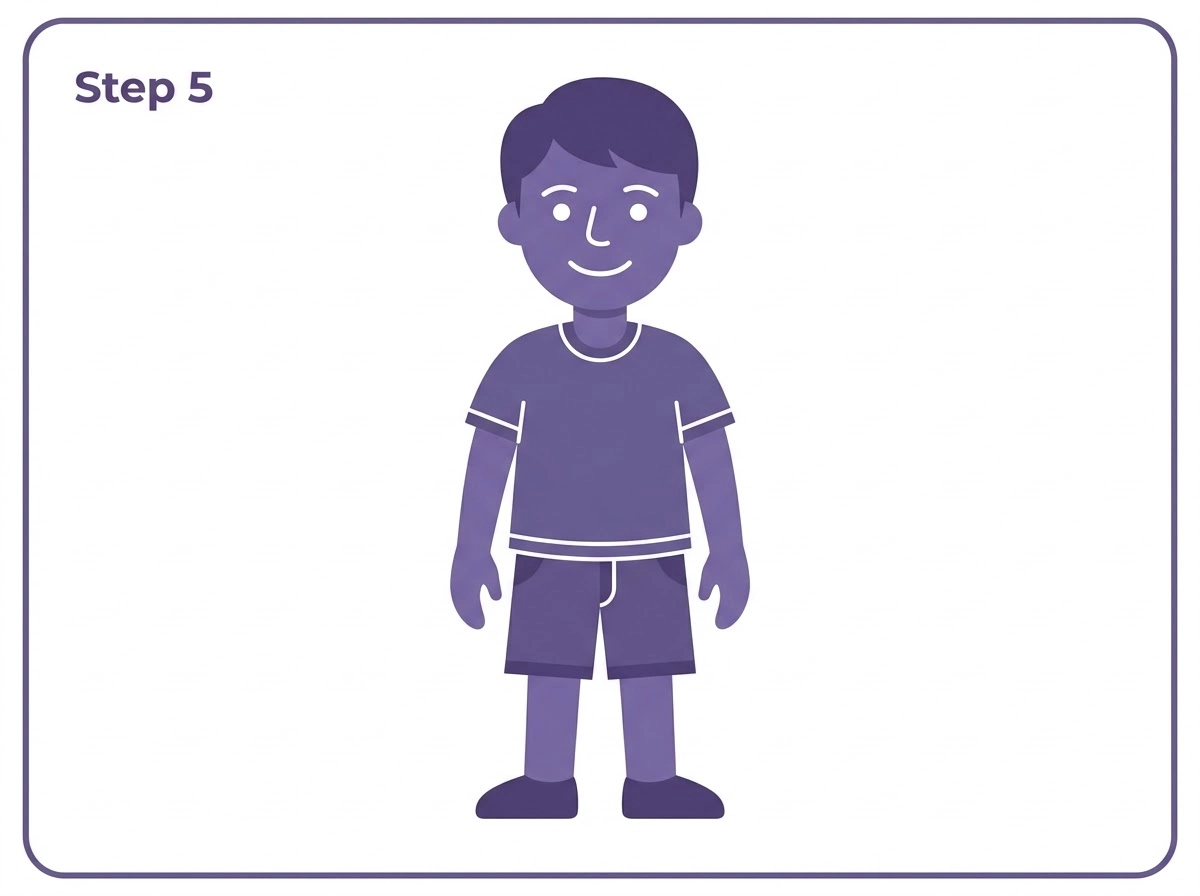
Step 5 — Colour the Drawing
Erase all visible guide oval and circle lines. Then colour the person.
The face, neck, arms and legs are the skin tone. The T-shirt and shorts are in your chosen colours. The hair can be any colour you like.
The face features, clothing lines and shoe details show as slightly darker outlines within their respective areas.
How to Draw a Person for Kids
For younger children, an even simpler version works well. A circle head, a rectangle body, four stick lines for arms and legs, and a simple smiley face. This stick figure approach takes two minutes and can be the starting point for building toward the more complete version above.
The transition from stick figure to rounded-body person is a natural step in a child’s drawing development, and the oval body method bridges that gap clearly.
How to Draw a Person Full Body
The full body person drawing covers the figure from head to shoes in a single composition. The key proportion rule is that the total height of the body is approximately seven to eight times the height of the head.
In practical terms: if the head circle is a certain size, the entire standing figure from top of head to bottom of shoes should be about seven or eight of those same head heights tall. The knee sits roughly at the halfway point of the total figure height.
Many beginners make the head too large relative to the body, which produces a cartoon or childlike effect. For a more balanced adult figure, keep the head smaller than it instinctively feels.
How to Draw a Cartoon Person
A cartoon person uses the same guide shapes but with intentionally exaggerated proportions. The head is larger relative to the body. The eyes take up more of the face. The limbs are shorter and chubbier than realistic proportions would suggest.
Cartoon figures communicate expression and personality more directly than realistic figures precisely because the proportions are exaggerated. A very large head with large eyes reads as young and innocent. A taller, broader figure reads as strong and authoritative.
The clothing on a cartoon person is simplified to its most recognisable shapes. A T-shirt is a rectangle with two short arm shapes. Shorts are a simple U-shape below the shirt hem. Shoes are rounded ovals.
How to Draw a Girl
A girl person drawing uses the same five-step method with two main adjustments. The hair is longer, flowing past the shoulders on both sides. The clothing is a dress or skirt rather than shorts.
For longer hair, draw the hair outline extending past the ears and continuing downward to roughly shoulder level or below. Two or three flowing strand lines within the hair mass suggest the natural direction of hair flow.
A dress replaces the T-shirt and shorts in Step 4. An A-line dress shape, wider at the hem than at the waist, is the simplest and most recognisable dress silhouette. Two small sleeve shapes at the shoulder complete the basic dress design.
How to Draw a Person from the Side
A side profile person drawing shows the figure from ninety degrees to the standard front-facing view. The construction changes significantly.
For a side view head, draw a circle but add an extending muzzle area at the front suggesting the nose and mouth. One ear is visible on the near side. One eye is visible from the side, shown as a simple almond shape. The neck extends from the back of the head downward.
The body from the side shows the natural S-curve of the spine. The chest is forward of the spine. The belly area is roughly vertical. The hips extend backward. The arms hang alongside the body showing their full length from side view.
A side profile figure is more challenging than a front-facing figure because there is no symmetry to rely on. Each side of the figure is different.
How to Draw a Person Sitting
A sitting person drawing changes the leg construction completely. Instead of two parallel vertical legs, the legs fold at the knee and extend forward or backward depending on the sitting pose.
For a person sitting on a chair: draw the upper body and head in the same way as the standing figure. Below the hip, the legs angle forward horizontally rather than downward vertically. The feet dangle toward the floor in front of the chair legs.
The most common mistake in sitting figure drawings is forgetting that the upper legs become mostly invisible from the front view when a person is sitting. The legs are foreshortened, meaning they appear shorter than they actually are because they angle toward the viewer rather than extending parallel to the picture plane.
How to Draw a Realistic Person
A realistic person drawing uses reference. A photograph, a life model or a mirror are all valid reference sources. Without reference, drawing a realistic person from memory almost always produces a figure with wrong proportions.
The grid method is the most reliable way to get proportions right from reference. Divide the reference image into a grid. Draw the same grid on your paper. Copy what you see in each grid square rather than trying to draw the whole figure at once.
Work from large shapes to small details. Establish the overall figure proportions before working on the face. Draw the face features in rough positions before drawing them in detail.
The hardest proportions to get right are the hands and feet. Both are larger than most people expect. A hand from the wrist to the fingertip is roughly the same length as the face from chin to hairline.
How to Draw a Person’s Face
The face within a person drawing follows a reliable positioning system. On a head circle, the eyes sit roughly halfway between the top of the skull and the chin, which is lower than most beginners place them. The nose sits halfway between the eyes and the chin. The mouth sits halfway between the nose and the chin.
The width of the eye is roughly one fifth of the total face width at eye level. There is one eye-width of space between the two eyes.
Getting these positions right before drawing any individual feature in detail produces a face that reads as correct proportionally, which matters far more than the precision of any individual eye or nose drawing.
How to Draw an Anime Person
An anime person drawing uses recognisably different proportions and drawing conventions from realistic or cartoon Western figures.
Anime faces have large eyes that take up a significant portion of the face area. The nose is very simplified, often just a small curved line or two small dots for the nostrils. The mouth is small and simple. The chin is more pointed than in a realistic face.
Anime figures often have longer, more stylised proportions than realistic figures. The legs are elongated relative to the torso. The hair is a significant design element, drawn as simplified geometric chunks of volume rather than individual strands.
For an anime person easy enough for beginners, the simplified face is the most important starting point. Getting the large eye proportions right changes the reading of the drawing immediately.
How to Draw a Chibi Person
A chibi person is a very small, extremely simplified character style where the head is approximately the same size as the body or even larger. The arms and legs are tiny stubs. The face has very large eyes relative to the head size.
Chibi figures are popular for their cuteness and are significantly easier to draw than proportionally correct figures because the body is so simplified. The head takes up half or more of the total figure height. The body is a small rounded oval. The arms are two short lines. The legs are two short stubby shapes.
The face on a chibi character has two enormous eyes, a tiny or absent nose and a very small mouth. The hair is drawn as large simplified chunks sitting on top of and around the oversized head.
Drawing Tips for Better Person Figures
The most important habit for improving person drawings is drawing both sides of the figure simultaneously rather than finishing one arm before starting the other. Small asymmetries between arms or legs are much easier to correct when both are being developed at the same pace.
Drawing the guide shapes lightly is not optional. Guide shapes that are too dark show through the final outline and make it harder to see where corrections are needed and where the final line actually is.
The knee is the single most important joint position in a figure drawing. Placing it correctly at roughly the halfway point of the total leg length determines whether the figure reads as naturally proportioned. A knee placed too high makes the figure look short-legged. A knee placed too low makes the figure look unnaturally tall.
Faces should be positioned in the lower half of the head circle rather than centered in it. The skull above the eyeline is more of the total head than most people expect, and placing the features too high is one of the most consistent proportion errors in beginner figure drawing.
Printable Person Outline PDF
A printable person outline based on the finished Step 5 design is available as a free download below. Use it as a colouring page, a drawing practice template or a proportions reference guide.
Explore more Free Printable Coloring Collections
Looking for more engaging activities? Check out these free printable coloring pages fun for kids, useful for teachers, relaxing for adults, and inspiring for designers.
FAQ
What is the easiest way to draw a person?
Start with a circle for the head and a larger oval for the body. Add a neck, two shoulder lines and two arms. Draw face features and hair inside the head circle. Add clothing shapes over the body oval and two legs below. Erase all guide shapes. This five-step circle and oval method is the most reliable approach for all ages and experience levels.
How do you draw a person for kids?
A simplified version uses a circle head, a rectangle body and four stick lines for arms and legs. Add a simple smiley face. This stick figure version takes two minutes and is a natural starting point that can be built toward the more complete oval body method as the child’s confidence grows.
How do you draw a person step by step for beginners?
Draw the head circle and body oval first. Add the neck and arms. Add face features and hair. Add clothing and legs. Erase guides and colour. Working through these five stages in order, lightly drawing the guides first and erasing them cleanly, is the most beginner-friendly approach.
How do you draw a person full body?
A full body person is seven to eight head-heights tall from the top of the head to the bottom of the shoes. The knee sits at roughly the halfway point of the total figure height. The shoulders are roughly two head-widths apart. These proportion guidelines apply to the five-step method in this tutorial and to more complex figure drawing methods.
How do you draw a realistic person?
Use a reference photograph or drawing from life. Apply the grid method: divide the reference into a grid, draw the same grid on your paper, copy what you see square by square. Work from large proportions to small details. The hands and feet are larger than most beginners expect and deserve careful attention.
How do you draw a girl person?
Follow the same five-step method but add longer hair extending past the shoulders in Step 3 and replace the T-shirt and shorts with a dress or skirt in Step 4. An A-line dress wider at the hem than at the waist is the simplest and most recognisable option.