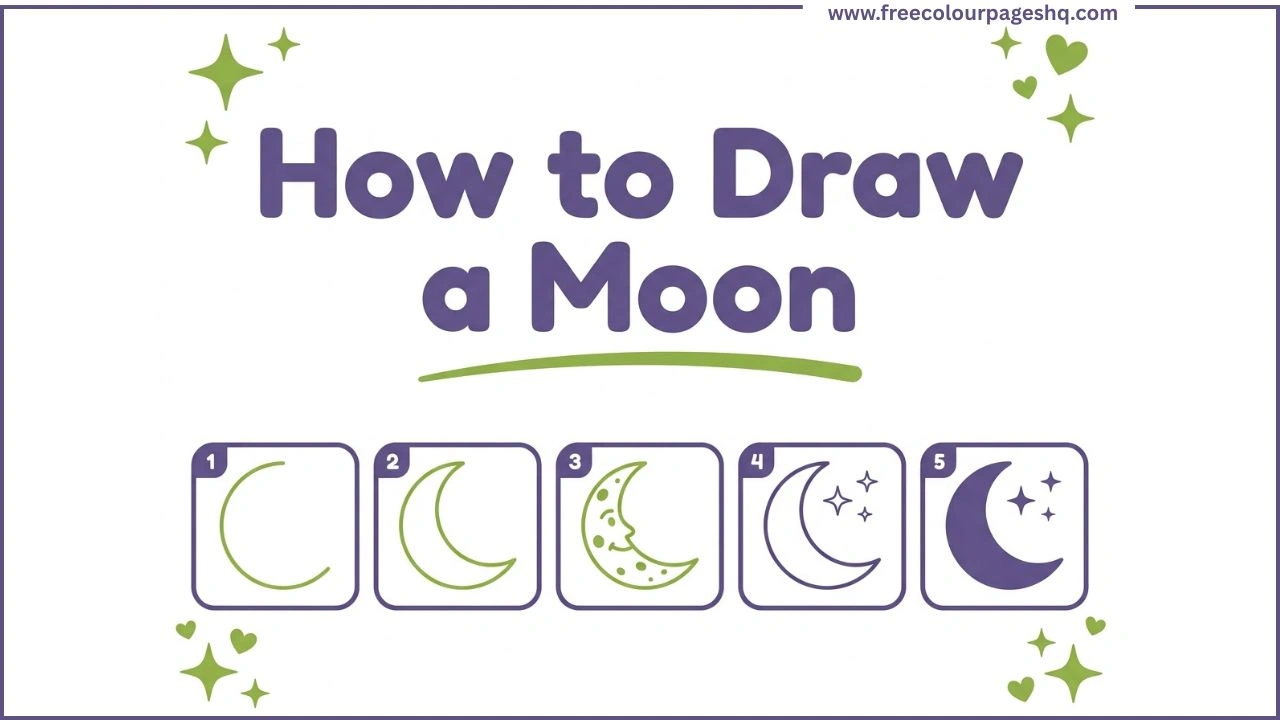
There is something quietly magical about the moon. It appears every night without being asked, changes its shape on a reliable schedule, and has had humans staring at it in wonder for as long as humans have existed. It is also one of the most satisfying things to draw because its shapes are simple, its features are charming and the finished result looks beautiful whether you are five years old or fifty.
This tutorial shows how to draw a crescent moon step by step using the two-circle method. It takes about ten minutes and produces a cartoon crescent moon with a friendly face, crater texture and stars. All you need is a pencil, an eraser and something to colour with at the end.
What You Need
Pencil, eraser, plain white paper and coloured pencils or crayons for the final step. Drawing the early guide circles lightly in pencil makes them easy to erase cleanly once the final moon outline is in place.
How to Draw a Moon Step by Step
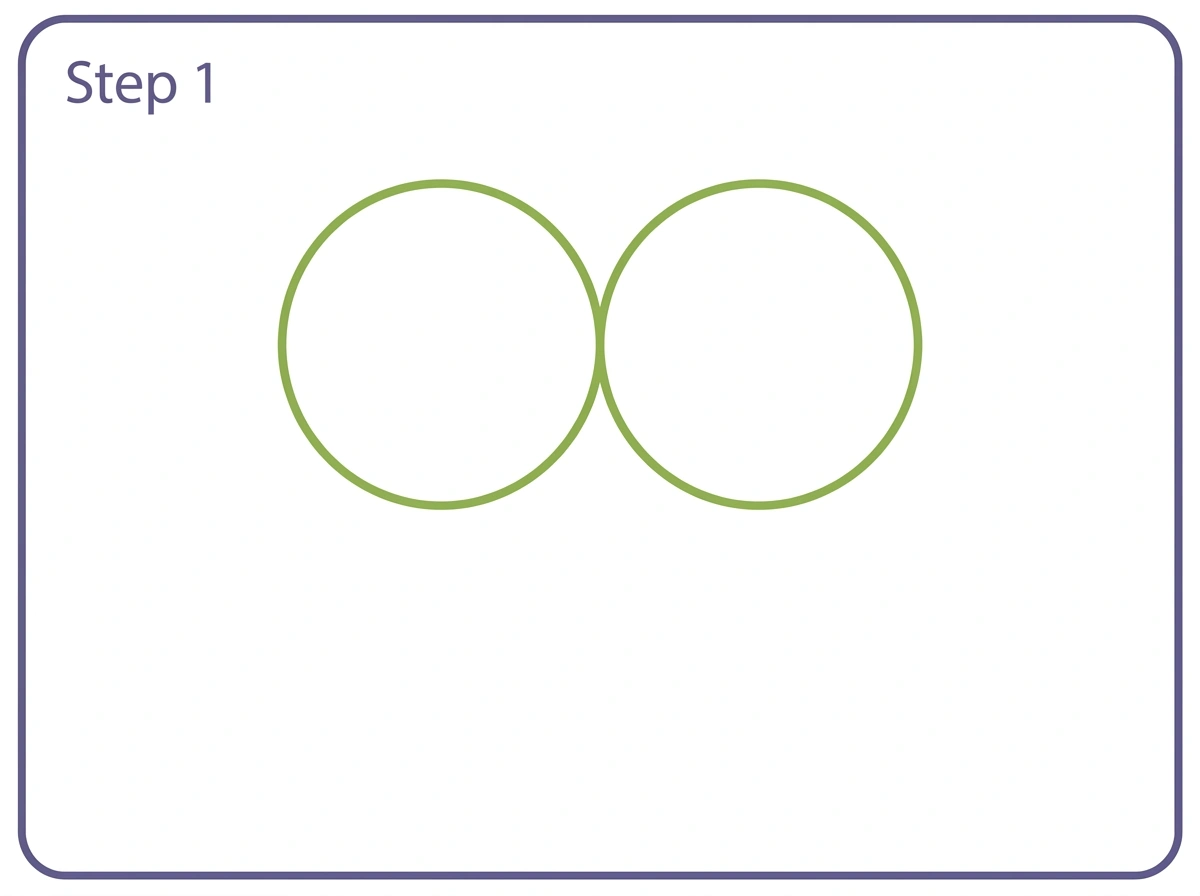
Step 1 — Draw Two Overlapping Circles
Start near the upper center of the page. Draw two circles the same size sitting side by side, overlapping slightly where they touch in the middle. These circles are the guide shapes that will help you create the two rounded bumps of the crescent. Draw them lightly because they will be erased later.
Leave plenty of space below the circles. The crescent shape extends downward from here.
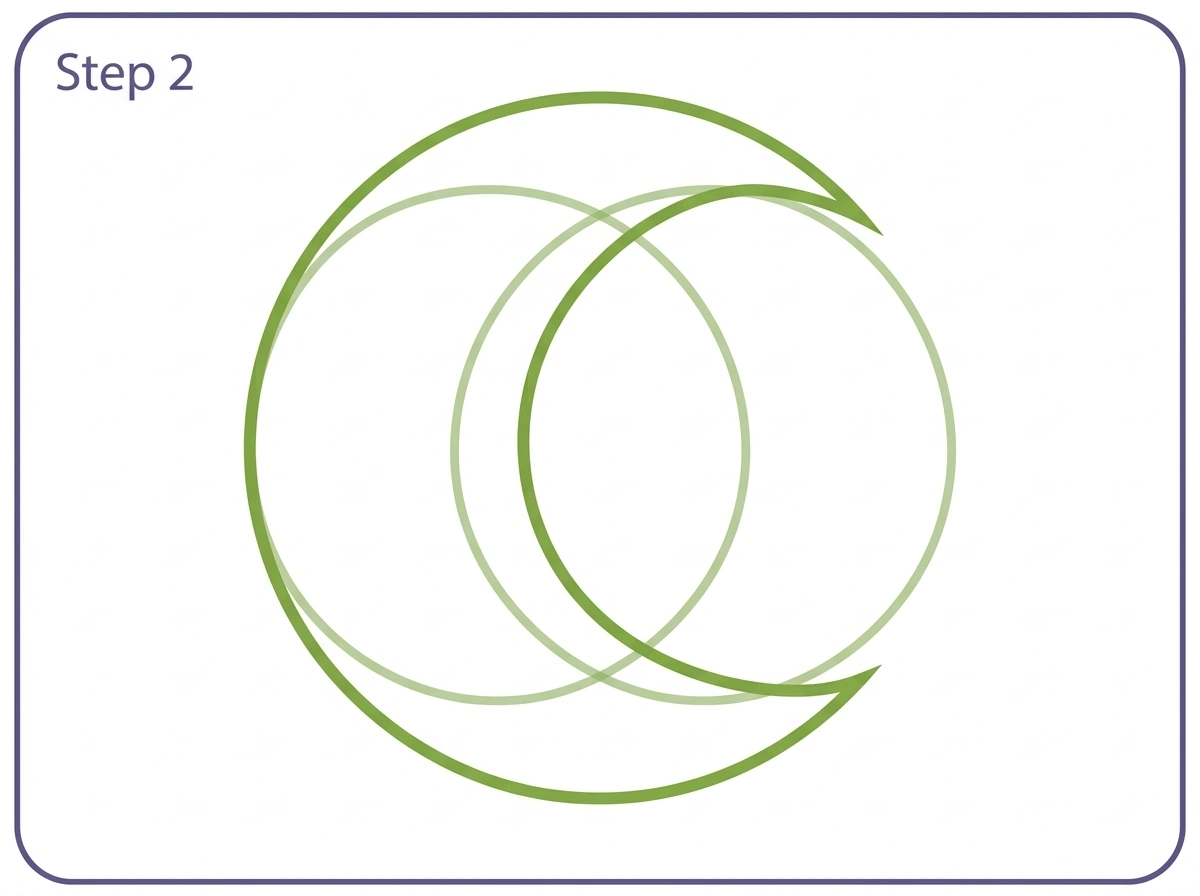
Step 2 — Draw the Crescent Shape
Using the circles as a guide, draw the outer arc of the crescent. Start from the top of the left circle and sweep the line around to the left and down in a large smooth curve, ending at a pointed tip below. Then draw the inner concave edge connecting the two pointed tips on the right side, creating the characteristic curved inner edge of the crescent shape.
The crescent is now a complete enclosed shape with two sharp pointed tips, one at the top and one at the bottom. Erase the guide circles that fall outside or inside the final crescent shape, keeping only the outer curved edge and the inner concave curve.
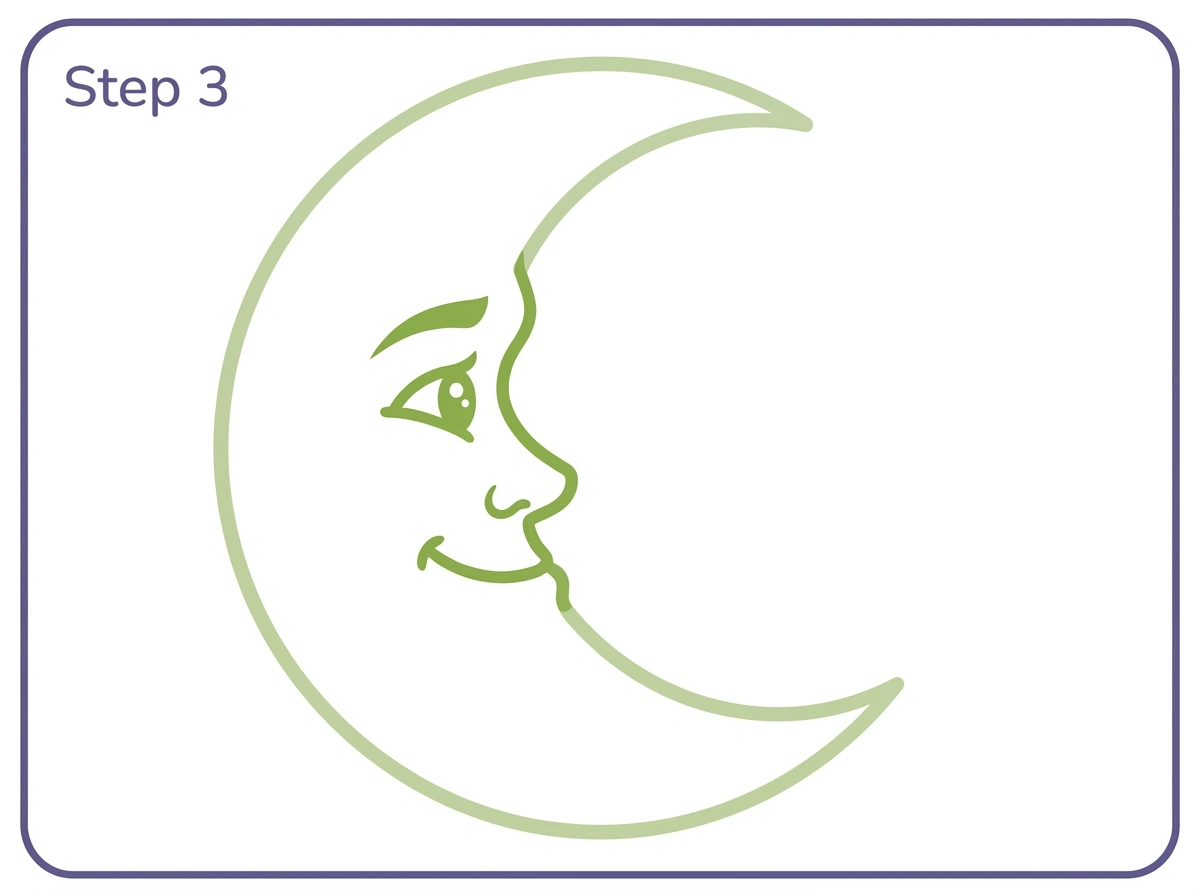
Step 3 — Add the Face Features
The classic cartoon moon has a profile face on its inner concave edge. This is the version that appears on everything from nursery decor to storybook illustrations, and it is one of the most recognisable drawing subjects in the entire collection.
Add a gentle brow bump near the upper inner edge of the crescent. Below that, draw a sharp pointed curved eyebrow. Below the eyebrow, draw the eye as an almond shape with a curved eyelid above it and a small circle for the pupil, leaving a tiny white dot inside the pupil as a sparkle highlight. Below the eye area, add a small curved nostril line and a gentle upward curved smile for the mouth.
The face gives the moon personality without making the drawing complicated. The features are simple enough for young children to manage and distinctive enough to look immediately recognisable when finished.
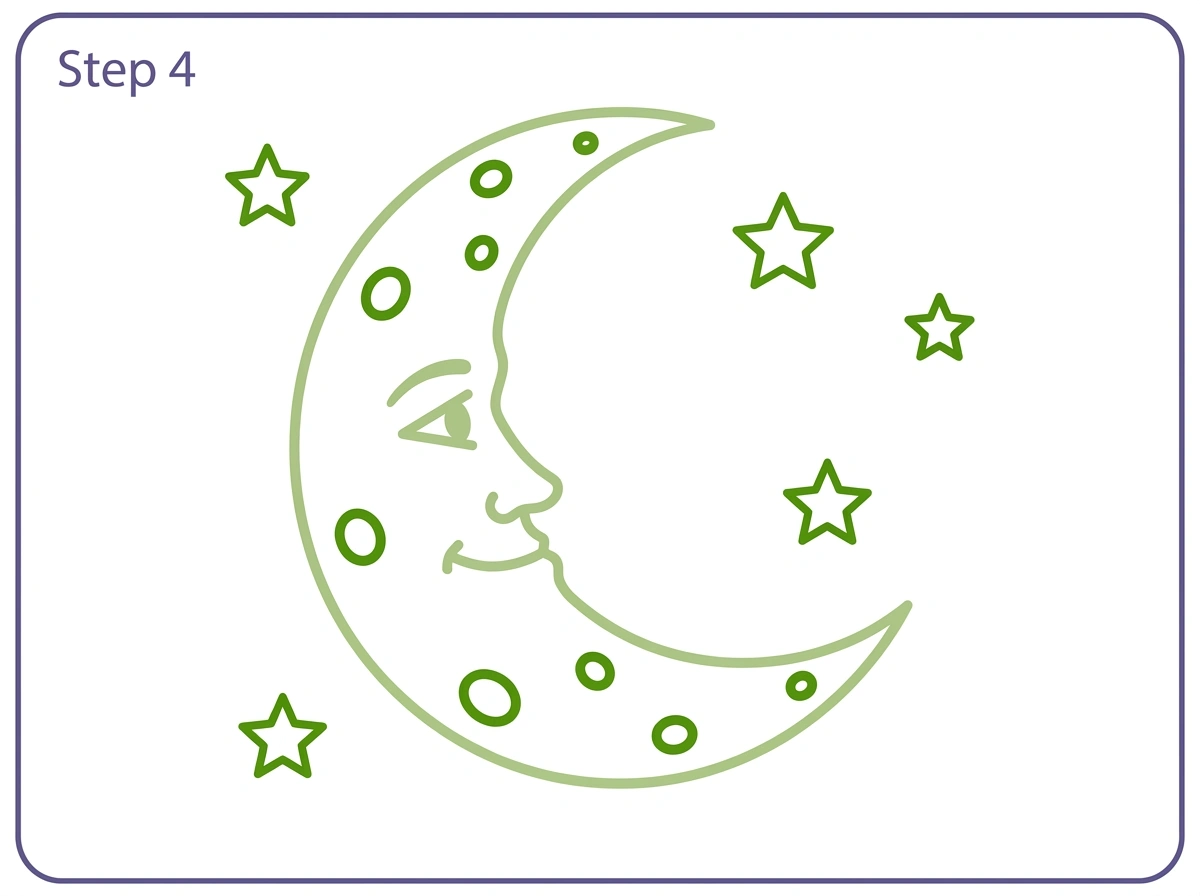
Step 4 — Add Crater Dots and Stars
Scatter eight to twelve small circular dots across the body of the crescent, avoiding the face area. These represent the craters that cover the real surface of the moon. They do not need to be perfectly circular or evenly spaced. A slightly random natural scatter looks more convincing than a rigid grid.
Then add five five-pointed stars in the empty space around the crescent. Two in the upper right, one in the lower right, one in the upper left and one smaller star near the lower area of the composition. Simple outline stars with no fill work best at this stage.
Step 5 — Colour the Moon
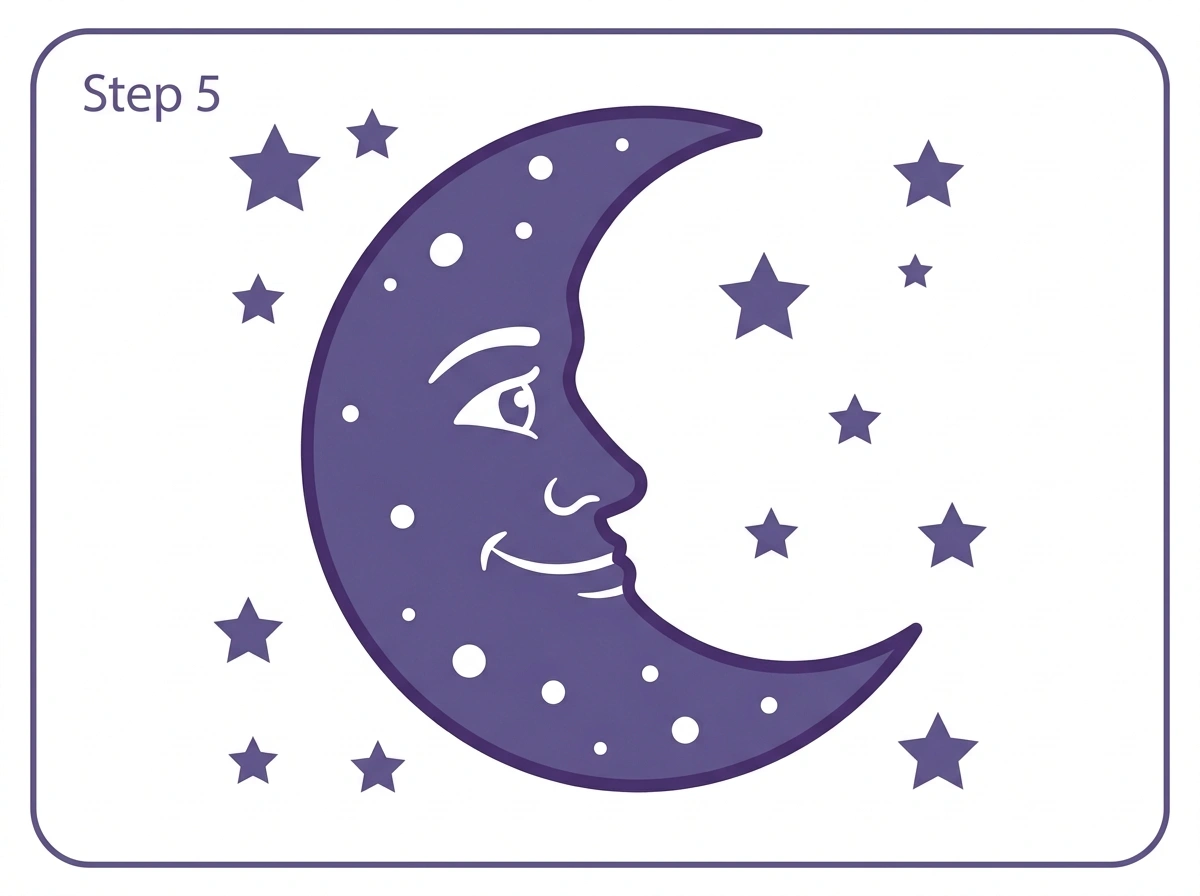
The moon is now fully drawn and ready to colour. The most natural colour choices are warm golden yellow, pale silver or a soft cream for the moon body. The face features can be left white against a coloured fill for a glossy cartoon effect, or outlined in a darker shade of the same colour.
The stars around the moon can match the moon colour exactly or be left as white outlines against a coloured night sky background if the colouring goes beyond the drawing itself.
Tips for a Better Moon Drawing
The most common mistake in crescent moon drawings is making the two pointed tips uneven. One tip ends up much sharper or much longer than the other. The two-circle method in this tutorial prevents this because both circles establish the top and bottom positions of the crescent before any final lines are drawn.
Drawing the outer arc slowly in a single smooth sweep rather than in several shorter connected lines produces a much cleaner curve. If the first attempt comes out lumpy or uneven, erase and try again. The outer arc of a crescent is one of those lines that gets significantly easier with two or three practice attempts.
For the face, positioning the eye in the upper third of the inner face area gives the moon the pleasant slightly dreamy expression that makes cartoon moon drawings so appealing. An eye placed too low makes the moon look tired. An eye placed too high leaves no room for the nose and mouth.
How to Draw a Full Moon
A full moon is actually simpler to draw than a crescent because it uses a single circle rather than the overlapping circle construction. Draw one large clean circle in the center of the page. Add crater dots scattered across the surface, some shown as simple circles and others as slightly elongated ovals to suggest the varying shapes of lunar craters. Add a face in the center if desired, using two round eyes, a small round nose and a gentle smile. The full moon face is more symmetrical than the crescent profile because it faces the viewer directly rather than showing a side view.
Full moon drawings work particularly well with a night sky background. A dark blue or deep purple background with small star dots scattered around the moon creates the most visually satisfying result.
How to Draw a Half Moon
A half moon, properly called a quarter moon in astronomical terms, shows exactly half of the moon’s disc illuminated. To draw one, draw a full circle and then draw a straight vertical line through the center. Erase the left half of the circle completely. On the right half that remains, the left edge is now a straight vertical line and the right edge is the curved arc of the circle. This gives the half moon its characteristic D shape.
Crater dots on a half moon work best concentrated on the illuminated right side rather than scattered across the erased left half.
How to Draw Moon Craters
Real moon craters are circular depressions left by asteroid and meteorite impacts. In drawing they appear as simple rings: a circle with a slightly raised rim, which is represented by a second slightly larger circle around the first, and a small shadow line on one side of the inner circle suggesting the depth of the depression.
For a simple cartoon moon, craters are just small circular dots or rings. For a more realistic moon drawing, each crater can be given a slightly irregular outer edge and a thin shadow crescent on one side. The largest craters can be given a small mountain peak visible in the center, which appears in the largest real lunar impact craters and adds visual interest to detailed realistic moon drawings.
How to Draw the Moon with Pencil
Realistic pencil moon drawings use shading rather than outlines to create the form. Start with a very lightly drawn circle as the guide shape. Then identify where the imaginary light source is coming from. The side facing the light source will be left mostly white, while the opposite side will be darkened with pencil shading.
Use circular hatching strokes that follow the curved surface of the moon to add shading gradually from the light side to the dark side. The craters in a realistic pencil moon are shown as shaded depressions rather than simple circles, with the shadow falling on the side away from the light source.
How to Draw Sun and Moon Together
The sun and moon drawn together is one of the most popular celestial drawing subjects. The two designs work particularly well when they are shown as faces looking toward each other. The sun on the left with rays extending outward, a circular face with warm round eyes and a broad smile. The crescent moon on the right facing left so its profile looks toward the sun, with the crater dots and stars as described in this tutorial.
A decorative element connecting the two, a garland of small stars, a wave of cloud shapes or a simple curved line with small dots, ties the composition together and gives the finished drawing a deliberate balance.
Moon Drawing Ideas to Try Next
Once the basic crescent moon is comfortable, there are several interesting variations worth trying.
A moon and stars scene adds a full night sky around the finished crescent, with stars of different sizes and a wispy cloud trailing across the lower portion of the composition.
A moon with a wolf howling below adds a wolf silhouette at the base of the drawing, shown in profile with head raised and mouth open toward the moon above. This combination is enduringly popular because the two subjects feel so naturally connected.
A Halloween moon places the crescent or full moon in an orange-tinted sky with bats flying across it, a witch on a broomstick silhouetted against it and a haunted house below. The moon serves as the natural backdrop for Halloween-themed drawings.
A moon cake, the traditional pastry associated with the Mid-Autumn Festival in Chinese culture, is drawn as a round disc with a decorative pattern pressed into the top surface. The pattern typically shows a full moon with a rabbit or flower design inside a circular border. This is a lovely alternative moon drawing subject for younger children.
If you enjoyed this moon tutorial, our how to draw a heart guide uses the same two-circle method to produce a completely different shape. It is a good next step once the crescent moon feels comfortable, and the finished heart makes a natural pairing with the moon in celestial-themed drawings.
Colouring Tips for Moon Drawings
The colour of the moon is one of the most interesting creative decisions in this tutorial. The scientifically accurate answer is that the moon is grey, reflecting sunlight off its dusty volcanic rock surface. But in drawings and illustrations, the moon appears in a much wider range of colours depending on the mood the drawing is trying to create.
Golden yellow is the warmest and most inviting moon colour, associated with harvest moons and late summer evenings. Pale silver or light grey is the most accurate and suits realistic or detailed moon drawings. Cool blue suggests a cold clear winter night. Deep orange or amber suggests a moon low on the horizon, which does look distinctly orange in real life due to the light passing through more atmosphere.
For the face details, leaving the sparkle dot in the eye as white against whatever colour fills the iris gives the eye a lively, glossy quality that is worth preserving regardless of which colour palette is chosen for the rest of the drawing.
Explore more Free Printable Coloring Collections
Looking for more engaging activities? Check out these free printable coloring pages fun for kids, useful for teachers, relaxing for adults, and inspiring for designers.
Fun Facts About the Moon for Kids
The moon is about 384,400 kilometers from Earth on average. This distance changes slightly as the moon follows its elliptical orbit, which is why some full moons appear slightly larger than others. The larger-than-usual full moon is commonly called a supermoon.
The moon has no atmosphere and no wind. This means that the footprints left by astronauts during the Apollo missions in 1969 are still there exactly as they were left, undisturbed, and will remain so for millions of years unless disturbed by a meteorite impact.
The same side of the moon always faces Earth. We never see the far side of the moon from Earth’s surface because the moon’s rotation and orbit are perfectly synchronized. The far side was first photographed by a Soviet spacecraft in 1959.
The moon influences the tides on Earth. The gravitational pull of the moon and sun together produce the tidal cycles that coastal ecosystems depend on.
Conclusion
The moon is one of those drawing subjects that rewards even very young children with a result that looks genuinely satisfying. The crescent shape is distinctive enough to be immediately recognisable, the face adds personality without requiring advanced skill and the crater dots and stars give the finished drawing a sense of completeness. Follow the five steps in this tutorial, take the guide circles slowly and remember that the erasing step is where the drawing starts to look really good. Download the free printable moon outline below to use as a coloring page or a practice reference, and check back for more how to draw tutorials in this collection.
FAQ
What is the easiest way to draw a crescent moon?
The easiest method is to draw two overlapping circles as guide shapes, use their outer arcs to establish the crescent form, draw the inner concave curve connecting the two pointed tips, erase the guide circles and add a face, craters and stars to complete the design.
How do you draw a moon for kids?
Start with two overlapping circles drawn lightly in pencil. Use them to create the crescent shape with two pointed tips. Add a simple cartoon face on the inner curve with an eye, eyebrow, nose and smile. Scatter small circles across the body for craters, add a few five-pointed stars around the moon and colour it golden yellow.
How do you draw a full moon step by step?
Draw a large clean circle. Add crater circles scattered across the surface in a natural irregular pattern. Add a face in the center if desired. Colour the moon in your chosen colour and add a night sky background.
How do you draw realistic moon craters?
Draw a small circle for the crater opening, then a slightly larger circle around it for the crater rim. Add a thin curved shadow line on one side of the inner circle to suggest depth. For the largest craters, add a tiny peak in the center of the crater floor. Scatter these across the moon surface in irregular sizes and positions.
How do you draw a half moon?
Draw a complete circle. Draw a straight vertical line through the center. Erase the left half of the circle. The remaining right half, with its straight left edge and curved right edge, is the half moon shape. Add craters on the illuminated right side.
Can beginners draw the moon?
Yes. The crescent moon using the two-circle method in this tutorial is one of the most beginner-friendly drawing subjects available. The circles provide structure before any final lines are committed to, which removes most of the difficulty from the curved shape.