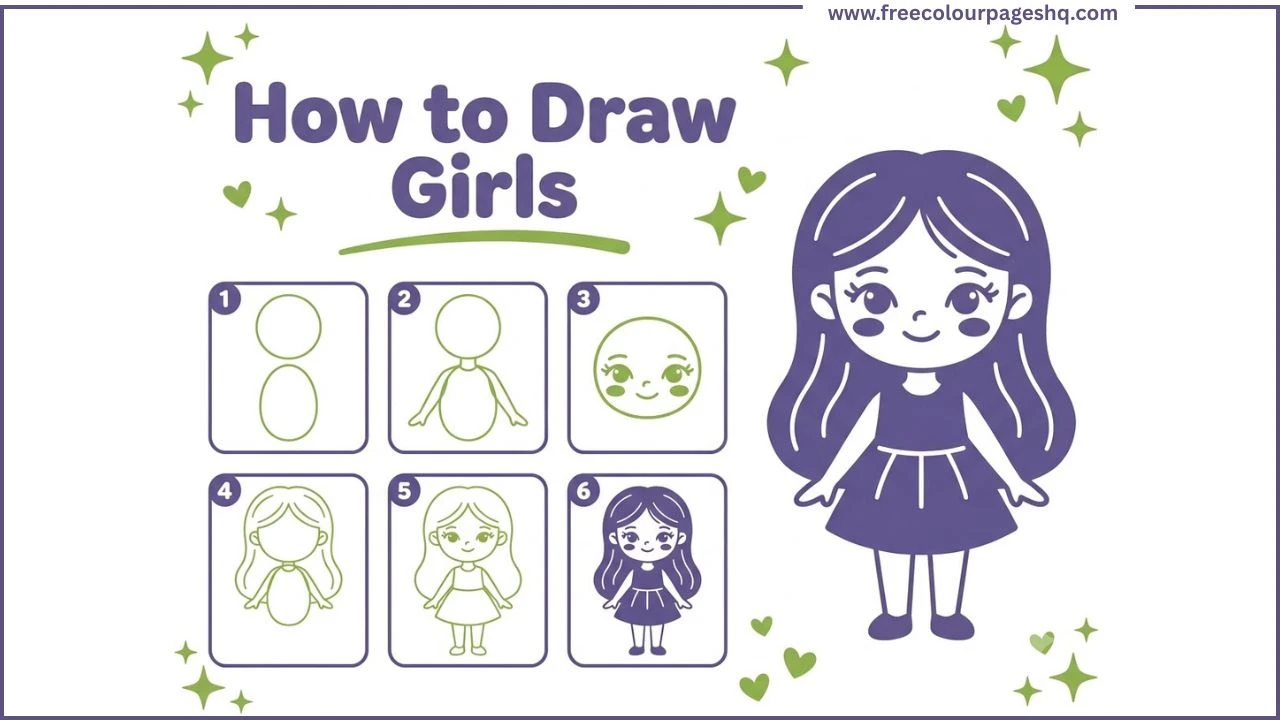
Most people’s first attempt at drawing a girl produces something that feels almost right but not quite. The head is the right shape. The hair is recognisable. But the proportions between the head, body and legs feel off, and the face features end up placed too high on the head or slightly too large for the face.
These are proportion problems and they have specific fixes. This tutorial shows how to draw a girl step by step in six stages using the circle head and oval body guide shape method. It also covers how to draw a girl’s face, hair and eyes as standalone subjects, plus anime girls, chibi girls and cartoon girls.
What You Need
A pencil and eraser. The guide shapes in the early steps are temporary. Coloured pencils, crayons or markers for the finished drawing
How to Draw Girls Step by Step
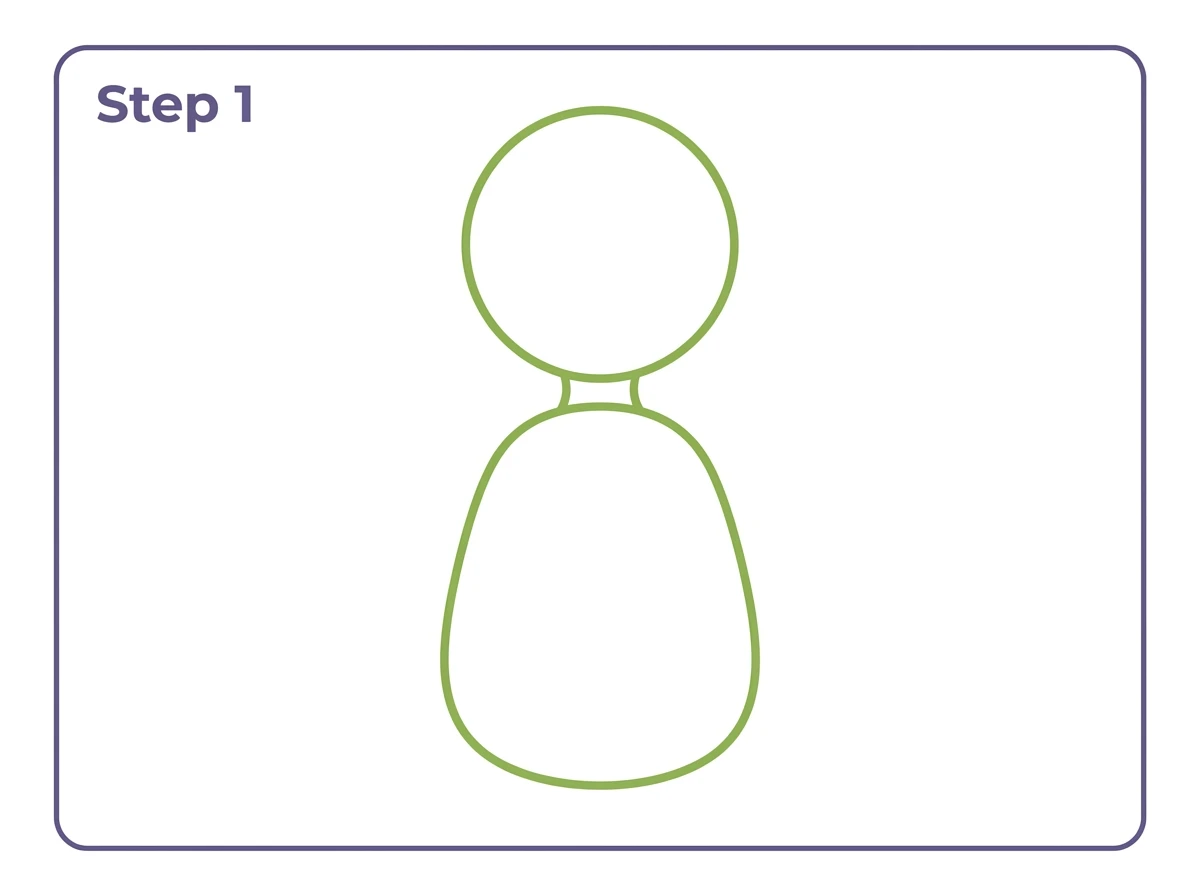
Step 1 — Circle Head and Oval Body Guide
Draw a medium circle for the head in the upper center of the page. Below it draw a larger rounded oval for the body. Leave a small gap between the two for the neck.
The head circle should be roughly one third the height of the oval body. The body oval is wider than the head and slightly taller than it is wide.
These two guide shapes establish the foundation for everything else in the drawing. Getting them the right size relative to each other is the most important step.
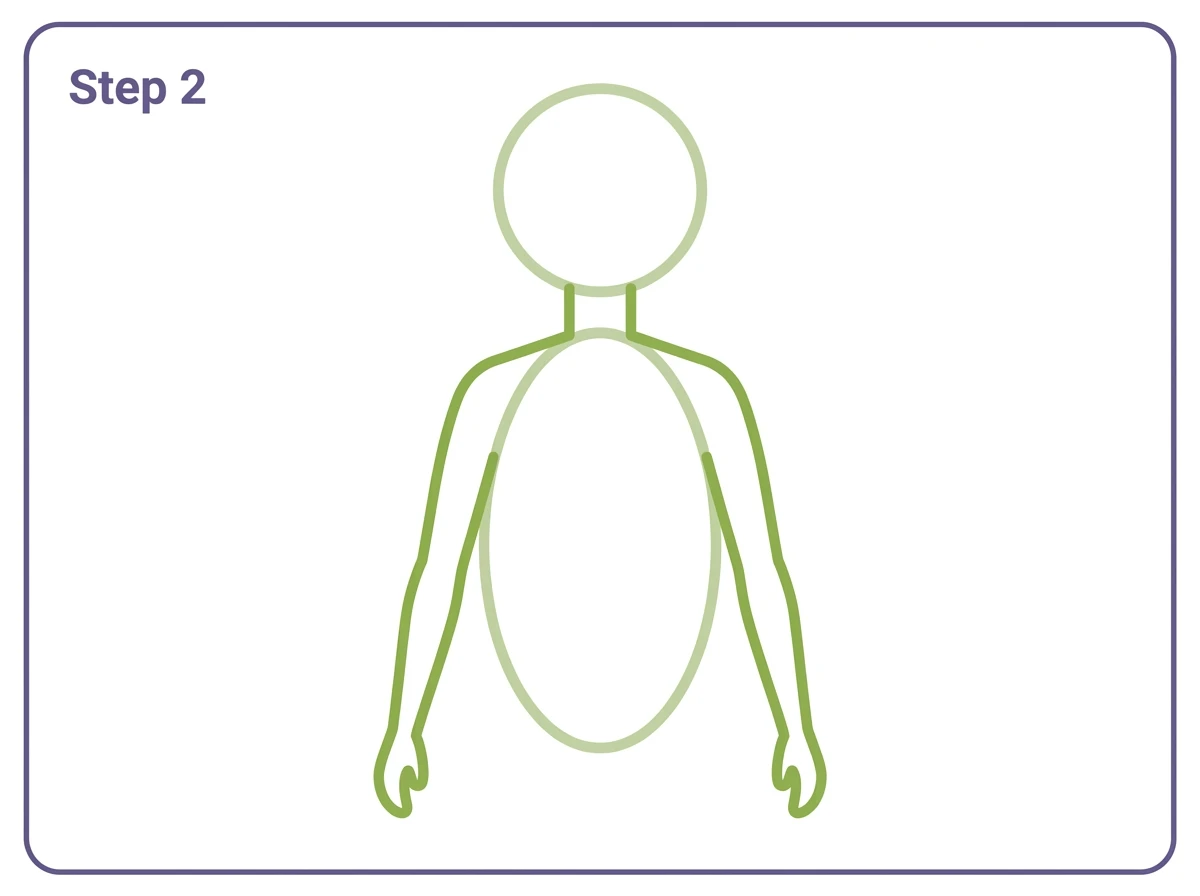
Step 2 — Neck, Shoulders and Arms
Add two short parallel vertical lines connecting the base of the head to the top of the body oval for the neck.
Draw two gently sloping shoulder lines outward from the upper sides of the oval. From each shoulder, draw a slender arm shape extending downward, ending in a small rounded hand. The arms hang naturally at the sides.
Female figure proportions in cartoon drawing typically show shoulders slightly narrower than the hip width, which is the opposite of a male cartoon figure.
Step 3 — Face Features
Inside the head circle, draw two large almond-shaped eyes in the upper half of the face. Each eye has a curved upper eyelid, three or four short eyelash lines fanning upward from the upper lid edge, an oval iris, a small round pupil and a tiny sparkle dot.
Below the eyes, draw a small neat nose. Below the nose, a gentle curved upward smile. Two small rosy circle shapes on the cheeks and two softly arched eyebrow lines above each eye complete the face.
Two small oval ear shapes on either side of the head at eye level.
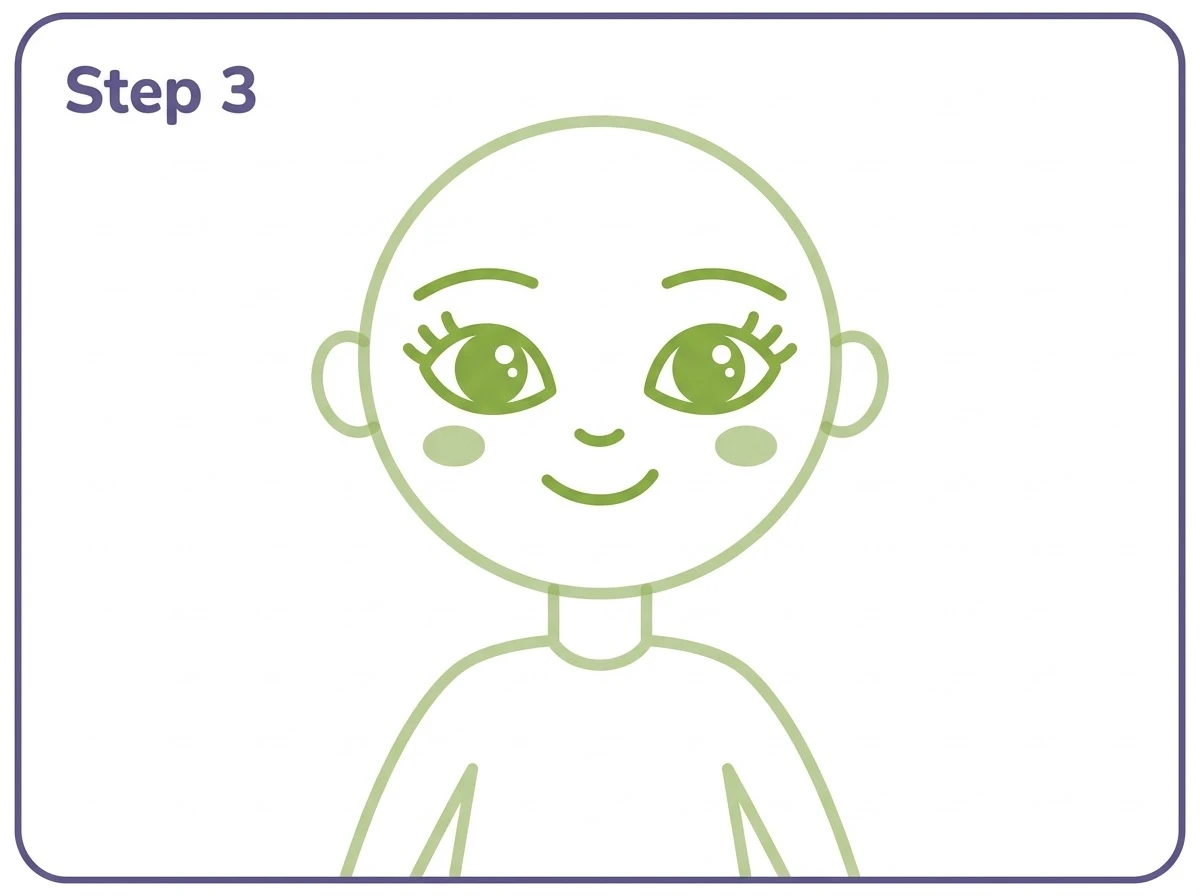
The eyes in the upper half of the face rather than the center is the most important positioning rule. Most beginners place the eyes too high. The horizontal midpoint of a head circle is almost exactly where the eyes belong.
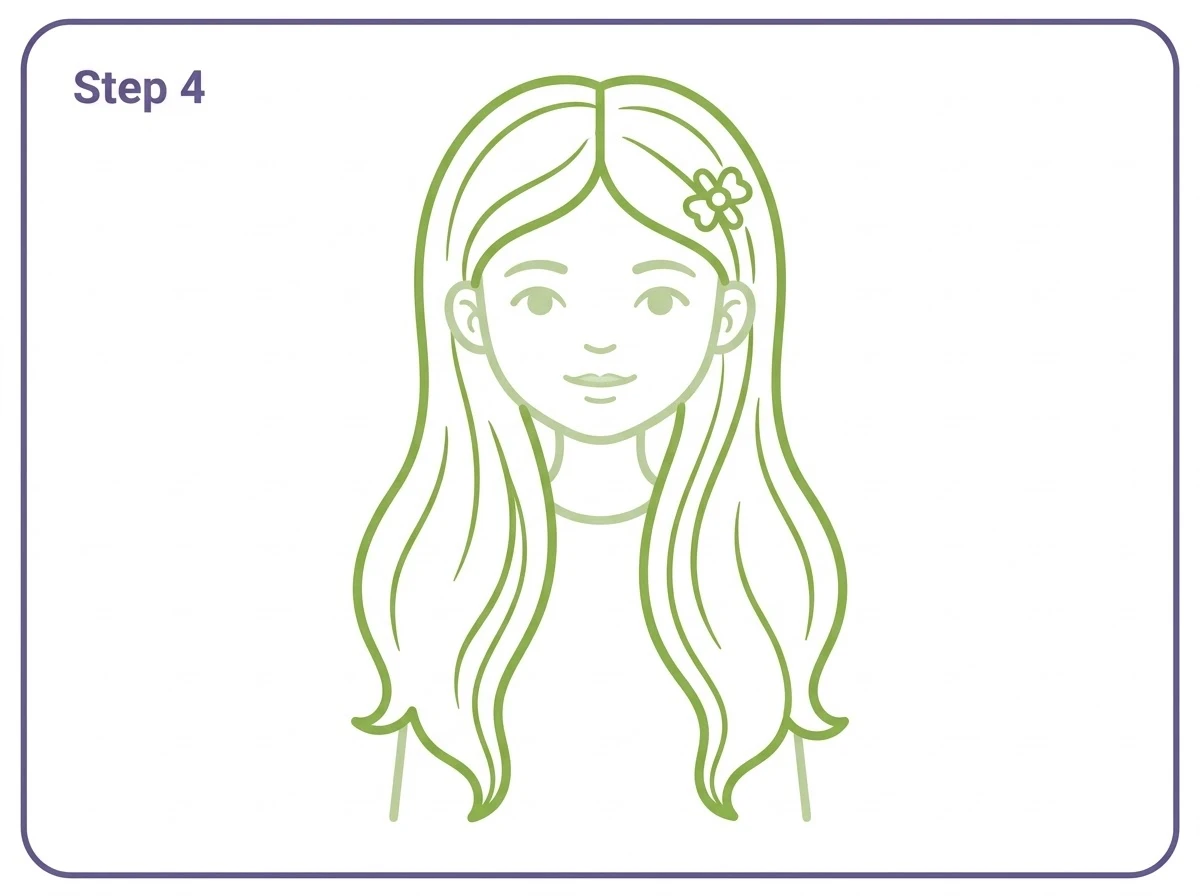
Step 4 — Long Flowing Hair
Draw a center parting line at the top of the head. Hair flows from the parting down over both sides of the head past the ears and continuing to roughly waist level.
The hair outline on each side is a smooth flowing curved line with a slight wave at the tips. Two or three flowing strand lines within the hair mass suggest the direction and give the hair dimension.
A small forelock section falls from the parting onto the forehead. A hair accessory, a bow or flower clip on one side, is optional but adds character.
Step 5 — Dress, Legs and Shoes
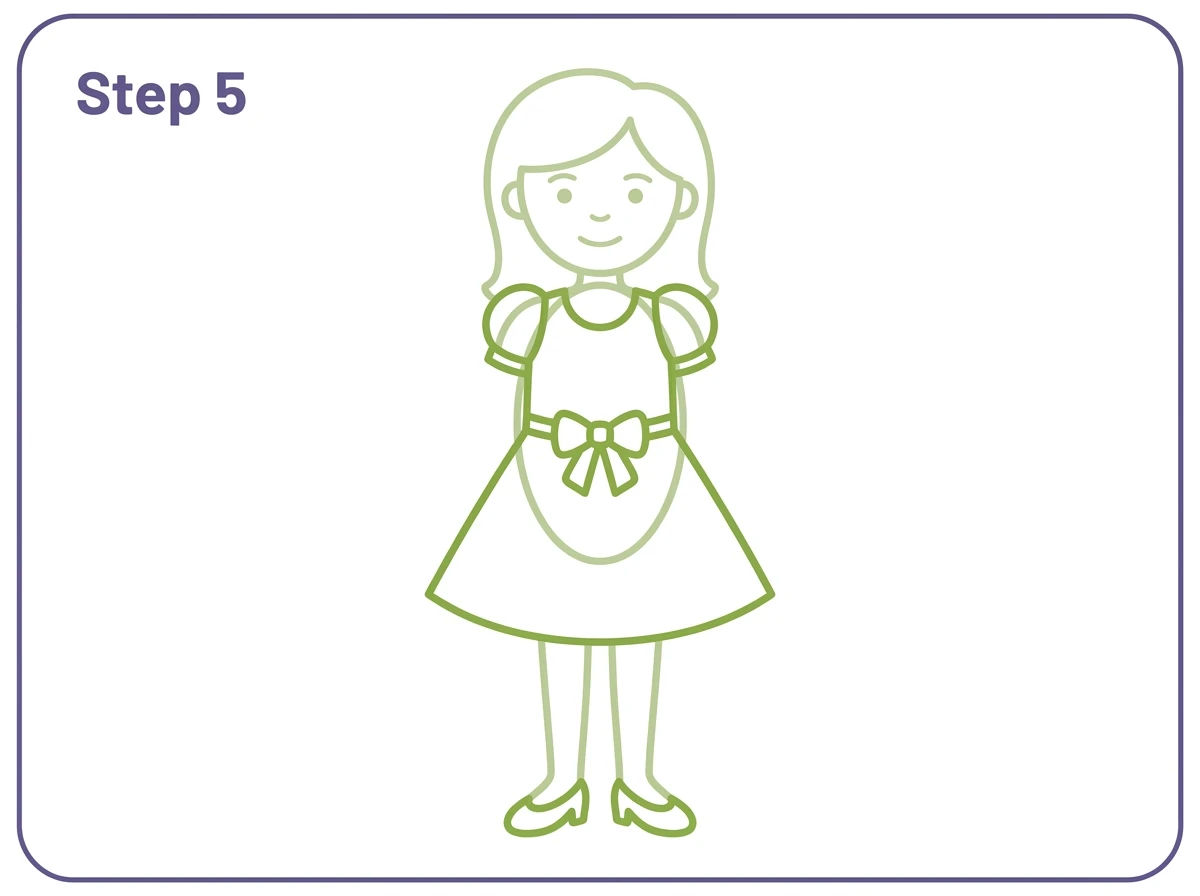
Draw a dress outline over the oval body. A curved neckline at the collar, two small puff sleeve shapes at the shoulders and a flared A-line hem below the waist. A bow or ribbon at the waist adds a decorative element.
Below the dress hem, draw two slim legs extending downward to small rounded shoe shapes. The shoes point slightly outward in a natural standing position.
Step 6 — Colour the Drawing
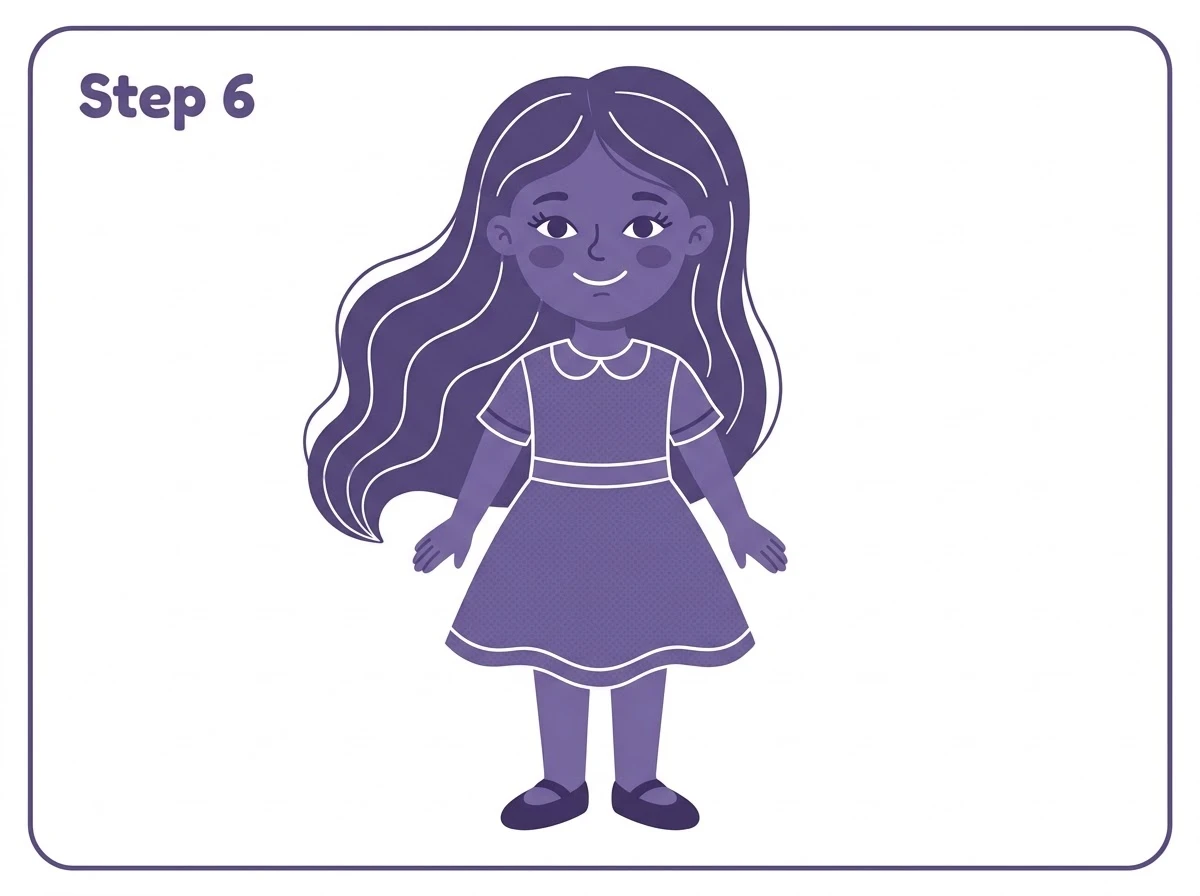
Erase all visible guide circle and oval lines. Then colour the girl using your chosen colours.
The face, neck, arms and legs take the skin tone. The hair can be any colour. The dress can be any colour combination.
The face features, eyelashes and clothing detail lines stay visible as darker outlines within the coloured areas.
How to Draw a Girl’s Face
The girl’s face is the most searched element in the how to draw girls category. It is worth understanding the face as a standalone drawing subject before incorporating it into a full figure.
The face oval is slightly taller than it is wide and tapers slightly more at the chin than at the forehead. Draw a horizontal midline across the center of the oval. Eyes sit on this line. Nose sits halfway between the midline and the chin. Mouth sits halfway between the nose and the chin.
For a cute girl face, make the eyes larger relative to the face than the positioning guide above suggests. Larger eyes communicate youth and innocence in cartoon character design across most cultural traditions.
A girl’s nose in cartoon drawing is typically very simplified. A small curved line or two small circles for the nostrils is all that is needed. Over-drawing the nose makes a cartoon girl face look older and less appealing.
How to Draw a Girl’s Eyes
Girl’s eyes in cartoon drawing use the almond eye shape with specific additions that read as feminine. A thick upper eyelid line that is heavier than the lower lid. Eyelashes that fan upward and outward from the upper lid, with the longest at the outer corner. A slightly upward tilt to the outer corner of the almond shape.
The iris is large, taking up a significant portion of the eye opening. The pupil is a round circle inside the iris. One or two sparkle highlight dots in the upper area of the iris make the eyes look bright and alive.
The eyebrows above girl eyes in cartoon style are softly arched rather than straight, following a curve from the inner to outer corner of the eye.
For anime girl eyes specifically, the almond shape is wider and rounder, the iris takes up almost the entire eye opening and the sparkle highlights are very large and elaborate.
How to Draw a Girl’s Hair
Hair is one of the most enjoyable elements of a girl drawing because it offers so many creative possibilities. The key principle is that hair has volume and mass rather than being a flat shape drawn directly on the head.
The hair sits slightly outside and above the head circle guide. The hairline begins at the top of the forehead, a gentle curved line across the upper face area. The hair then rises from this line over the skull before falling to the sides and back.
For long straight hair, two smooth flowing lines descend from the parting on each side. The movement of the hair, whether it falls in a single smooth mass or has individual strand groups, is shown by two or three internal flowing lines within the hair shape.
For curly hair, the outer edge of the hair mass is bumpy and irregular rather than smooth. Short curved spiral lines within the hair mass suggest the curl texture. The volume of curly hair extends further from the head in all directions than straight hair.
For short hair, the hair shape sits close to the head circle, following its contour from the hairline over the skull and ending just below the ear level.
How to Draw an Anime Girl
Anime girls use a recognisably different set of drawing conventions from Western cartoon girls.
The face has large eyes that dominate the upper face area. The nose is extremely simplified, often just a small curved line. The mouth is small, sometimes just a single curved line. The chin is pointed. The face overall is wider than a realistic face because the skull area above the eyes is proportionally smaller in anime style.
Anime girl hair is designed as simplified geometric chunks of volume rather than individual strands. Each section of hair, the fringe, the side pieces, the back section, is treated as a single shaped mass with a few internal lines rather than as many individual hairs. Hair in anime often moves in dramatic ways, with sections pointing outward or upward in stylised gravity-defying arrangements.
Anime girl bodies typically have longer leg proportions than realistic figures. The torso is shorter relative to the leg length, which produces the characteristic elegant elongated silhouette of anime character design.
How to Draw a Chibi Girl
A chibi girl is a very simplified character style where the head is approximately the same size as or larger than the body. Arms and legs are tiny stubs. The face has enormous eyes relative to the head.
Draw the head circle very large, taking up half or more of the total figure height. The body is a very small rounded oval below. The arms are two short stubby lines. The legs are two short stubby shapes below. The feet can be suggested by simple oval shapes.
The chibi face has two enormous round eyes with very large sparkle highlights, a tiny or absent nose and an extremely small mouth. The hair is drawn as large simplified chunks sitting on and around the oversized head.
Chibi girls are particularly popular in sticker art, fan art and greeting card illustration because their compact proportions fit small formats well and their exaggerated cuteness reads clearly at small sizes.
How to Draw a Cute Girl
A cute girl drawing uses the same six-step method as the main tutorial but with three specific proportion adjustments. Make the head circle larger relative to the body oval. Make the eyes larger within the face. Add rosy circular cheeks below the eyes.
These three adjustments, larger head, larger eyes, rosy cheeks, are the visual signals of youth and cuteness that work across almost all cartoon art traditions. A character with a proportionally large head and large eyes is automatically read as young and appealing.
For extra cuteness, add a small accessory. A flower in the hair, a bow on the dress, a small pet or favourite object held in one hand. These details add personality and story to the drawing without requiring additional technical skill.
How to Draw a Cartoon Girl
A cartoon girl uses bold simplified shapes and clear outlines. The head is round. The eyes are large and round or almond-shaped. The nose is minimal. The body is simple. The clothing is shown in its most recognisable geometric form.
The key distinction of cartoon style from realistic style is the absence of subtle tonal gradation. A cartoon girl drawing has clear outlines separating every element from every other element, flat or simply shaded colour areas within those outlines and exaggerated proportions that communicate personality immediately.
The expression on a cartoon girl face is more important than the detail. A slight change in the eyebrow angle or the curve of the mouth produces a completely different personality impression. Experimenting with expression is one of the most interesting aspects of cartoon girl drawing.
How to Draw a Girl’s Body Step by Step
The girl’s body in cartoon drawing uses specific proportions that distinguish it from a male cartoon body. The shoulders are narrower relative to the waist. The waist is more pronounced, narrower than both the shoulders above and the hips below. The overall silhouette has an hourglass quality even in simplified cartoon form.
For a girl’s body easy enough for beginners: a rounded oval torso narrowing slightly at the waist. Two slender arms from the shoulder points. Two slim legs from the lower torso. The clothing shape defines the body silhouette more than the body outline itself in most cartoon girl drawings.
For a more developed girl body drawing that shows figure proportions accurately, the figure should be approximately six to seven head-heights tall from the top of the head to the bottom of the feet. The waist sits at roughly the third head-height down. The hip level sits at roughly the fourth head-height. The knee sits at the fifth head-height. These proportioning guides produce a balanced figure.
How to Draw Girls Clothes
Clothing on a girl figure follows the body shape beneath it rather than floating independently. The first step in drawing clothes convincingly is to draw the body shape first, then draw the clothing over it.
For a dress: draw the torso, add the collar line at the neck, draw the sleeves from the shoulder points, add the skirt shape from the waist flaring outward to the hem. Fabric folds appear at points of stress, where the fabric pulls tight across the body, and at points of gathering, where excess fabric bunches together.
For a skirt: draw from the waistband downward, flaring outward. The hem line at the bottom is a gentle curve rather than a straight horizontal line, because fabric hangs slightly below the hips on each side.
For jeans or pants: draw the waistband, draw the leg shapes descending from it, add the central seam line down each leg, add the front pocket suggestion lines at the hip, add the zipper area at center front.
Clothing folds are the detail that makes girl figure drawings look more natural. They appear where the arm meets the sleeve, at the waist bend when sitting, at the knee when bent and at the armpit area.
Drawing Tips for Better Girl Figures
Symmetry comes from developing both sides of the figure simultaneously. Draw the left eye and the right eye at the same time rather than finishing one before starting the other.
The most common proportion error in girl figure drawings is making the head too large relative to the body. For a realistic figure, the head should be roughly one seventh of the total figure height. For a cartoon figure, one fifth or one quarter is typical. For a chibi figure, one half.
Hair should be drawn last, after the face is complete. Drawing hair before the face features are placed means the hair takes up space that the features then have to compete with.
The eyes are the most important element of a girl drawing. If the eyes look right, the rest of the drawing reads as a success even when other elements are imperfect. If the eyes look wrong, nothing else in the drawing compensates for it.
Printable Girl Outline PDF
A printable girl outline based on the finished Step 6 design is available as a free download below. Use it as a colouring page or a drawing reference.
Explore more Free Printable Coloring Collections
Looking for more engaging activities? Check out these free printable coloring pages fun for kids, useful for teachers, relaxing for adults, and inspiring for designers.
FAQ
What is the easiest way to draw a girl?
Start with a circle head and larger oval body. Add a neck, two shoulder lines and two arms. Draw face features including almond eyes, nose and smile inside the head circle. Add long flowing hair. Draw a dress and two legs with shoes below the body. Erase the guides. This six-step method works for all ages.
How do you draw a girl’s face step by step?
Draw a slightly vertical oval tapering at the chin. Mark the horizontal midline. Draw two almond eyes on the midline with arched eyelashes and sparkle highlights. Add a small simple nose halfway between the midline and chin. Add a small curved mouth halfway between the nose and chin. Add rosy cheek circles and softly arched eyebrows.
How do you draw anime girls?
Use a wider, rounder face oval than a standard cartoon face. Draw enormous eyes that dominate the upper face area. Simplify the nose to a single small curved line. Keep the mouth very small. Draw the hair as large simplified geometric chunks with a few internal lines. Use elongated leg proportions for the body.
How do you draw a chibi girl?
Draw a very large head circle taking up half or more of the total figure height. Add a tiny rounded body oval below. Draw two short stubby arm lines and two short stubby leg shapes. Add an enormous round eye with very large sparkle highlights on each side of the face and the tiniest possible nose and mouth.
How do you draw a girl’s hair?
Draw the hairline as a gentle curve across the upper forehead. Show the hair rising from this line over the skull before falling to the sides. Draw the outer edge of the hair shape slightly outside the head circle to show volume. Add two or three internal flowing lines within the hair shape to suggest direction and texture.
What proportions should a cartoon girl have?
A cartoon girl is typically five to six head-heights tall. The shoulders are narrower than the hips. The waist narrows between shoulders and hips. The eyes are larger than realistic proportions. The nose is very simplified. These conventions communicate the character as a young girl immediately.
Conclusion
Drawing a girl well is mostly a proportions problem. Get the head circle and body oval in the right size relationship, place the eyes on the horizontal midline of the face rather than above it, and give the hair genuine volume by drawing it slightly outside the head circle. These three principles solve the most common problems that appear in first attempts. Work through the six steps at whatever pace feels comfortable and download the free printable girl outline at the bottom of the page. Check back for more drawing tutorials in this growing collection.