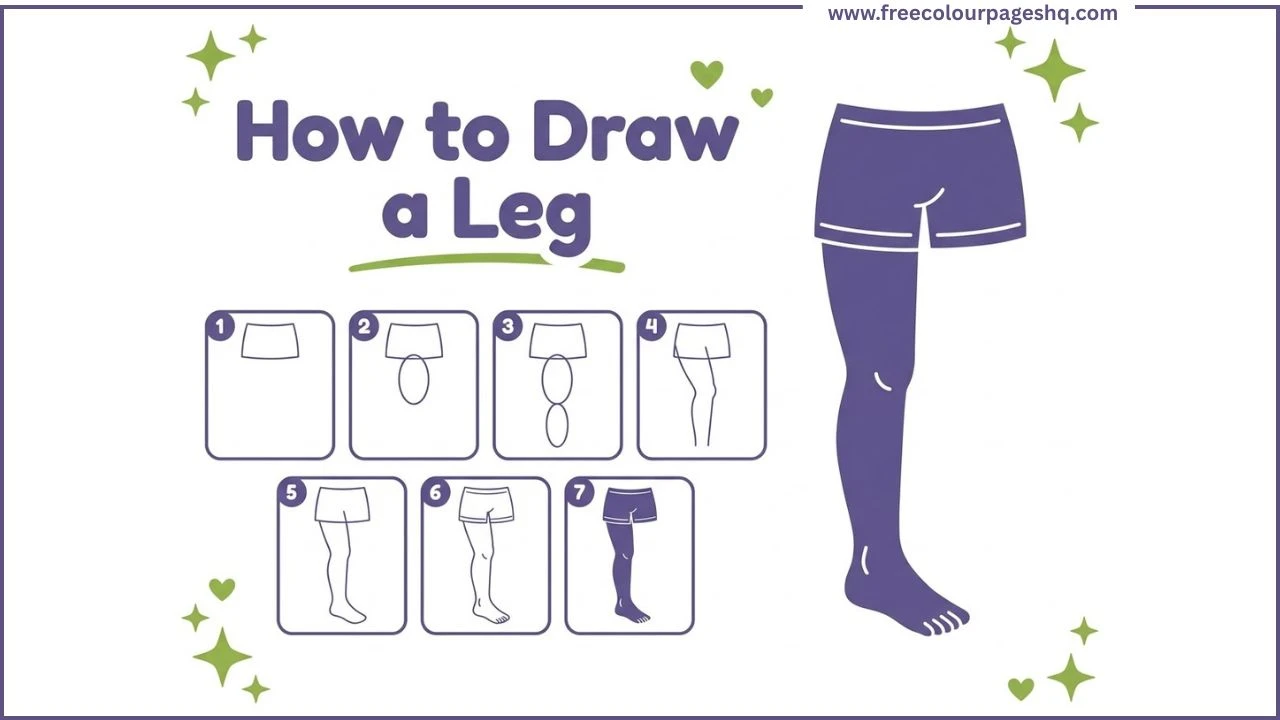
Most people can draw a rough stick figure without any help. The legs go straight down and that is more or less fine until you want the drawing to look like an actual person rather than a diagram on a fire escape sign. The difference between a stick figure leg and a convincing leg drawing is not as large as it might seem. It comes down to three things: the guide shapes, the joint positions and the curves.
This tutorial shows how to draw a leg step by step in seven stages. The method uses a shorts rectangle and two oval guide shapes to establish the thigh and calf before any final outline is drawn. It works for kids, for beginners and for anyone who has been avoiding drawing full figures because the legs always come out wrong.
What You Need
A pencil and eraser. Drawing the guide shapes lightly is the most important preparation because they need to be erased cleanly in the later steps. Coloured pencils or markers for the finished drawing.
How to Draw a Leg Step by Step
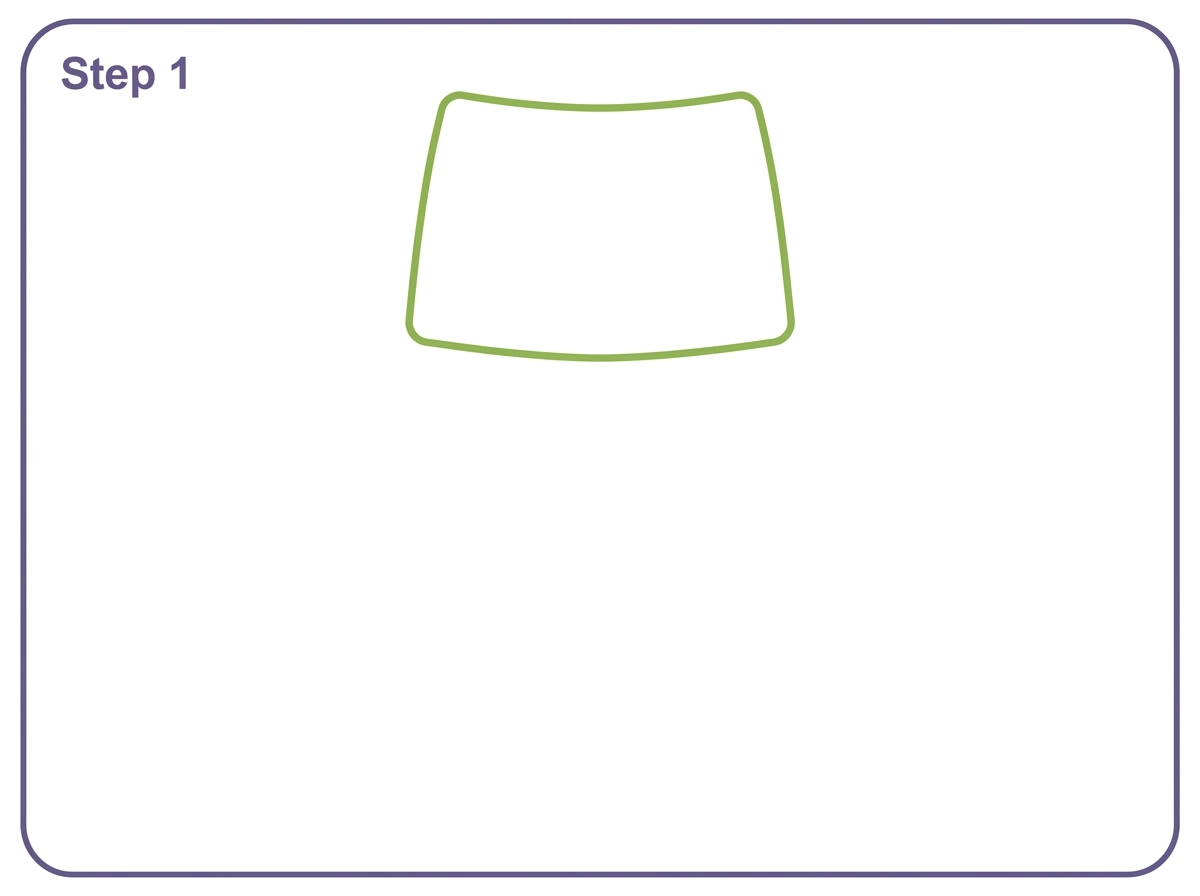
Step 1 — Draw the Shorts Rectangle Guide
Start near the top center of the page and draw a simple rounded rectangle. This represents the bottom hem of a pair of shorts or the hip area where the leg begins. It is wider than it is tall.
Position it in the upper quarter of the page. Everything else builds below this starting point, so getting this anchor right makes all the proportions easier to manage.
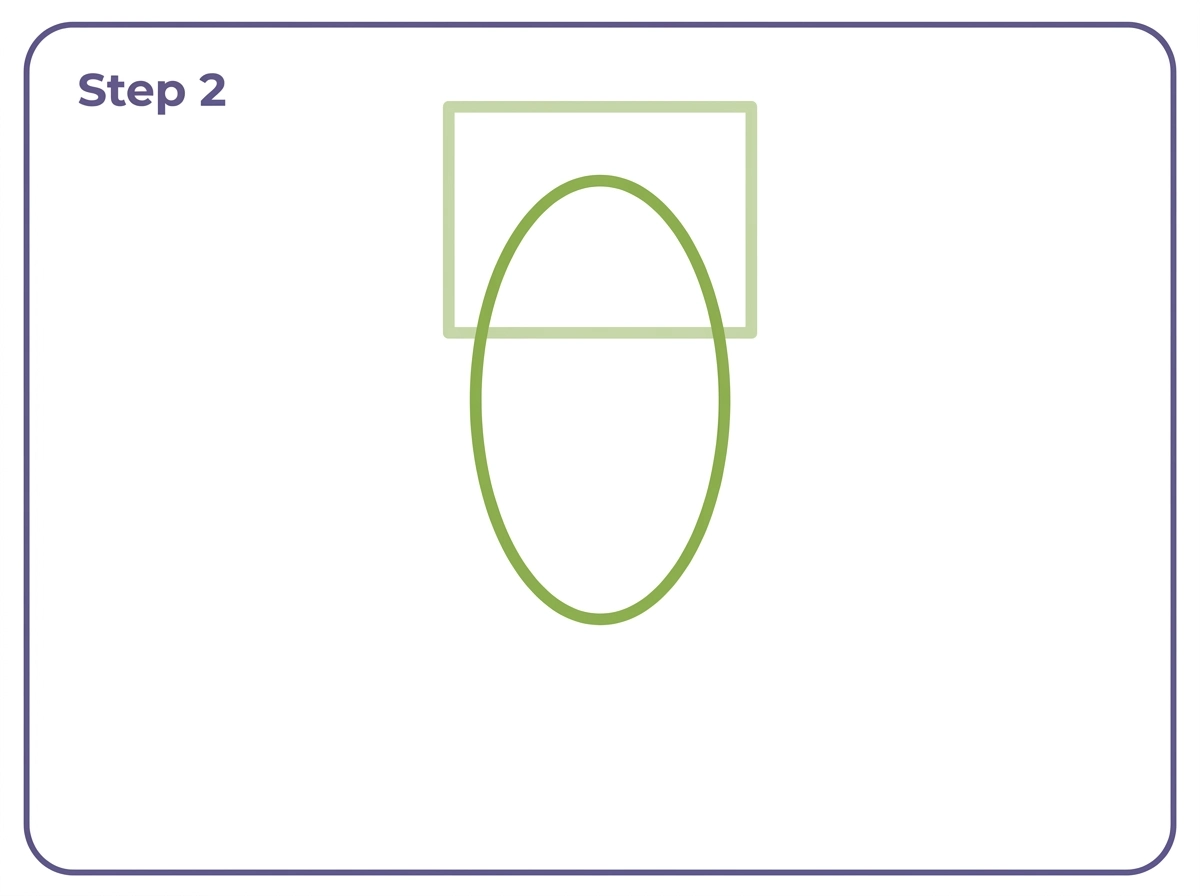
Step 2 — Draw the Thigh Oval
Below the rectangle, draw a large elongated oval for the thigh. It overlaps slightly with the bottom edge of the rectangle at the top. The oval is taller than it is wide and tapers very slightly toward the bottom.
The thigh is the widest section of the leg and the most forgiving guide shape to draw because slight imperfections in an oval do not affect the finished outline much at all.
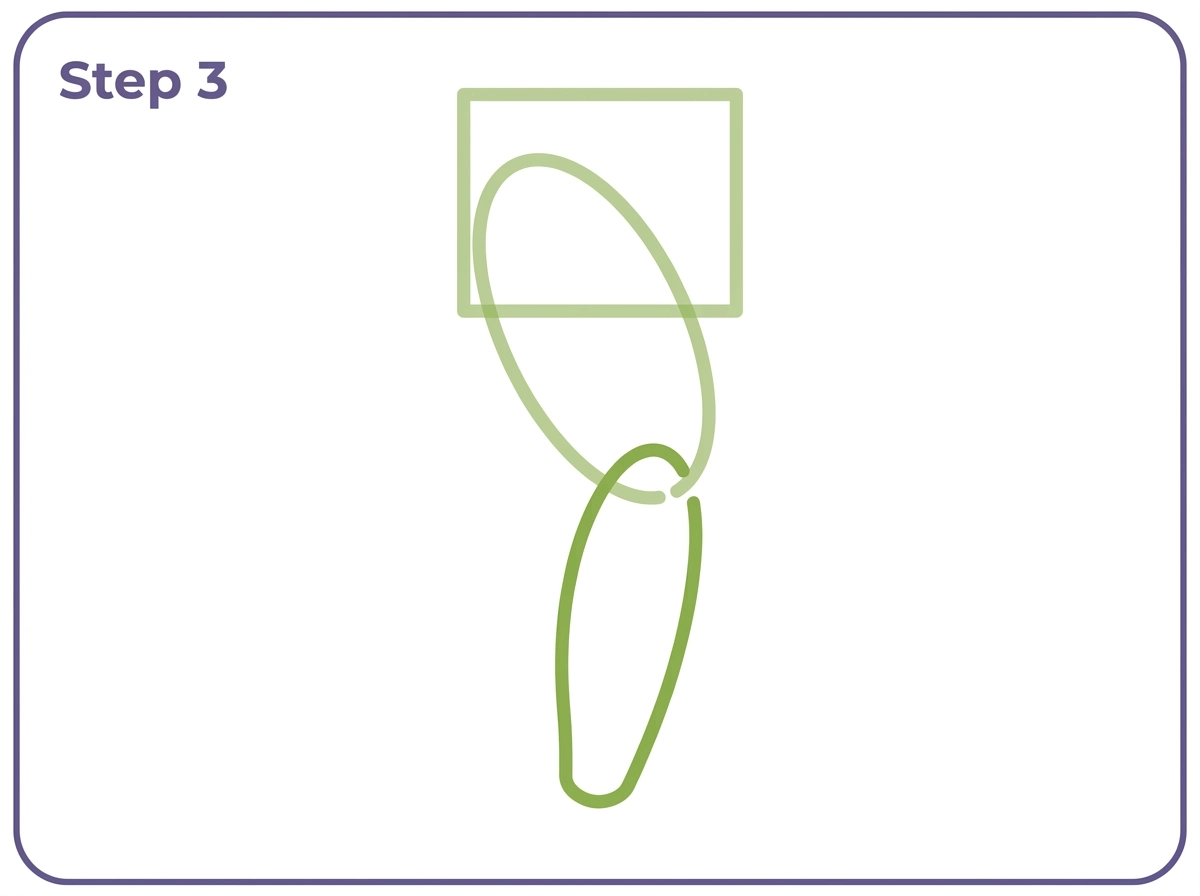
Step 3 — Draw the Calf Oval
Below the thigh oval, draw a second narrower elongated oval for the calf. It overlaps slightly with the bottom of the thigh oval at the knee position, creating a small pinch where the two ovals meet.
The calf oval is noticeably narrower than the thigh and slightly shorter. It tapers toward the ankle at the bottom.
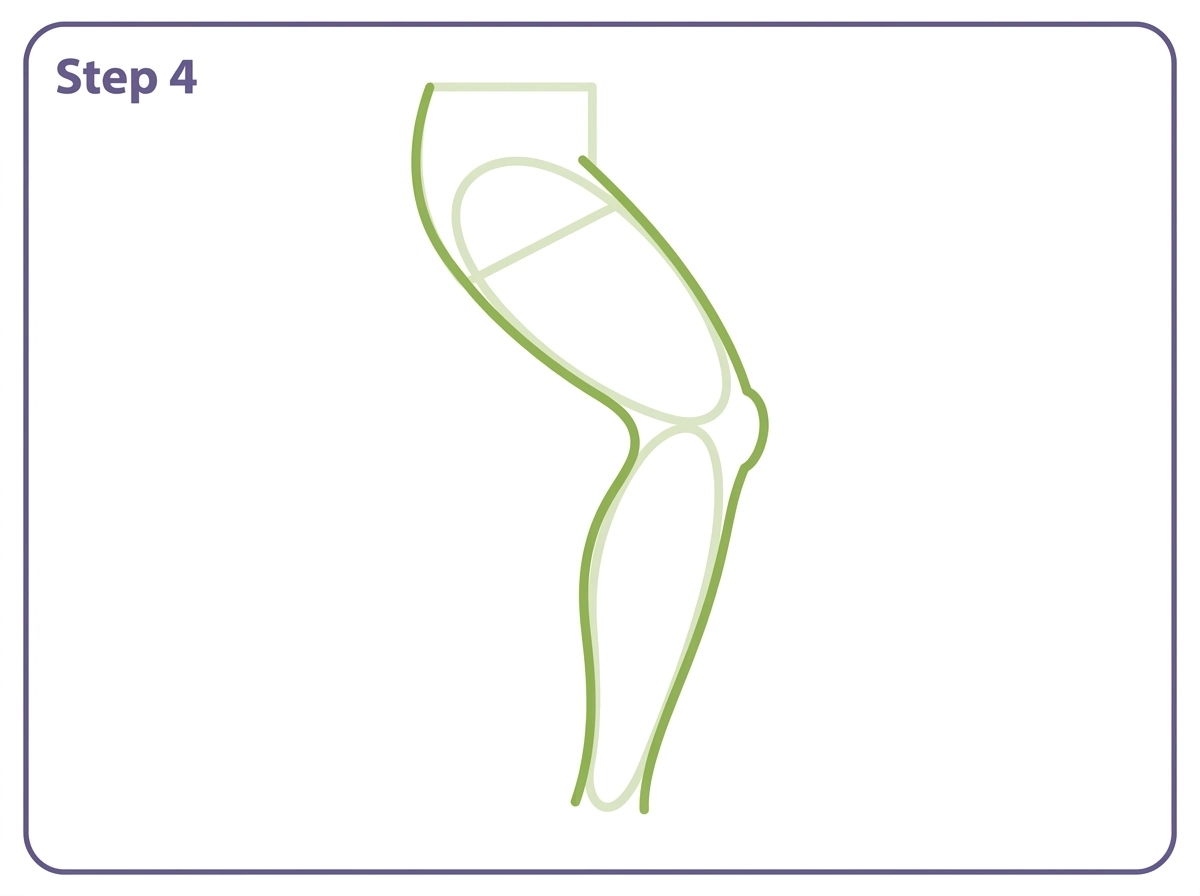
Step 4 — Draw the Smooth Leg Outline
Using the three guide shapes as reference, draw a smooth continuous leg outline over them. The front edge curves gently outward through the thigh, slightly inward at the knee, then outward again through the widest part of the calf, then inward toward the ankle.
The back edge curves more steeply inward at the knee, creating the characteristic S-curve of the back of a leg seen from the side. A small rounded bump at the knee position on the front edge suggests the kneecap.
The guide ovals are mostly absorbed into the smooth outline at this stage.
Step 5 — Add the Foot
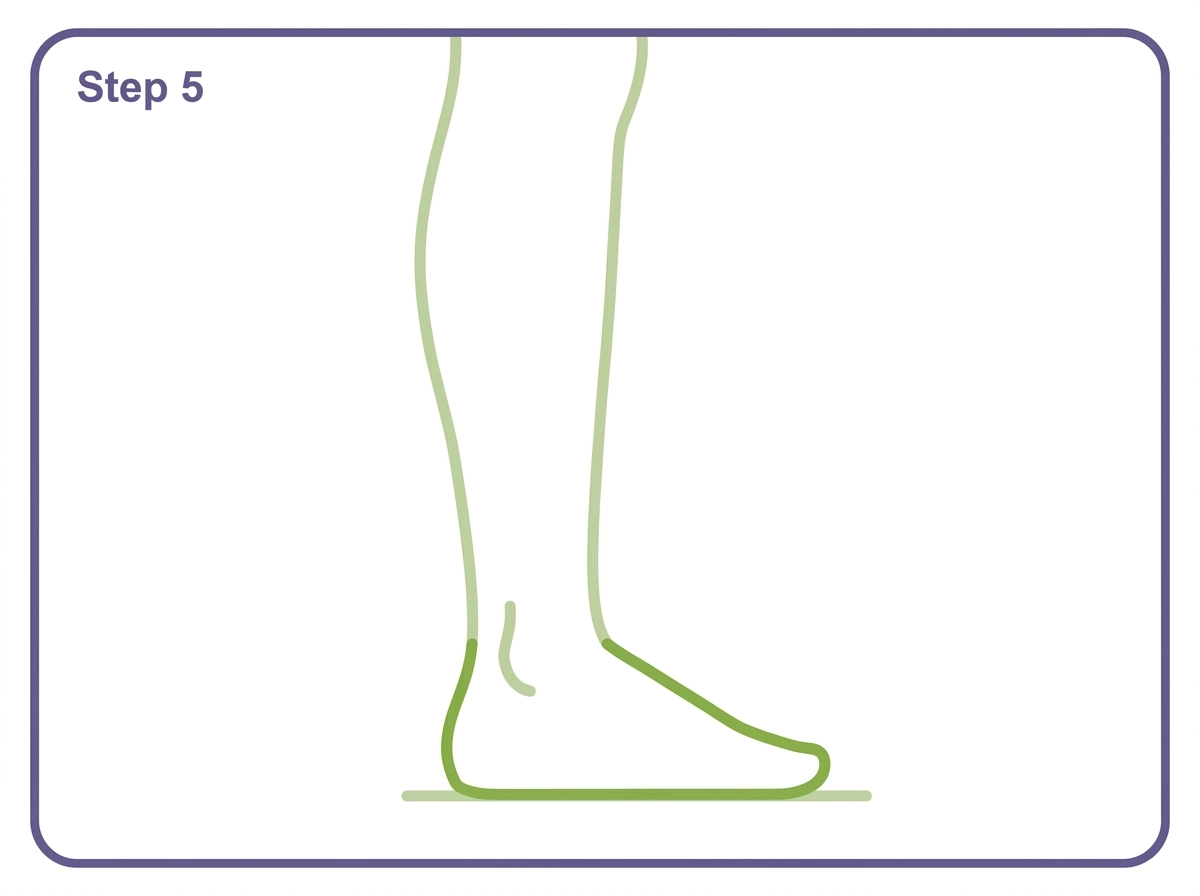
At the bottom of the leg, draw the foot shape. The foot extends forward from the ankle in a wedge shape, wider at the toe end and narrowing at the heel. The heel protrudes slightly backward from the ankle line and the bottom of the foot is flat.
The toe area is a gentle rounded curve at the front without individual toe detail at this stage.
Step 6 — Add Detail Lines
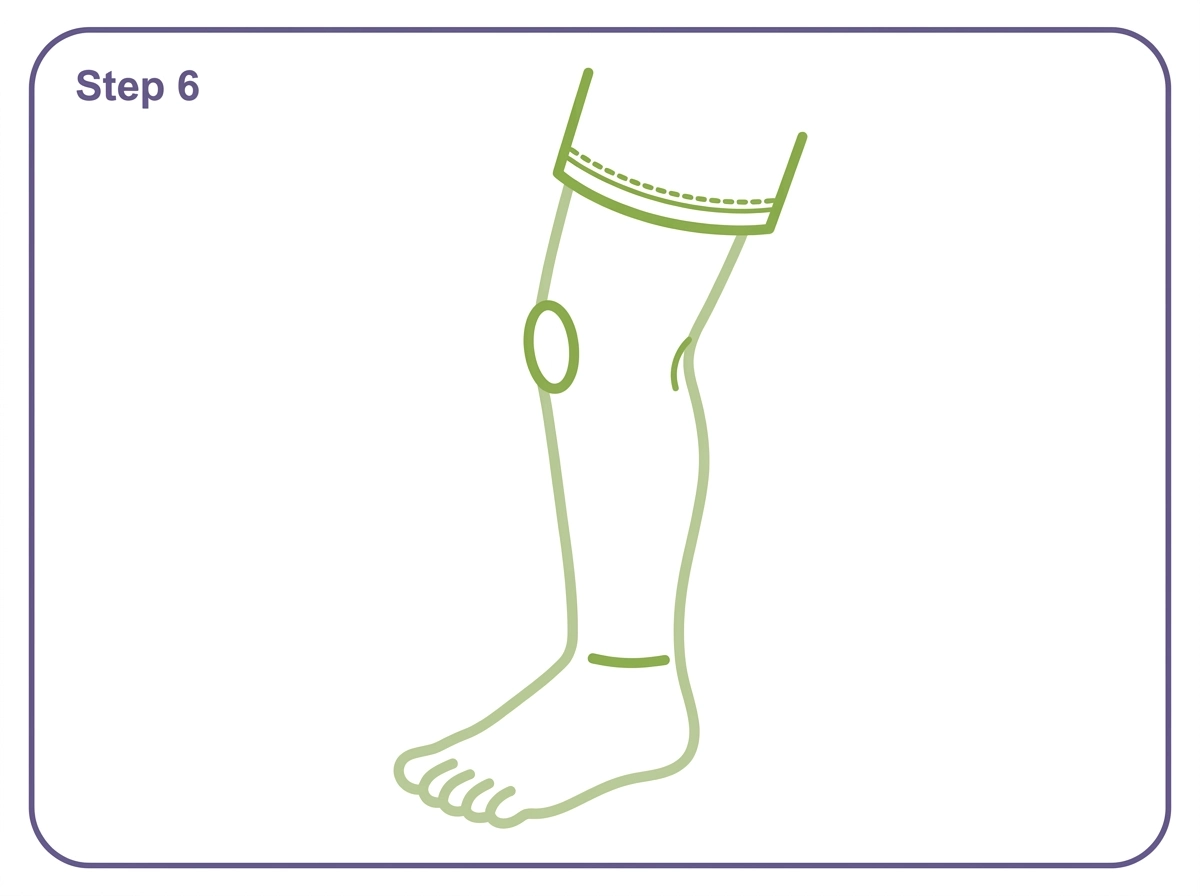
Erase all guide oval and rectangle lines. Then add the finishing details that make the outline feel like a complete leg rather than a silhouette.
A small oval kneecap shape on the front of the leg at the knee position. A short horizontal ankle line where the leg meets the foot. Four or five short curved lines across the toe area suggesting individual toes. A curved shorts hem line at the top with a small double-stitch line below it. A curved line on the back of the knee suggesting the inner fold.
Step 7 — Colour the Drawing
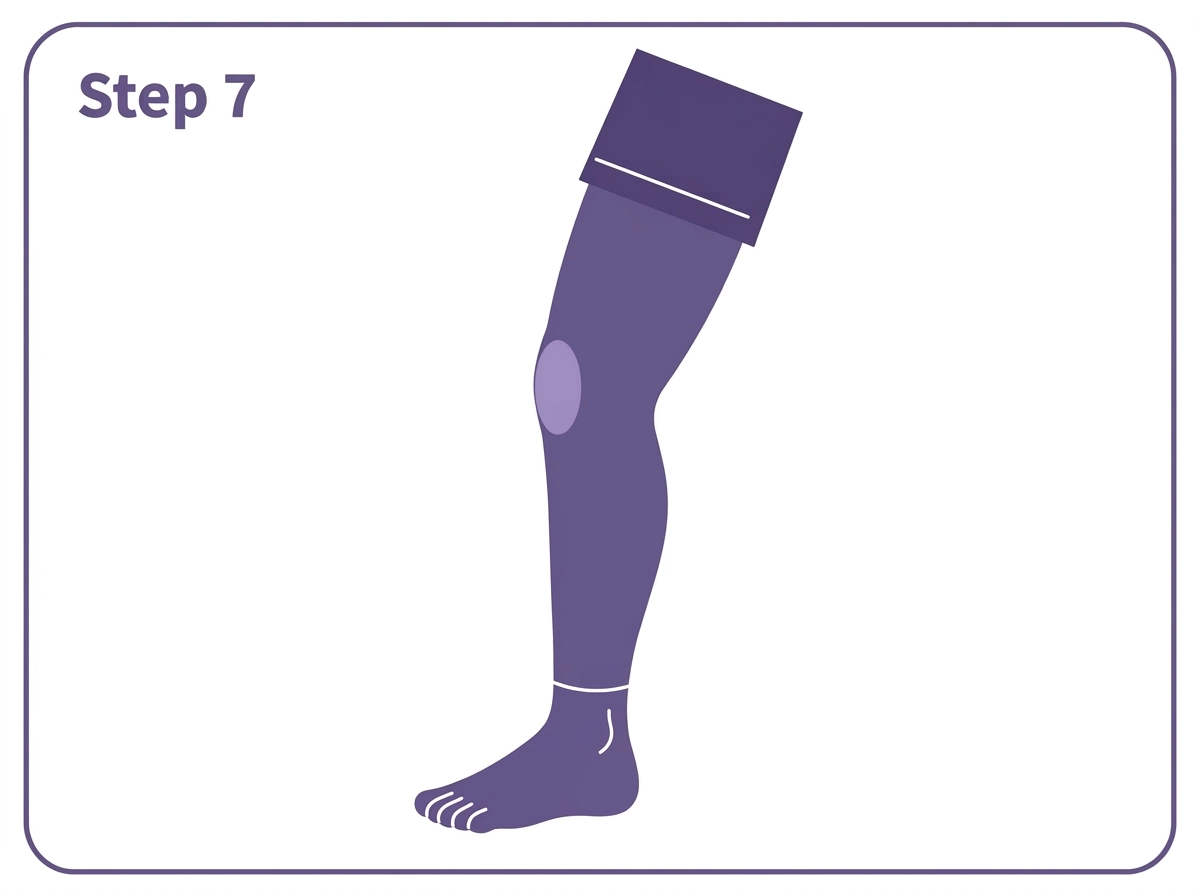
The leg is now ready to colour. The skin area including the thigh, calf, foot and ankle can be any warm tone. The shorts above the leg hem are a different colour from the skin, distinguishing clothing from body.
The kneecap catches slightly more light than the surrounding skin, so leaving it very slightly lighter produces a more naturalistic result. The ankle area is slightly bony and sharper in definition than the rounded calf above it.
How to Draw a Leg for Kids
Very young children do not need the full seven-step method. A simplified leg drawing for kids uses two connected rectangles, one wide one for the thigh and one narrower one for the calf, with a flat oval foot at the bottom. Add a horizontal line at the knee to suggest the joint. This version takes about two minutes and immediately reads as a leg.
The simplified version works well as the leg component in a full cartoon person drawing where the level of detail is consistently simple across the whole figure.
How to Draw a Female Leg
A female leg drawing in cartoon style uses the same guide oval method but with slightly adjusted proportions. The thigh oval is rounder and fuller relative to the calf. The calf oval is slightly narrower and more defined. The ankle is more slender at the connection point with the foot.
These proportion adjustments are subtle but they add up to a noticeably different silhouette from a more neutral or male leg drawing. For a realistic female leg, the same principles apply but the transitions between the different sections are smoother and the contours have more gradual curves.
How to Draw a Leg and Foot Together
The leg and foot as a combined drawing subject involves one proportion decision that many beginners get wrong. The foot is longer than most people expect relative to the leg length. A properly proportioned foot from heel to toe is roughly the same length as the head from chin to crown, and significantly longer than it looks in simplified cartoon drawings.
For a realistic leg and foot drawing, the ankle joint deserves careful attention. The inner ankle bone sits higher than the outer ankle bone on a real leg, which means the two sides of the ankle are not at the same height. This asymmetry is subtle but its absence is one of the things that makes an ankle look wrong in a drawing even when the viewer cannot identify exactly why.
How to Draw a Bent Leg
A bent leg drawing is one of the most commonly needed poses for any figure drawing. When a leg bends at the knee, the kneecap becomes more prominent and the back of the knee folds inward. The overall silhouette changes significantly from a straight leg.
Start with the same thigh oval but tilt it to match the angle of the upper leg. The calf oval angles in a different direction from the thigh, connected at the knee position. The angle between the two depends on how deeply the leg is bent. A shallow bend produces a modest angle. A fully bent leg has the calf oval folded back almost parallel to the thigh.
The foot points downward when a leg is bent in a sitting position, which changes the foot shape from the flat profile of a standing foot to a more pointed-down form.
How to Draw a Cartoon Leg
Cartoon legs use the same structural principles as realistic legs but with exaggerated proportions. The thighs are rounder and larger. The calves are more clearly defined with a stronger outward curve. The ankle is smaller relative to the leg, almost like a pinch point. The feet are larger and flatter.
These exaggerations are not random. They follow the same logic as other cartoon body proportions: emphasise the features that communicate the most information most quickly, and simplify or reduce the features that contribute less to the immediate read.
A cartoon leg with a shoe adds another element. Draw the shoe as a rounded rectangular or oval form below the ankle, larger than the actual foot size would suggest, because large shoes read as grounded and stable in cartoon aesthetics.
How to Draw an Anime Leg
Anime leg drawings tend to use longer proportions than a realistic leg would have. The thigh section is elongated. The calf has a more pronounced and clearly defined bulge at its widest point. The ankle is extremely slender. The overall impression is of a longer, more stylised leg than anatomically accurate.
The lines in an anime leg drawing are cleaner and more decisive than in a realistic sketch. There is less crosshatching and less tonal variation. The outline itself does most of the work, with a few well-placed inner lines suggesting the kneecap and ankle bone and the inner calf curve.
How to Draw a Muscular Leg
A muscular leg drawing requires understanding the main muscle groups of the leg and how they appear on the surface. The quadriceps, four muscles at the front of the thigh, create a broad rounded form with a slightly divided appearance at the front. The hamstrings at the back of the thigh create a smoother, more unified surface. The gastrocnemius, the main calf muscle, has two distinct heads that create the characteristic diamond shape when viewed from behind.
For a simplified muscular leg: draw the thigh with a slight division line down the front center suggesting the quad muscles. Draw the calf with a more pronounced outward curve and a clearer definition at the lower edge where the muscle meets the Achilles tendon. The inner knee area shows a rounded form suggesting the inner quad muscle.
How to Draw a Realistic Leg
A realistic leg drawing uses reference. This is not a shortcut. It is what every professional artist does. The human leg is specific in its proportions and its contours in ways that memory and imagination cannot reliably reproduce.
With a reference in hand, the guide oval method from the main tutorial still applies. Draw the thigh oval and the calf oval lightly. Then observe the specific contours of the reference and draw the outline following what you actually see rather than what you think the leg should look like.
The most common mistakes in realistic leg drawing are making the thigh too narrow relative to the hip width, making the kneecap too large and round, and making the calf too symmetrical when the inner and outer calf profiles are actually different from each other.
Leg Proportions Reference
Understanding proportions makes every leg drawing easier. The leg from hip to floor is roughly half of total body height in most proportioning systems. The thigh from hip to knee and the lower leg from knee to ankle are roughly equal in length. The foot from heel to toe is roughly equal to the length of the forearm from elbow to wrist.
These are proportioning rules rather than measurements. Individual bodies vary. But for cartoon and illustration purposes, these proportions produce a leg that reads as natural and balanced.
The knee joint sits at roughly the halfway point of the total leg length. Placing it too high or too low is the single most noticeable proportion error in leg drawings because the eye calibrates to the knee position immediately.
Tips for Better Leg Drawings
Draw both legs simultaneously rather than finishing one before starting the other. Small asymmetries are much easier to correct when both legs are at the same stage of development.
The S-curve of the back of the leg is the detail that most clearly distinguishes a convincing leg from a generic tube shape. The gentle convex curve of the calf and the concave curve at the back of the knee are what make the back of the leg look three-dimensional rather than flat.
Erase. Guide ovals left visible under the final outline make the drawing look unresolved and the tonal confusion between the guide lines and the final lines makes it harder to see where corrections are needed.
Printable Leg Outline PDF
A printable leg outline based on the finished Step 7 design is available as a free download below. Use it as a colouring page, a practice template or a proportions reference when working through the drawing steps.
Explore more Free Printable Coloring Collections
Looking for more engaging activities? Check out these free printable coloring pages fun for kids, useful for teachers, relaxing for adults, and inspiring for designers.
FAQ
What is the easiest way to draw a leg?
Start with a shorts rectangle at the top. Draw a thigh oval below it. Draw a narrower calf oval below that. Draw a smooth outline following the guide shapes and adding a knee bump. Add a foot at the bottom. Erase the guides and add kneecap, ankle and toe details. This seven-step guide shape method works for all ages.
How do you draw a leg for kids?
Two connected rectangles, one wide for the thigh and one narrower for the calf, with a flat oval foot below. A horizontal line at the knee suggests the joint. This simplified version takes two minutes and reads immediately as a leg.
How do you draw a bent leg?
Tilt the thigh oval to match the angle of the upper leg. Draw the calf oval at a different angle connecting at the knee position. The depth of the angle depends on how much the leg is bent. The foot points downward in a sitting bent-leg position.
How do you draw a realistic leg?
Use a reference photograph or life drawing. Apply the guide oval method lightly and then draw the outline following what you actually observe rather than from memory. Pay particular attention to the knee placement, which should sit at roughly the halfway point of the total leg length, and the asymmetry between the inner and outer calf profiles.
What are the main proportions for drawing a leg?
The leg from hip to floor is roughly half of total body height. The thigh and lower leg are roughly equal in length. The knee sits at approximately the halfway point. The foot from heel to toe is roughly equal to the length of the forearm.
How do you draw a female leg differently from a neutral leg?
A female leg in cartoon style uses a fuller, rounder thigh oval relative to the calf. The ankle is more slender at the connection point with the foot. The transitions between sections are smoother with more gradual curves. These are proportion conventions for cartoon illustration rather than anatomical prescriptions.