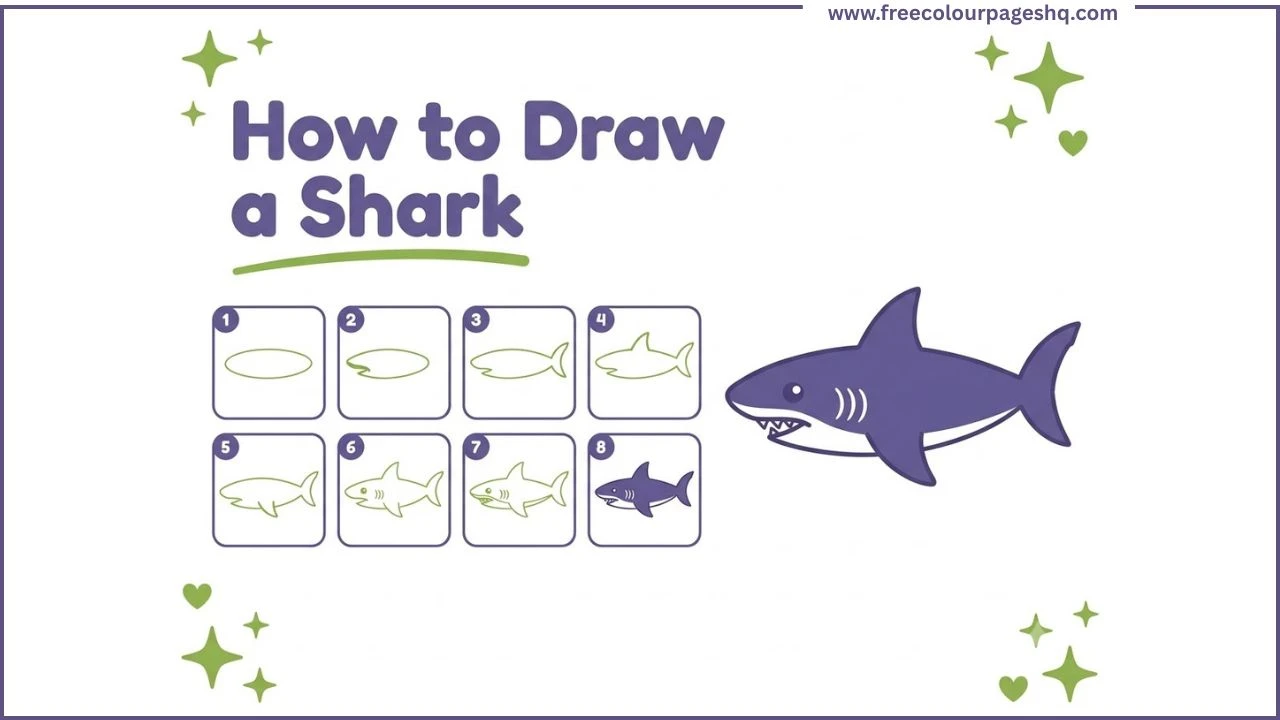
Something about sharks commands attention in a way that few other animals manage. They have been swimming the world’s oceans for approximately 450 million years, which means they existed before trees, before dinosaurs and before almost everything else that currently lives on land. They survived every mass extinction event since. Whatever sharks are doing, they are doing it correctly.
They are also one of the most satisfying animals to draw, because the shark body is built around a small number of very strong visual ideas. The torpedo body. The triangular dorsal fin. The crescent tail. The rows of teeth. Each of these elements is immediately recognisable and each one is achievable with basic drawing skills. This tutorial shows how to draw a shark step by step in eight stages, from a basic torpedo-body guide through to a fully detailed shark with fins, gills, teeth, belly line, and underwater context. It works for complete beginners, for kids of all ages and for anyone who wants a reliable shark drawing method.
What You Need
Pencil and eraser for the drawing stages. The torpedo guide shape drawn in the first step is meant to be erased before the final details are added. Coloured pencils, crayons or markers for the finished drawing.
How to Draw a Shark Step by Step
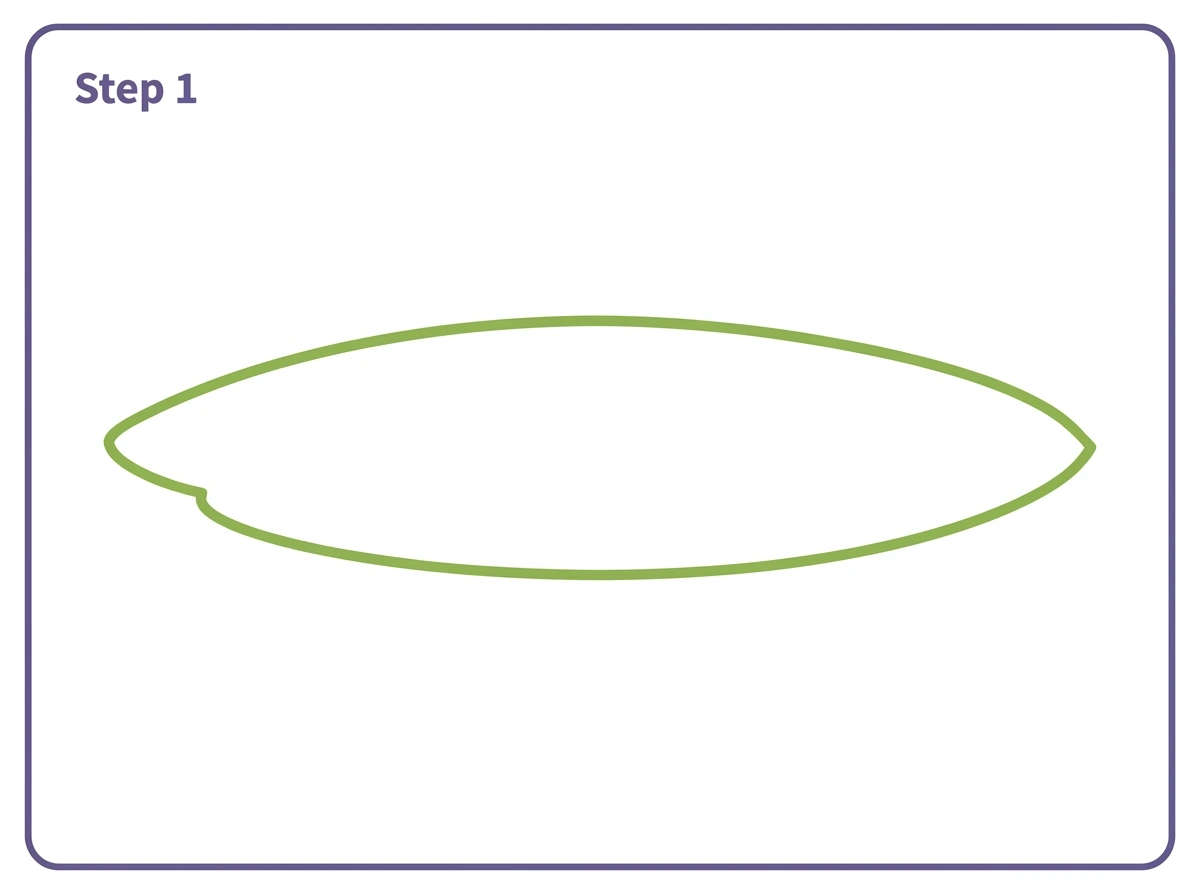
Step 1 — Draw the Torpedo Body Guide
Start in the center of the page and draw a large horizontal torpedo-shaped oval. The torpedo oval is longer than a regular oval and tapers to a blunter rounded point at the left end, which will become the snout, and a slightly sharper taper at the right end, which is where the tail will connect.
Draw this guide shape lightly. It will be partially erased and refined in later steps. The torpedo shape establishes the streamlined hydrodynamic form that makes a shark body instantly recognisable as a shark rather than a generic fish. Sharks evolved this shape over hundreds of millions of years because it is the most efficient form for moving through water at speed.
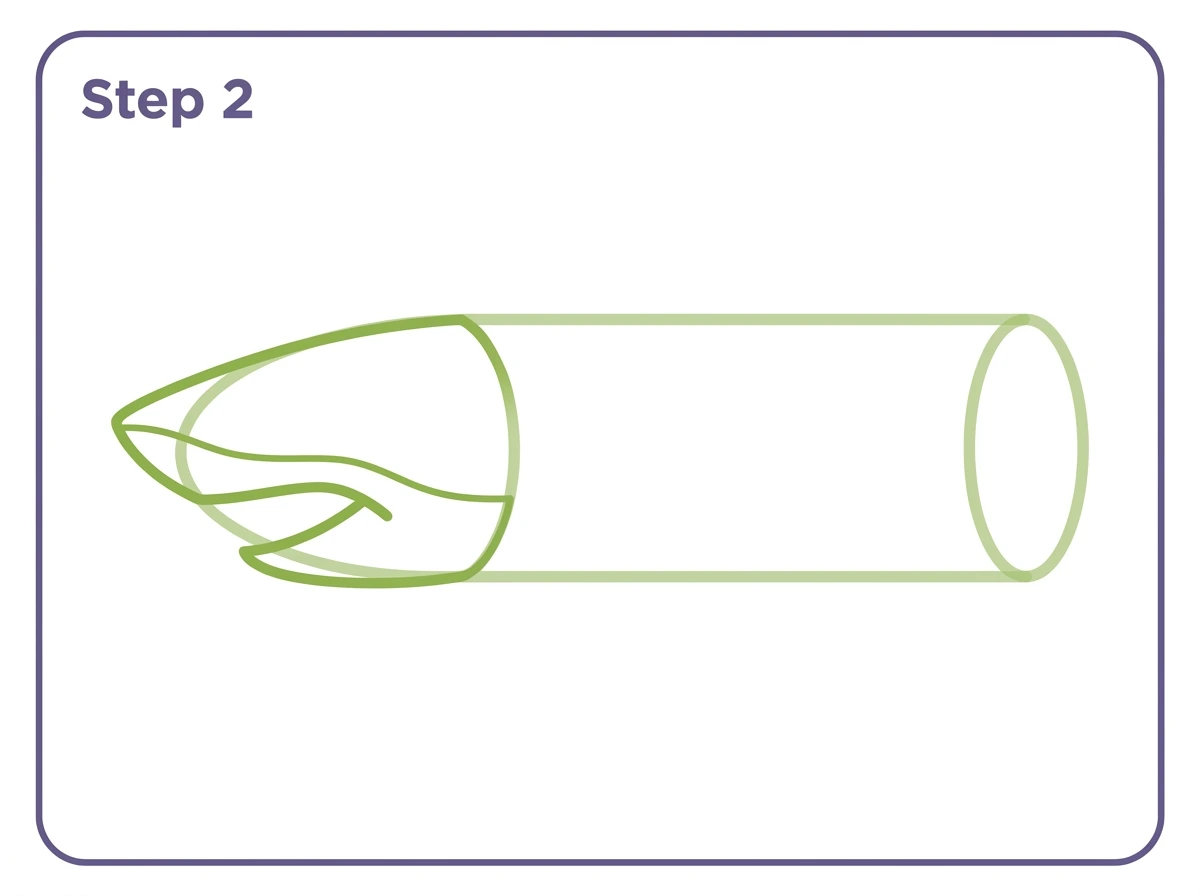
Step 2 — Refine the Mouth and Snout
At the left end of the torpedo oval, refine the blunt snout into a proper shark head shape. The shark’s snout is slightly pointed, not as dramatically pointed as a dolphin’s but considerably more angular than the rounded torpedo guide.
Below the snout, draw the mouth opening as a downward-curving line that opens toward the left, with the upper jaw above and the lower jaw below. Leave the mouth interior empty at this stage for the teeth to be added later. The mouth on a shark is positioned below and behind the snout rather than at the very tip, which gives the shark its characteristic slightly underslung jaw that is visible from the side.
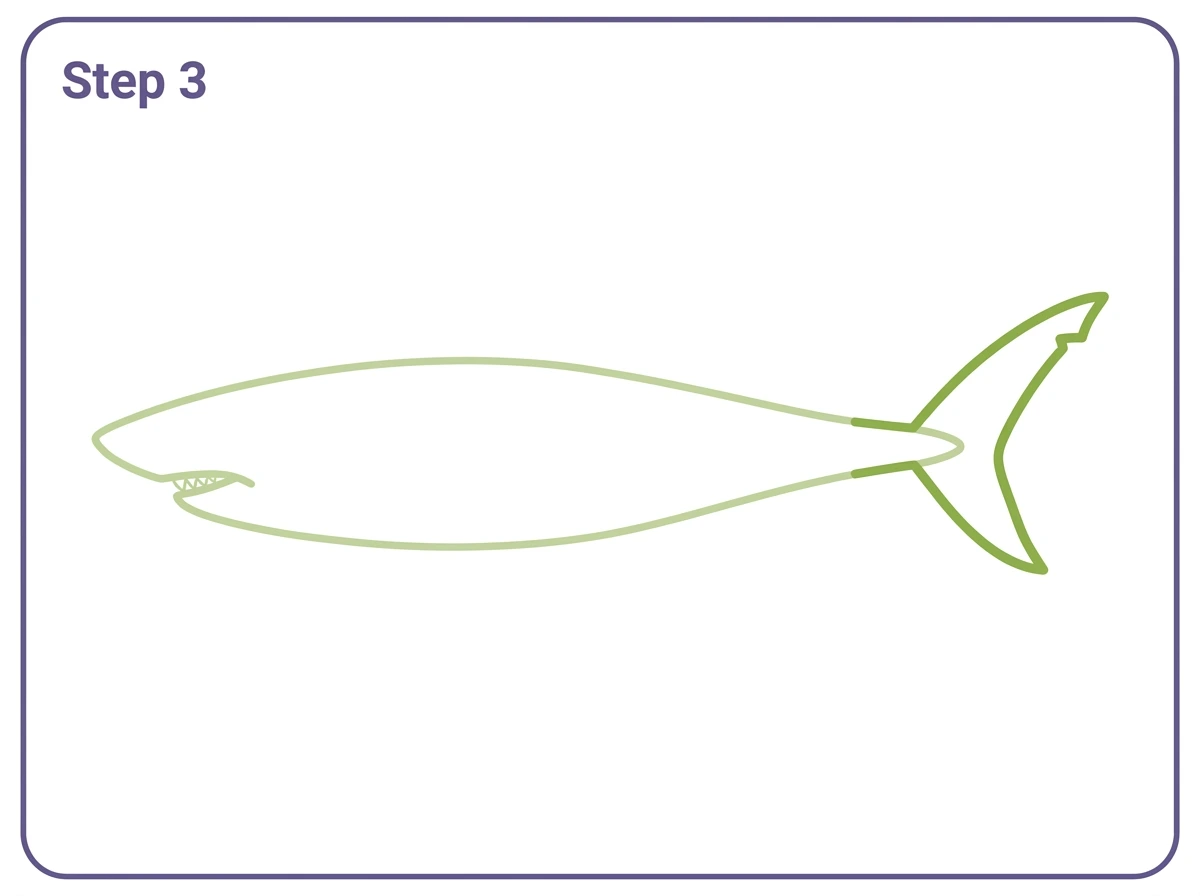
Step 3 — Add the Crescent Tail Fin
At the right end of the torpedo body, add the tail fin. The shark tail is a crescent or V-shape with one lobe pointing upward and one lobe pointing downward. The upper lobe is larger than the lower lobe, which is accurate to real shark anatomy and visible in every species from the great white to the whale shark.
The narrow connection point between the body and the tail is called the caudal peduncle. It is noticeably narrower than the rest of the body and creates the characteristic pinch before the tail spreads into its two lobes. This narrow waist before the tail is a consistent feature across all shark species and one of the details that makes a shark body drawing look anatomically convincing.
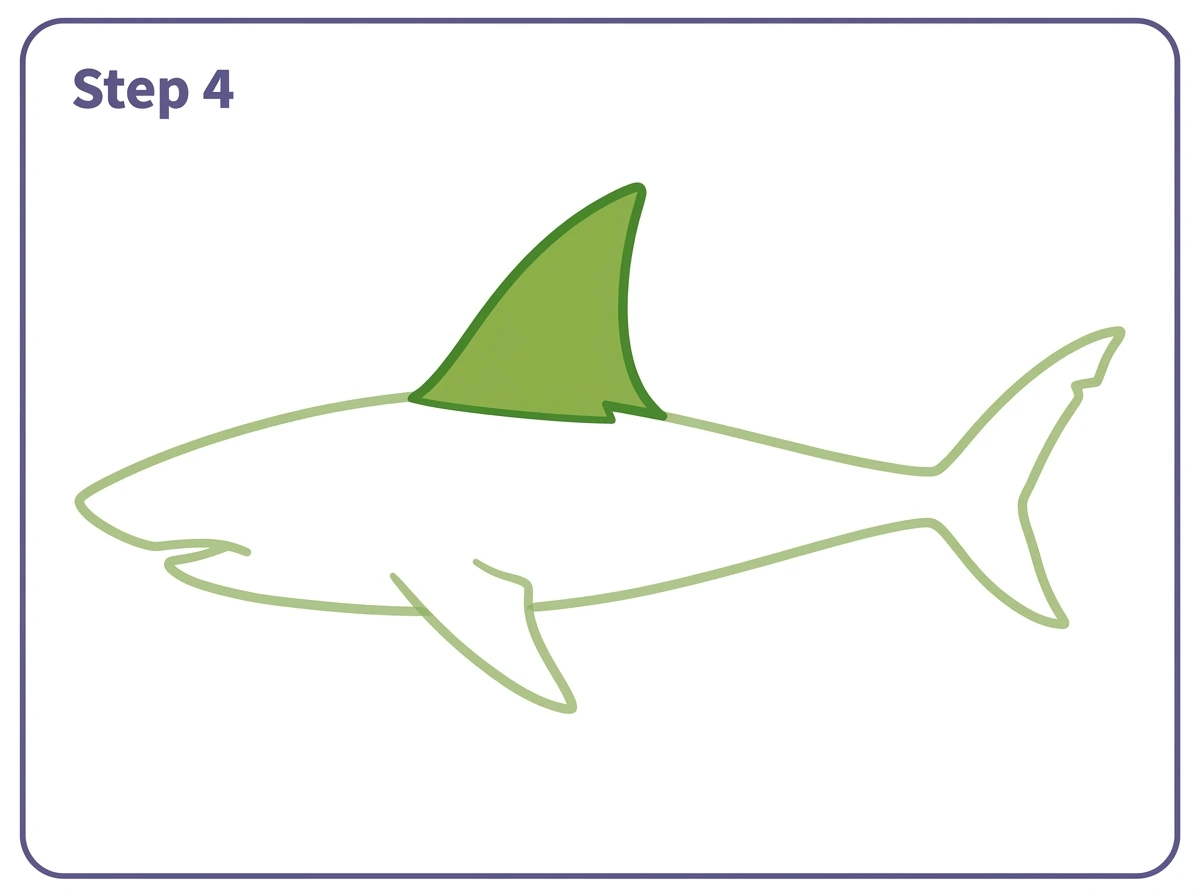
Step 4 — Draw the Large Dorsal Fin
On the top center of the shark body, draw the dorsal fin. This is the fin that appears above the water surface in films and that has become one of the most universally recognised animal silhouettes in the world.
The dorsal fin is a tall triangle with a slightly curved leading edge at the front and a longer, more gently angled trailing edge at the back. The base of the dorsal fin connects flush along the top of the body with clear connection lines at both ends. The height of the dorsal fin should be approximately one third of the total depth of the shark body from top to bottom, making it large enough to read clearly as the iconic shark fin.
Step 5 — Add the Pectoral Fins
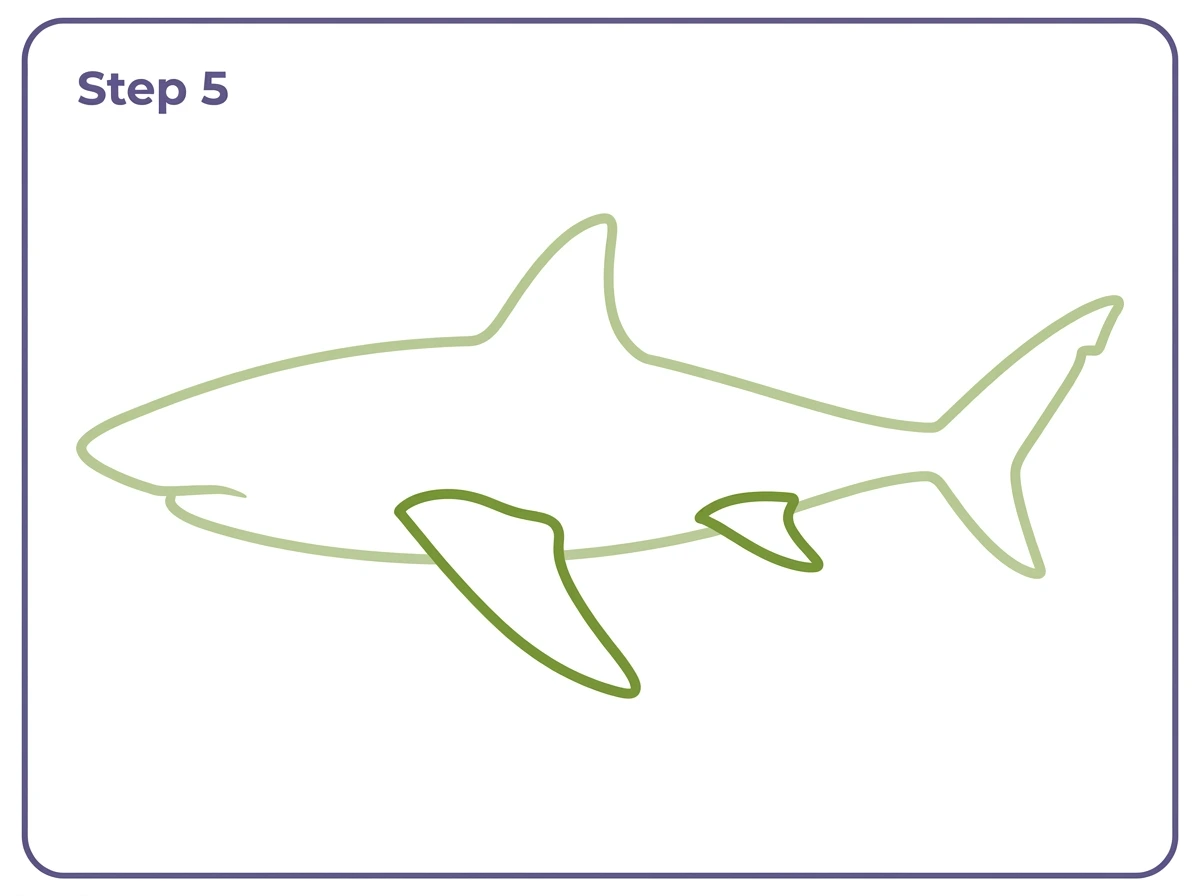
Draw two pectoral fins extending from the underside of the shark body. The large front pectoral fin is a swept-back shape, wide at the base where it joins the body and tapering to a rounded tip. It angles backward and slightly downward, suggesting the shark is moving forward.
A smaller second fin is visible further back along the lower body, also swept backward and proportionally smaller. These pectoral fins are the equivalent of arms on a shark and give it the ability to steer up, down and sideways as it swims. Their distinctive swept-back shape is another of the visual cues that immediately identifies a creature as a shark rather than a different type of fish.
Step 6 — Add the Eye and Gill Lines
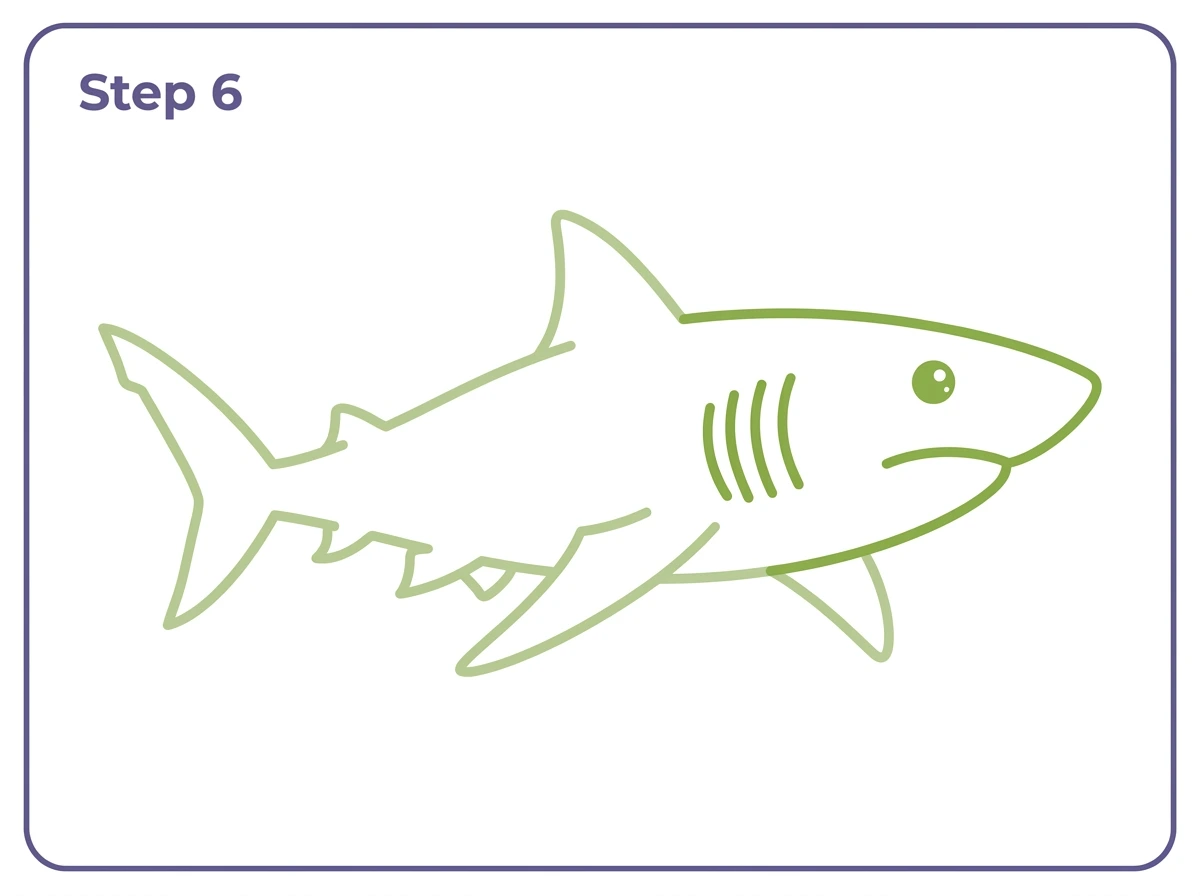
On the head area, draw a small round circle for the eye positioned in the upper portion of the head behind the snout, with a tiny pupil dot inside and a small white sparkle highlight. The shark’s eye is small relative to the size of the head, particularly on species like the great white, which gives it a cold, expressionless quality in drawings.
Behind the eye area, draw three or four short curved vertical lines representing the gill slits. Real sharks have five to seven gill slits on each side, which they use to extract oxygen from the water as it passes over the gills. The gill lines are one of the details that most clearly distinguishes a shark from a dolphin or a whale in a side-view drawing, because those air-breathing mammals have no gills.
Step 7 — Add Teeth and Belly Counter-Shading Line
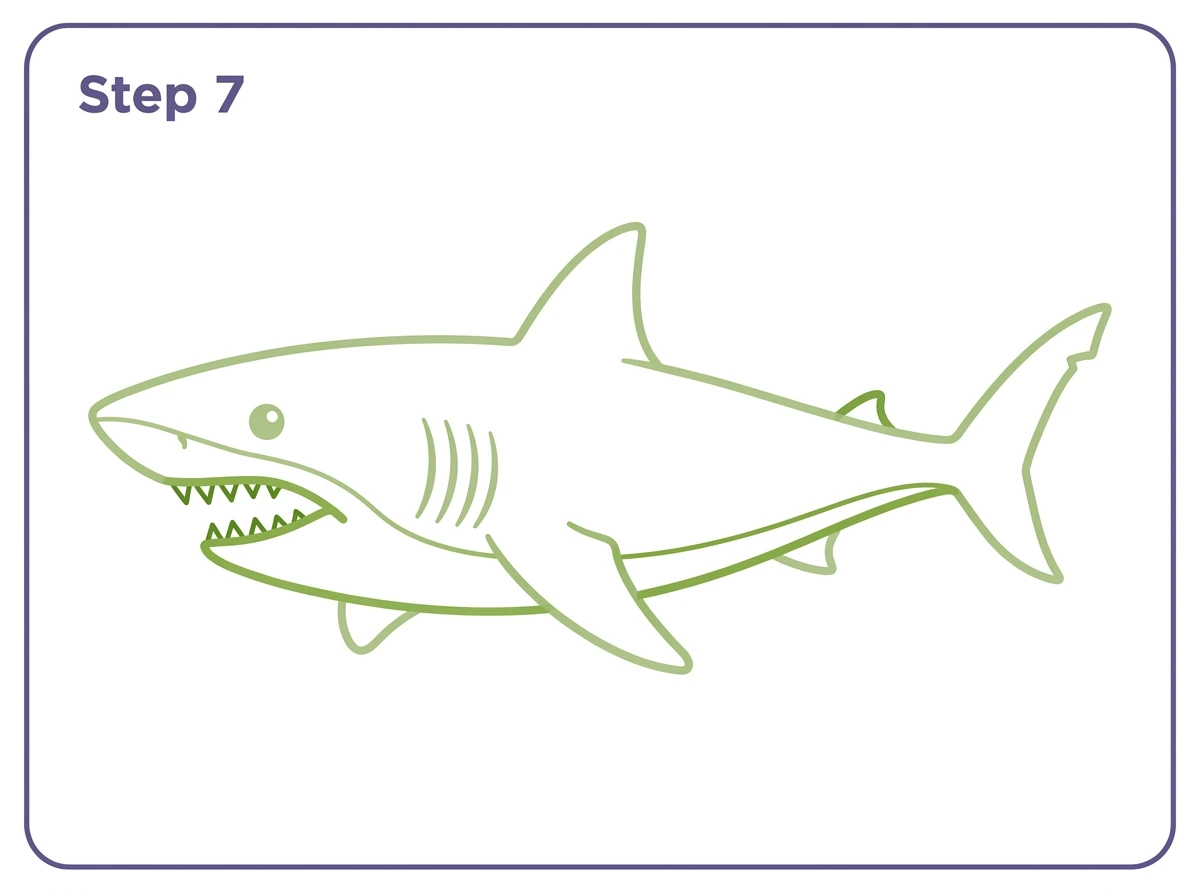
Inside the open mouth, add a row of small sharp triangular teeth visible along the upper jaw edge and a matching shorter row along the lower jaw. Shark teeth are one of the most remarkable dental structures in the animal kingdom. Sharks do not have a fixed set of teeth. New rows grow continuously from behind, moving forward to replace lost teeth throughout the shark’s lifetime. A great white shark may go through more than 30,000 teeth in a single lifetime.
Draw five or six triangular teeth along the upper jaw and three or four along the lower jaw. Keep them simple pointed triangles rather than individually detailed shapes.
Below the main body, draw a curved belly line running from just behind the mouth all the way to the base of the tail. This line separates the shark’s darker upper body from the lighter underside, a colouring pattern called counter-shading that appears in sharks, dolphins and many other marine animals. Counter-shading provides camouflage from above, where the dark back blends with the deep water, and from below, where the light belly blends with the bright surface.
Add a small second dorsal fin near the tail area and two small pelvic fins on the belly between the pectoral fins and the tail to complete the anatomically accurate fin arrangement.
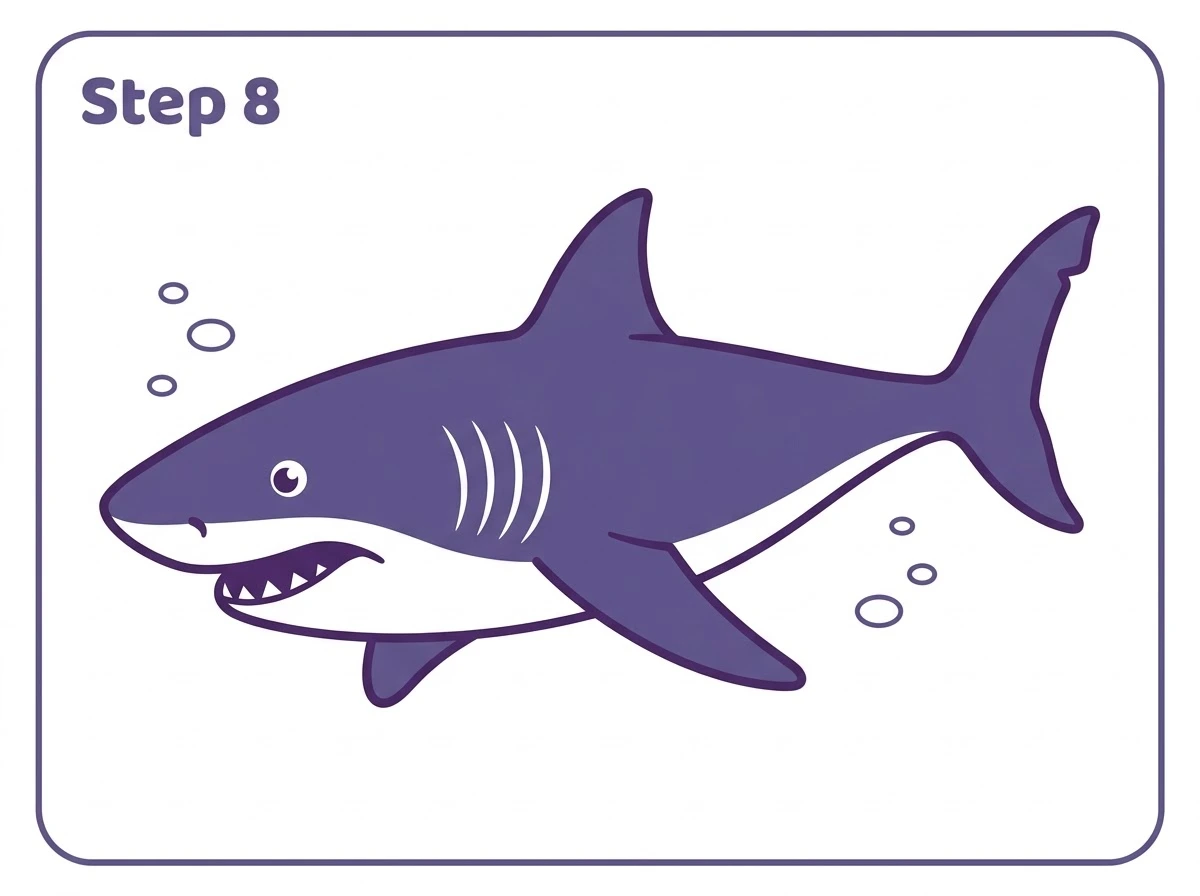
Step 8 — Colour the Drawing
The classic shark colouring uses the counter-shading principle established by the belly line in Step 7. The upper body, dorsal fin, pectoral fins and tail are a blue-grey or dark grey. The belly area below the curved belly line is pale grey or almost white.
This two-tone colouring is correct for most shark species including the great white, the bull shark, the tiger shark and many others. The great white has a particularly distinctive colouring because the contrast between the dark upper body and the white belly is very sharp with a clear dividing line, rather than the gradual blend that appears in some other species.
For a cartoon shark, any colour combination works. The design holds up in blue, purple, grey or any other colour scheme.
Add three or four small white oval bubble shapes around the shark to suggest it is swimming underwater. These simple additions immediately contextualise the drawing without requiring a full underwater background.
How to Draw a Great White Shark
The great white shark is the most searched shark drawing subject and the species that most people picture when they think of a shark. It has several specific visual features that distinguish it from a generic shark drawing.
The great white has a large, heavy-set body that is broader relative to its length than many other shark species. The snout is rounded and blunt rather than sharply pointed. The first dorsal fin is very large and distinctly triangular. The counter-shading contrast between the dark upper body and the white belly is particularly sharp and clearly defined.
For a great white shark step by step, follow the main tutorial above but make the body oval slightly broader and heavier, make the snout more rounded and less pointed, and draw the contrast between the dark back and white belly very sharply with a clean distinct line rather than a gradual blend.
How to Draw a Hammerhead Shark
The hammerhead shark is the most visually distinctive shark in the drawing category because of its extraordinary head shape. Instead of a pointed snout, the hammerhead has a wide flat head with an eye at each outer end, the whole head extending sideways beyond the body width in a characteristic T-bar or hammer form.
For an easy drawing of a hammerhead shark: follow the standard torpedo body construction but replace the pointed snout entirely with a wide flat rectangular extension at the front of the head, like a T-bar attached to the front of the torpedo. Draw an eye at each outer end of the T-bar. The rest of the body, dorsal fin, pectoral fins and tail, is the same as the standard shark tutorial.
The hammerhead’s unusual head is thought to improve its sensory ability. The eyes at the outer ends of the wide head give a nearly 360-degree vertical field of vision, and the wide surface of the head contains more of the electroreceptor organs that sharks use to detect the electric fields produced by the muscle movement of prey.
How to Draw a Whale Shark
The whale shark is the largest fish in the ocean, capable of growing to over twelve meters in length. Despite its enormous size it feeds almost entirely on tiny plankton, krill and small fish, filtering them from the water through its wide mouth as it swims slowly near the surface.
A whale shark drawing is actually one of the easier shark drawings because the body proportions are somewhat different from predatory sharks. The whale shark has a very wide flat head with a wide terminal mouth at the very front rather than the underslung jaw of a great white. The body is large and rounded rather than the sleek torpedo of a fast predatory shark.
For a whale shark from above, draw a wide flattened teardrop shape seen from a bird’s eye perspective, wider at the front and tapering toward the tail. The characteristic spotted pattern of white dots and lines on the dark blue-grey back is the whale shark’s most distinctive visual feature and one of the most satisfying patterns to add as a decoration in the final colouring step.
How to Draw a Baby Shark
A baby shark or shark pup drawing uses the same torpedo body construction as the adult shark but with adjusted proportions. The head is slightly larger relative to the body, suggesting youth. The fins are slightly oversized relative to the body length, again suggesting a young animal that has not yet grown fully into its features.
A cute baby shark or kawaii shark takes these adjustments further. The head becomes very large and round relative to the body. The eyes become oversized with large sparkle highlights. The teeth become fewer and less threatening. The overall impression is friendly and appealing rather than fearsome. This style is popular with young children who love sharks but find the realistic aggressive shark design less appealing.
Shark Fin Drawing Tips
The dorsal fin is the most iconic part of any shark drawing and worth spending extra time on. The key distinction between a convincing dorsal fin and a generic triangle is the leading edge. A real shark’s dorsal fin has a very slightly curved concave leading edge rather than a perfectly straight line. This subtle curve is one of the first things that marks a shark drawing as drawn from observation rather than from memory of a generic triangle.
The trailing edge of the dorsal fin is longer and more gradual than the leading edge, angling back toward the body at a shallower angle. This asymmetry between the steep leading edge and the gradual trailing edge is characteristic of shark dorsal fins across most species.
The tail fin is also asymmetrical in a specific way. The upper lobe is larger than the lower lobe. This heterocercal tail shape, where the spine extends into the upper lobe, is characteristic of sharks and distinguishes their tail shape from the symmetrical tail fins of bony fish.
Fun Facts About Sharks for Kids
Sharks are older than trees. The earliest shark-like fish appeared in the fossil record approximately 450 million years ago. The first forests appeared around 385 million years ago. Sharks are not just older than dinosaurs. They are older than forests.
Some shark species can detect a single drop of blood diluted in an Olympic-size swimming pool. The highly sensitive electroreceptors called ampullae of Lorenzini allow sharks to detect the tiny electrical fields produced by the muscle movement of prey, even when the prey is buried under sand.
Sharks never run out of teeth. New tooth rows continuously move forward from behind throughout the shark’s life. Some species produce a new set of teeth every one to two weeks.
A group of sharks is called a shiver. This is one of the more evocative collective nouns in the animal kingdom and accurately describes the experience of encountering a group of sharks in the open ocean.
The dwarf lantern shark, the smallest shark species, is small enough to fit in a human hand and measures approximately twenty centimeters as a fully grown adult. The whale shark at the other extreme can reach over twelve meters, making the size range within the shark family extraordinary
Colouring Tips for Shark Drawings
The counter-shading colouring of most shark species, dark above and pale below, is one of the most effective and straightforward colouring approaches in animal drawing. The key is the sharpness of the transition between the two tones. In a cartoon drawing a clean sharp line works best. In a more realistic drawing a very gradual blend from dark grey at the spine to pale grey at the belly produces a more naturalistic result.
The gill slits on a coloured shark are typically shown as slightly darker than the surrounding body, suggesting the groove in the skin. The eye in a realistic shark drawing is dark overall, the iris and pupil both very dark, with only the white highlight dot providing contrast.
For the underwater bubble details, white oval dots with a thin dark outline read clearly as air bubbles in any colour scheme and take only a few seconds to add.
Printable Shark Outline PDF
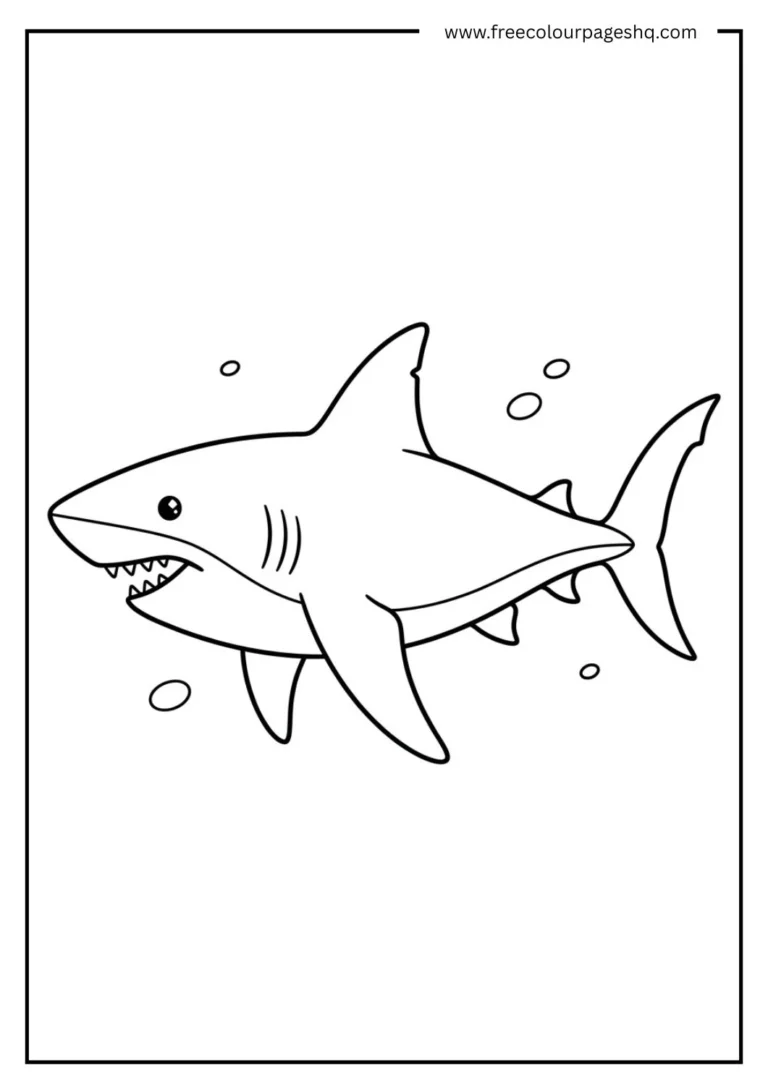
A printable shark outline based on the finished Step 8 design is available as a free download below. Print it on plain white paper and use it as a colouring page, a drawing reference or a tracing guide. The outline includes all the completed line details from the tutorial including the fins, gill lines, teeth and belly line.
Explore more Free Printable Coloring Collections
Looking for more engaging activities? Check out these free printable coloring pages fun for kids, useful for teachers, relaxing for adults, and inspiring for designers.
FAQ
What is the easiest way to draw a shark?
Start with a horizontal torpedo-shaped oval for the body. Refine the left end into a pointed snout with an open jaw. Add a crescent tail at the right end. Draw a large triangular dorsal fin on top and two swept-back pectoral fins below. Add a round eye, three gill line slits, triangular teeth and a belly counter-shading line. This eight-step method is reliable for all ages.
How do you draw a shark for kids?
Use the torpedo oval method but simplify each element. Larger rounder eye, fewer teeth shown as simple triangles, one large pectoral fin rather than two. Give the shark a friendly slight smile rather than a threatening open jaw. This simplified version takes about ten minutes and produces a recognisable friendly-looking shark.
How do you draw a hammerhead shark?
Follow the standard torpedo body construction but replace the pointed snout with a wide flat rectangular T-bar extension at the front of the head. Place an eye at each outer end of the T-bar. The rest of the body including the dorsal fin, pectoral fins and tail is the same as a standard shark drawing.
How do you draw a whale shark easy?
Draw a wider, more rounded body oval than a standard shark, heavier at the front and tapering at the back. Replace the underslung jaw with a wide terminal mouth at the very front of the head. Draw the body larger and more rounded overall. Add the characteristic spotted pattern of white dots and dashes in the final colouring step.
How do you draw a shark fin?
Draw a tall triangle with a slightly curved concave leading edge and a longer more gradually angled trailing edge. The leading edge is steep and slightly curved inward. The trailing edge angles back to the body at a shallower angle. This asymmetrical shape is more convincing than a simple equilateral or isosceles triangle.
What colour are sharks?
Most shark species use counter-shading. The upper body is a blue-grey or dark grey and the belly is pale grey or white. The great white shark has a particularly sharp contrast between the dark back and the white belly. Some species have distinctive patterns including the whale shark’s spotted pattern and the zebra shark’s striped juvenile pattern.