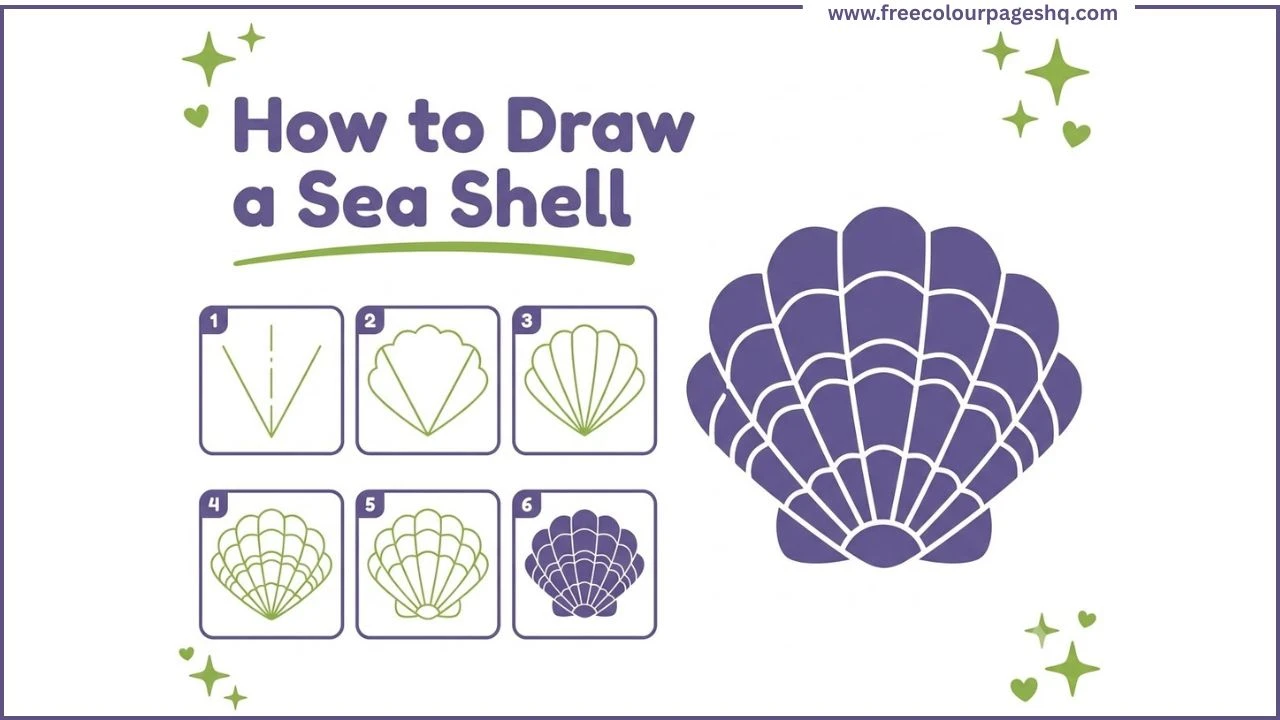
Finding a shell on the beach is one of those small specific pleasures that never really loses its appeal no matter how old you are. You pick it up, turn it over, notice the spiral or the fan shape or the ridged texture, and for a moment the complexity of the thing is genuinely surprising. Shells are not simple objects. They are precise geometric structures built by living creatures over months and years.
This makes them wonderful subjects for drawing, because their mathematical regularity means the structure can be learned and reliably reproduced. Once you understand how a scallop fan works you can draw it consistently. This tutorial shows how to draw a classic scallop shell step by step in six stages. It works for beginners, for kids and for anyone who has wanted to draw shells but was not sure where to start.
What You Need
A pencil and eraser. The V-shape base guide in Step 1 is temporary. Coloured pencils, markers or crayons for the finished drawing.
How to Draw a Sea Shell Step by Step
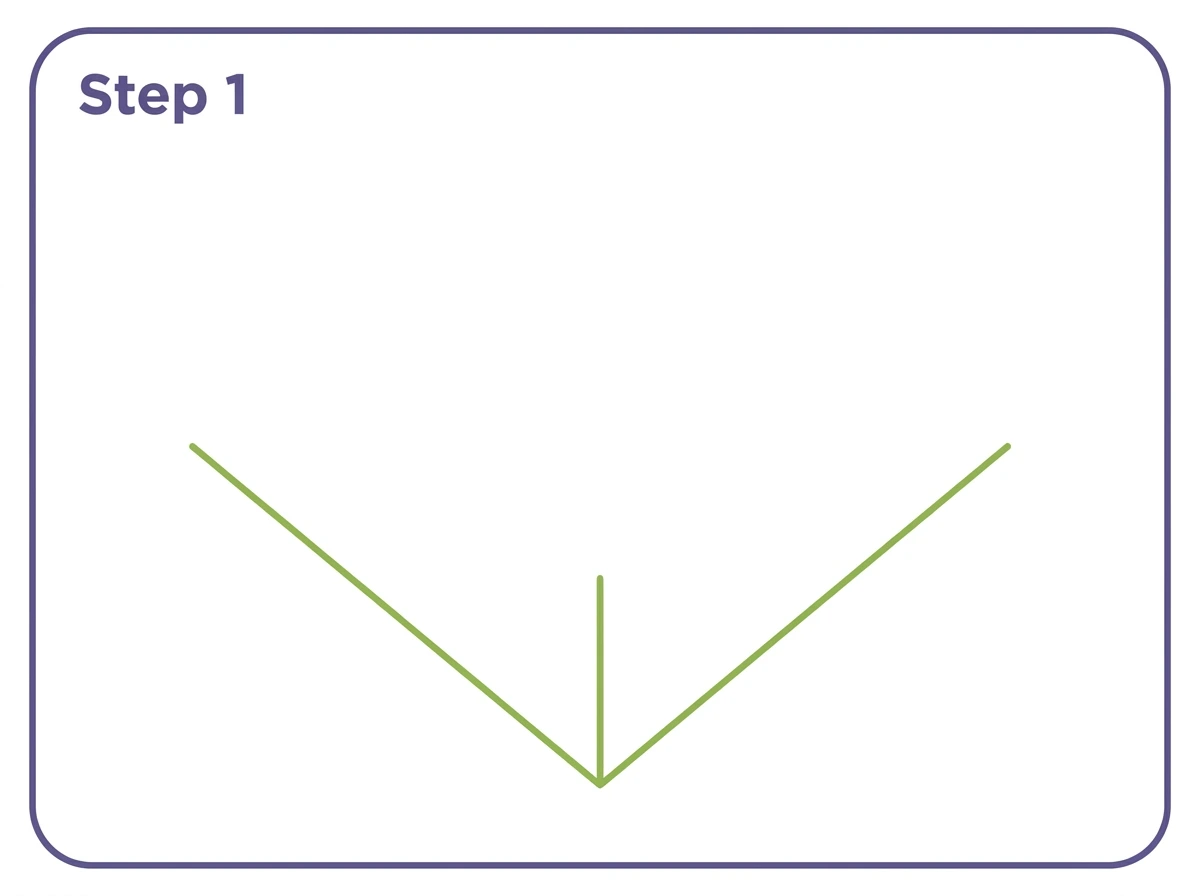
Step 1 — V Shape Base and Axis
Start in the lower center of the page. Draw a symmetrical V shape with its point at the bottom center and two arms angling upward and outward at roughly 45 degrees.
Through the point at the bottom of the V, draw a short central vertical axis line extending upward. This line establishes the center of the shell fan and ensures the ribs on the left and right match each other.
Everything in this shell drawing radiates upward and outward from this single bottom point. Getting the V angle right determines the proportions of the whole shell.
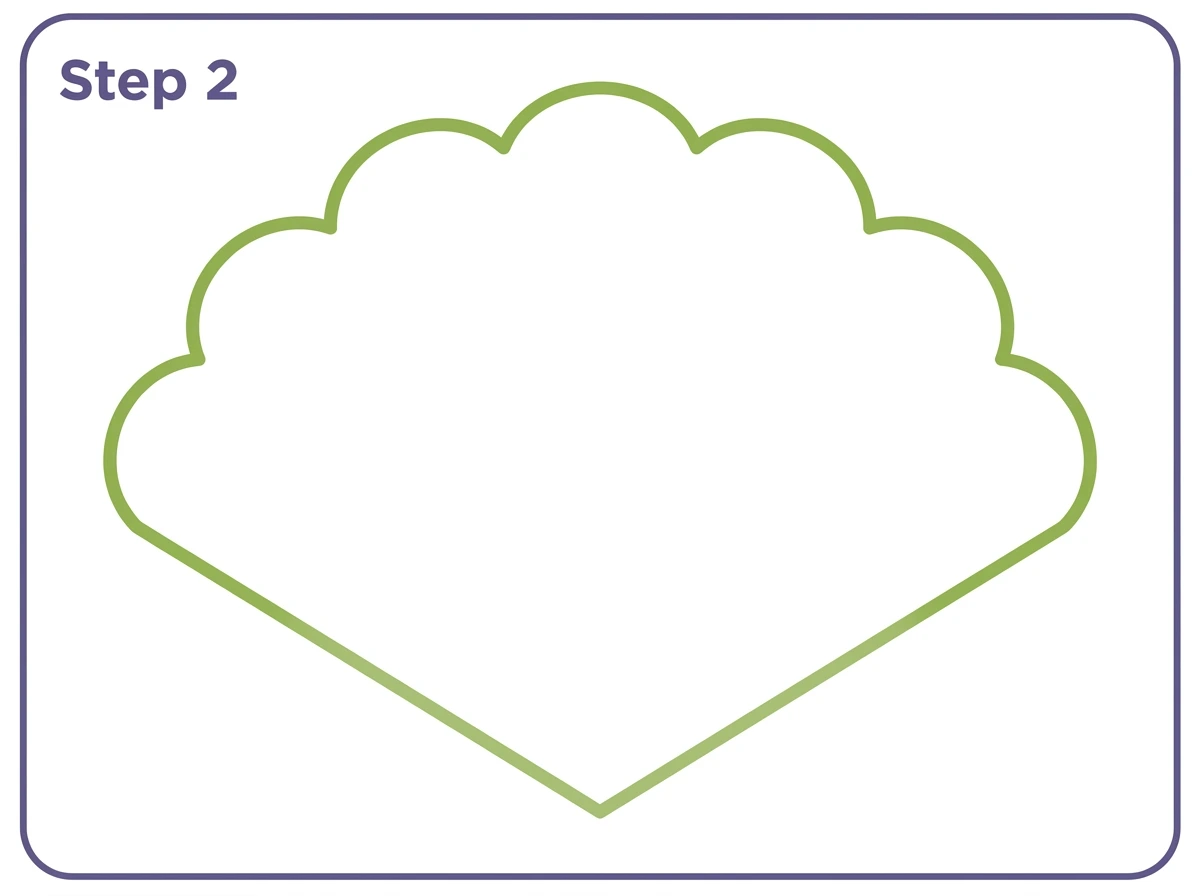
Step 2 — Scalloped Fan Outline
Draw a wide curved arc connecting the tip of the left V arm to the tip of the right V arm. This arc forms the top outer edge of the shell.
The arc is not a smooth semicircle. It has five or six gentle rounded bumps along its length, the characteristic scalloped edge that gives the scallop shell its name. Each bump corresponds to one rib that will be added inside the shell.
The overall outline now forms the classic fan or half-circle shape of the scallop shell, wider than it is tall, with the V point at the bottom and the scalloped arc across the top.
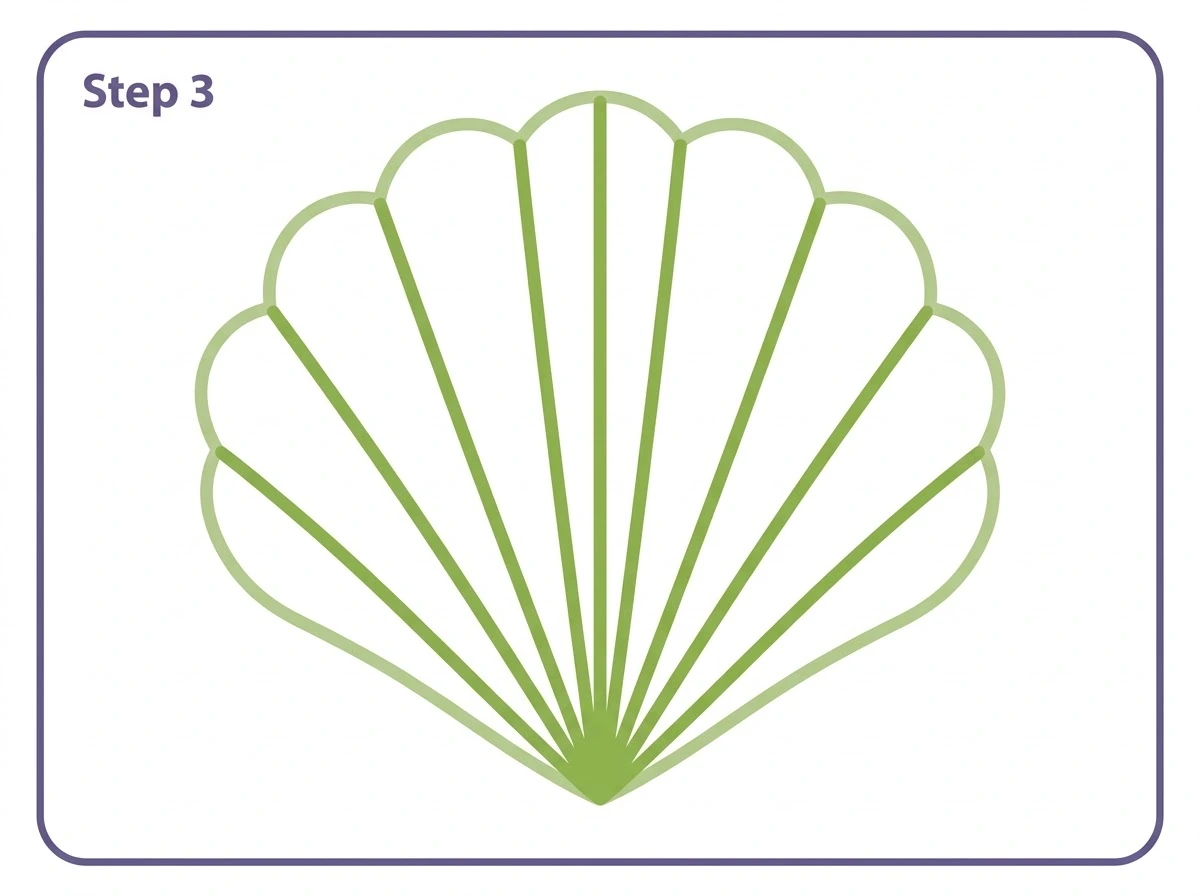
Step 3 — Radiating Rib Lines
From the bottom V point, draw seven or eight straight or very slightly curved rib lines radiating upward and outward toward the scalloped outer edge.
The central rib goes straight up along the axis line. The outer ribs angle progressively further left and right. Each rib ends at one of the peaks or valleys of the scalloped outer edge.
These ribs are the most characteristic feature of the scallop shell and the detail that most immediately distinguishes a drawn shell from a generic fan shape. Draw them evenly spaced, fanning out symmetrically from the base point like the spokes of a folding fan.
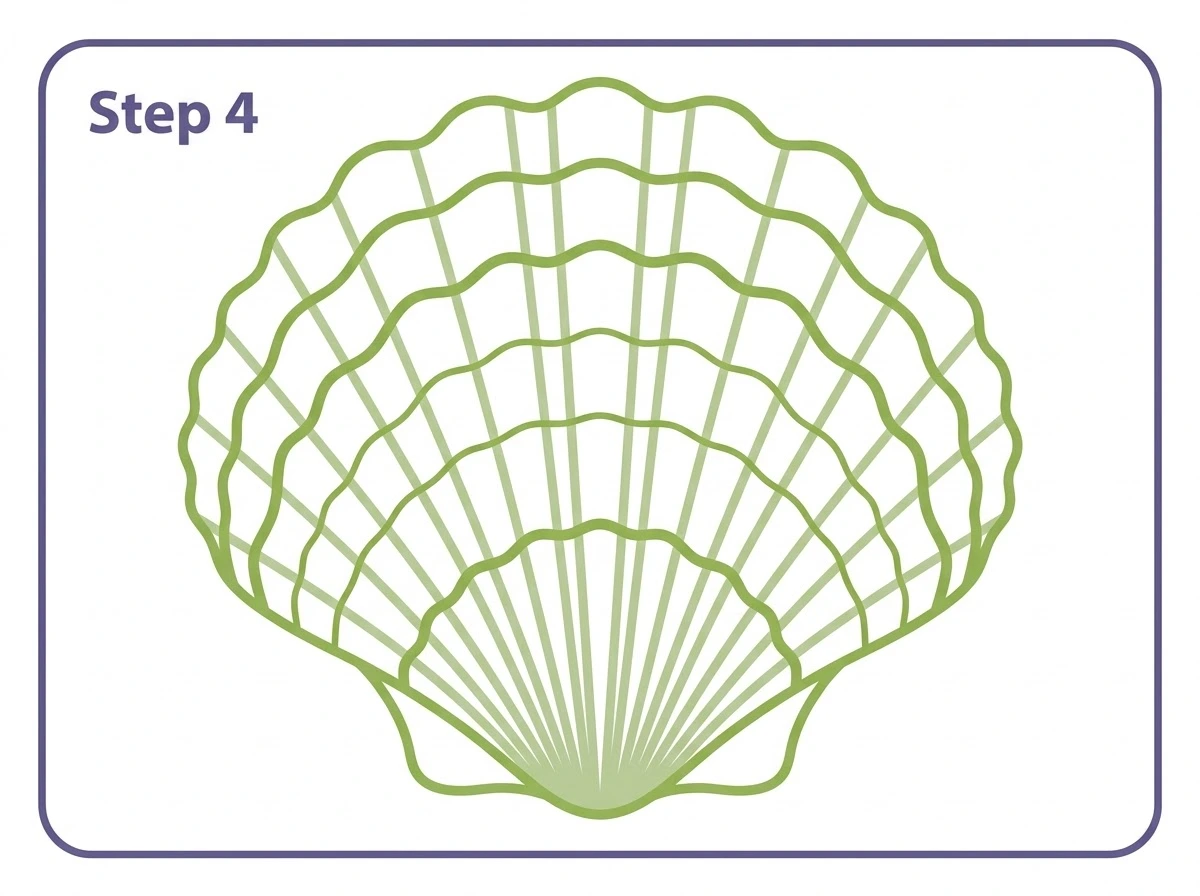
Step 4 — Growth Ring Lines
Add two or three wavy horizontal lines crossing the interior of the shell at different heights. Each line runs roughly parallel to the scalloped outer edge, curving gently between each pair of ribs to follow the rounded surface.
These lines represent the growth rings of the shell, the marks left by each stage of new shell material added as the mollusk grew. They cross all the radiating ribs and create the grid-like surface pattern characteristic of real scallop shells.
The upper growth ring sits near the outer edge. The lower growth ring sits closer to the base. Together they give the shell surface texture and a sense of three-dimensional form.
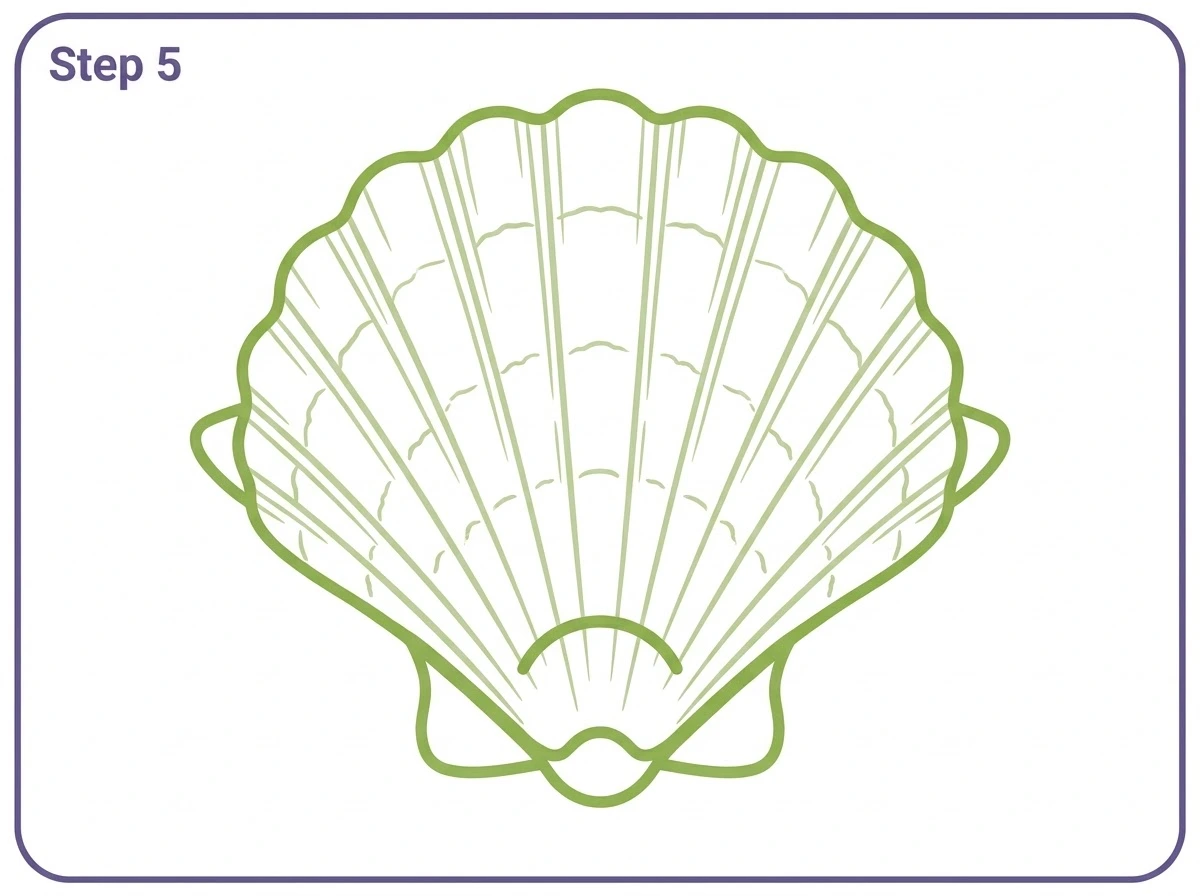
Step 5 — Hinge Detail and Ear Wings
At the base of the shell where all the ribs meet the V point, add a small upward curving arc separating the shell body from the hinge area below it.
At the upper corners where the V arms meet the scalloped fan outline, add two small triangular or rounded ear shapes, called auricles, extending slightly outward. These small wing projections are visible on real scallop shells at the hinge corners and are the detail that makes a shell drawing look observed from reality rather than invented.
A small rounded lobe at the very bottom V point completes the hinge.
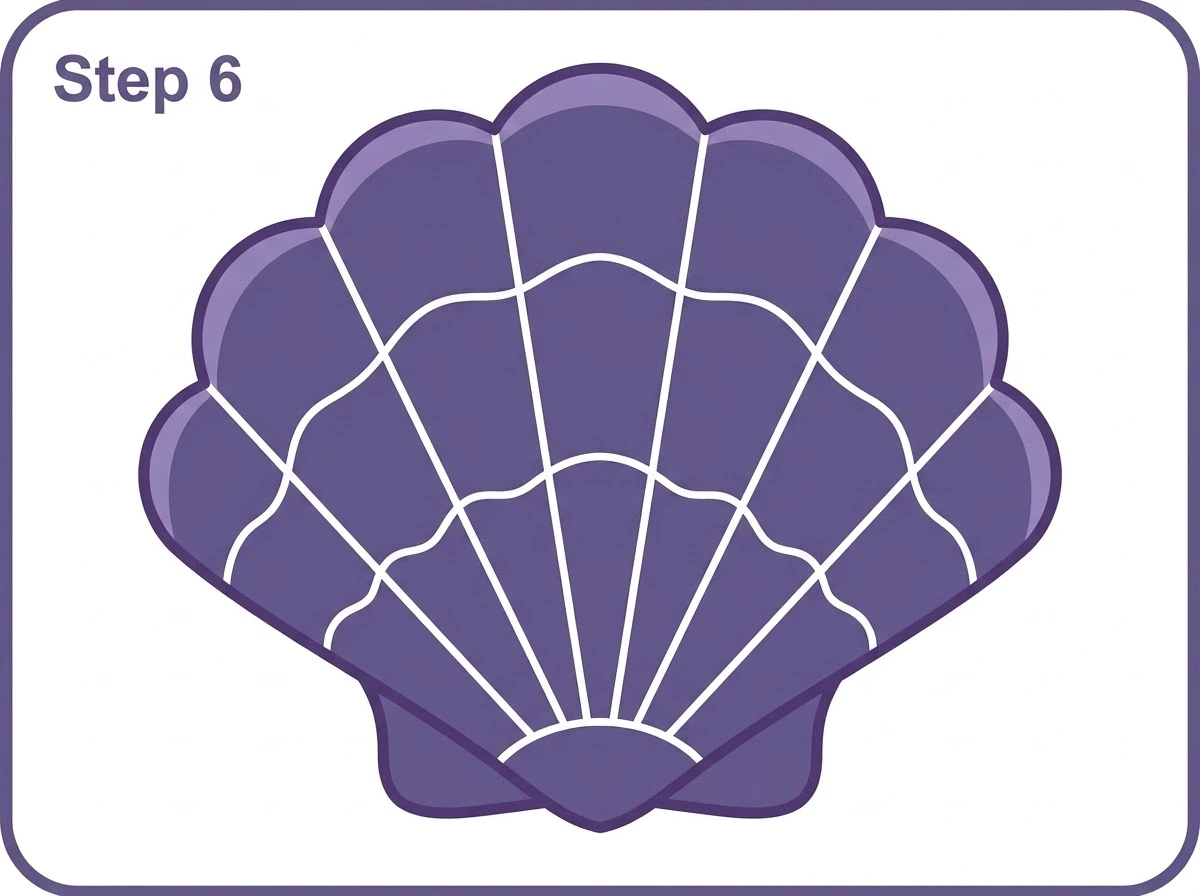
Step 6 — Colour the Shell
Seashells come in a remarkable range of colours. Real scallop shells are typically cream, tan, brown, orange or purple-pink, often with alternating darker and lighter stripes following the rib pattern.
For a simple coloured scallop shell, warm cream or pale orange for the main body with slightly darker tan along the rib lines works well. The deeper shadow areas near the base and between the lower ribs are a warm brown.
The growth ring areas can be slightly lighter than the main body colour, suggesting the different density of shell material deposited at each growth stage.
A white or near-white highlight along the crest of each rib suggests the rounded surface catching the light.
How to Draw a Sea Shell Easy for Kids
A simplified shell for young children reduces the tutorial to four elements. A V shape base. A bumpy arc across the top. Four or five straight lines from the V point to the bumps. A colour.
This four-element version takes under five minutes and produces an immediately recognisable shell. The bumpy arc is the most important element because it is the visual cue that says shell rather than fan or triangle.
How to Draw Different Types of Seashells
Not all shells look like a scallop. Different shell species have very different visual characters and each is worth learning as a drawing subject.
A nautilus shell seen from the front shows a beautiful flat spiral. Start with a small tight circle at the center. Draw a slightly larger curved chamber around it. Continue adding progressively larger curved chambers, each sweeping around the outside of the previous one, until the spiral fills the desired size. The outer edge of each chamber is the inner edge of the next. The spiral of a nautilus follows the golden ratio, which is why it has such a satisfying mathematical elegance.
A conch shell has a tall pointed spiral at the top, a wide flared lip at the opening and a generally elongated form wider at the lip end. Start with a tall pointed cone shape for the spire. Add the wide flared opening at the base of the spire. Draw curved lines along the surface suggesting the spiral growth.
A cowrie shell is a smooth polished oval with a flattened base. It is one of the simplest shell shapes to draw. An oval for the top surface, a flat oval for the base with a toothed central opening line. Smooth and symmetric with no radiating ribs.
A conical limpet shell is a simple rounded cone. Draw a circular base and a gentle domed cone rising from it. Add circular growth rings parallel to the base.
Shell Anatomy Worth Knowing
Understanding a few basic shell anatomy terms makes drawing shells considerably easier because it gives you names for the parts you are drawing.
The umbo is the point at the base of a scallop shell where all the ribs converge. It is the oldest part of the shell, the first tiny shell the creature grew.
The auricles are the small ear-shaped projections at the upper corners of a scallop shell on either side of the umbo. Not all scallops have them equally developed.
The ribs, more precisely called costae, run from the umbo to the outer edge and create the fan pattern.
The growth lines, called commarginal lines, run parallel to the outer edge and represent each growth stage.
The outer lip is the most recently grown edge of the shell, often the freshest and most brightly coloured.
Knowing these terms is not necessary for drawing a shell but it explains why the parts are where they are, which makes their placement in the drawing feel less arbitrary.
Colouring Tips for Shell Drawings
The most common mistake in colouring a shell drawing is using a single flat colour. Real shells have subtle gradations of tone that give them their three-dimensional quality.
The ribs of a scallop shell are rounded ridges. Light falls on the top of each ridge and shadow falls in the groove between ridges. A slightly darker line in each groove and a slightly lighter area on each ridge crest produces this effect simply.
The hinge area near the base is typically the most worn and most darkly stained part of a real shell, because it was the oldest and most exposed. Darkening the base area gives the drawing a sense of age and realism.
For a colourful shell inspired by tropical species, teal and turquoise for the main body with lime green or coral accents in the inner areas produces a vivid result that references actual shell species from warm water environments.
Fun Facts About Seashells for Kids
A seashell is not just a home. It is the actual outer body of the animal that lives inside it, secreted from glands in the animal’s mantle. When the animal dies, the shell remains.
The nautilus is one of the oldest shell designs on Earth. Nautilus relatives have been making spiral shells for approximately 500 million years, surviving every mass extinction event including the one that ended the dinosaurs.
Some shells are very rare. The glory of the sea cone snail shell was considered the rarest shell in the world until the mid-twentieth century, with fewer than a dozen known specimens. A human murder was committed over one specimen in the eighteenth century.
Hermit crabs do not make their own shells. They find empty shells made by other creatures and move into them, changing shells as they grow. A hermit crab choosing a new shell tests it carefully for size and condition before moving in.
Cowrie shells were used as currency across Africa, South Asia, East Asia and among some Indigenous American peoples for thousands of years. More than thirty billion cowrie shells have been found at archaeological sites.
Printable Shell Outline PDF
A printable seashell outline based on the finished Step 6 design is available as a free download below. Use it as a colouring page, a drawing reference or a craft template.
Explore more Free Printable Coloring Collections
Looking for more engaging activities? Check out these free printable coloring pages fun for kids, useful for teachers, relaxing for adults, and inspiring for designers.
FAQ
What is the easiest way to draw a sea shell?
Draw a V shape with the point at the bottom. Draw a bumpy scalloped arc from the left arm tip to the right arm tip. Draw radiating rib lines from the V point to the outer edge bumps. Add two or three wavy growth ring lines crossing the ribs. Add small auricle ear shapes at the upper corners and a hinge arc at the base. Colour the shell.
How do you draw a seashell for kids?
Draw a V shape base. Add a bumpy curved arc across the top connecting the V arm tips. Draw four or five straight lines from the V point to the bumps. Colour the shell in warm cream, tan or pink. This simplified four-element version takes under five minutes.
What are the different types of seashells you can draw?
The most common drawing subjects are the scallop fan shape, the nautilus spiral, the pointed conch with its flared lip, the smooth polished cowrie oval and the simple cone of a limpet. Each has a distinct visual character and its own drawing construction method.
How do you draw a realistic seashell?
Use an HB pencil for the initial light construction. Add the rib and growth ring structure. Then shade with a 2B or 4B pencil, darkening the grooves between ribs, the hinge area and the shadow side while keeping the rib crests light. A soft eraser used to lift highlights from the rib crests adds the final polish to a realistic shell drawing.
What colours do seashells come in?
Scallop shells are cream, tan, orange, brown and purple-pink. Cowries are pale cream with brown spots. Conch shells range from pale cream outside to vivid pink or orange inside. Nautilus shells are white with brown spiral stripe markings. Tropical species include vivid teal, turquoise and coral tones.