My daughter asked me once why lions have such big manes. I told her it was to make them look more impressive, which is technically true but also feels like an answer a lion would give if you asked it directly. The mane is the thing that makes a lion immediately recognisable from any angle and any distance, and it is also the thing that makes drawing a lion so satisfying. You draw a big fluffy circle and the result already looks like a lion before you have added a single face feature. No other animal has that quality.
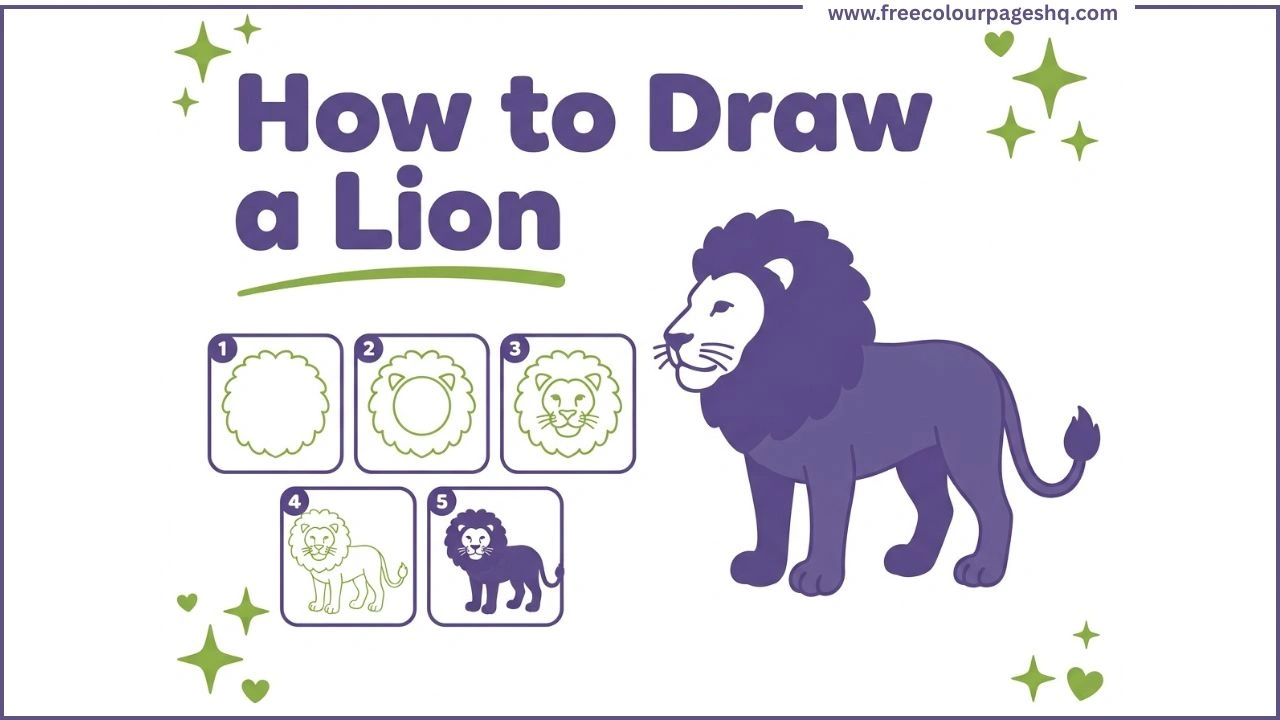
This tutorial shows how to draw a cartoon lion step by step in five stages. The method starts with the mane, works inward to the face, adds the features and then builds the body below. It works for kids in Class 1 and up, for complete beginners and for anyone who wants a reliable lion drawing method they can repeat and refine. All you need is a pencil, an eraser and something to colour with at the end.
What You Need
Pencil and eraser for the drawing stages. Crayons, coloured pencils or markers for colouring the finished lion. Plain white paper is fine. No special art supplies are required.
How to Draw a Lion Step by Step
Step 1 — Draw the Mane
Start in the upper center of the page and draw a large circle with wavy, bumpy edges rather than a smooth outline. Think of it as drawing a cloud shape or a pom-pom shape. The bumpy edges are what create the look of thick, fluffy fur. Do not worry about making this circle perfectly round. A slightly irregular shape looks more natural and actually more convincing as a mane than a geometric circle would.
Make this mane circle large. It should take up roughly the upper third of the page, leaving space below for the body.
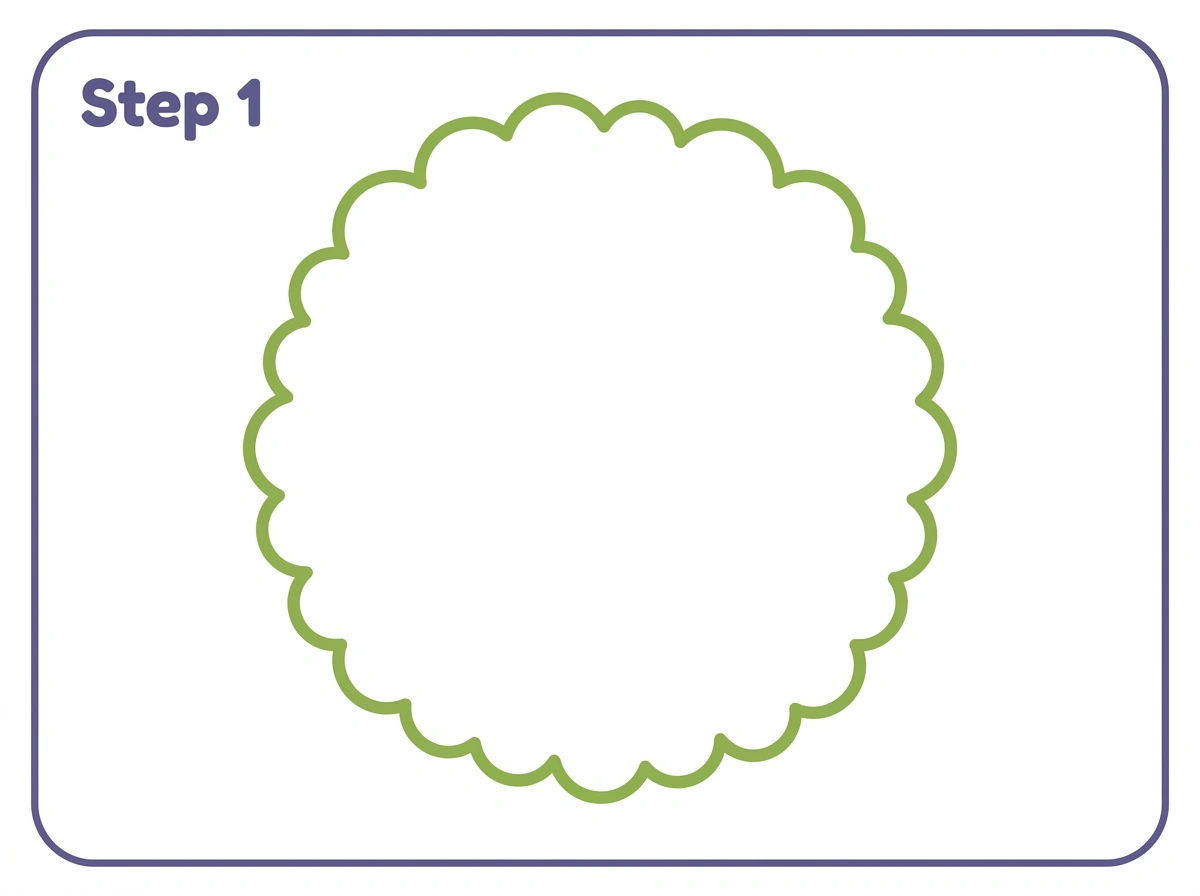
The mane is the defining feature of a male lion and the first thing anyone notices when they see one. Starting with it means the drawing looks like a lion from the very first step, which is motivating for younger children.
Step 2 — Draw the Face and Ears
Inside the mane circle, draw a smaller smooth round circle for the lion’s face. Position it slightly toward the upper half of the mane so there is more mane visible below the face than above it. The face circle should be noticeably smaller than the mane and sit comfortably inside it with mane visible all around.
Then add two small rounded triangle ear shapes peeking out from the top of the mane circle, one on either side. Lion ears are small and rounded, not sharp like cat ears. They should barely clear the top of the mane outline.
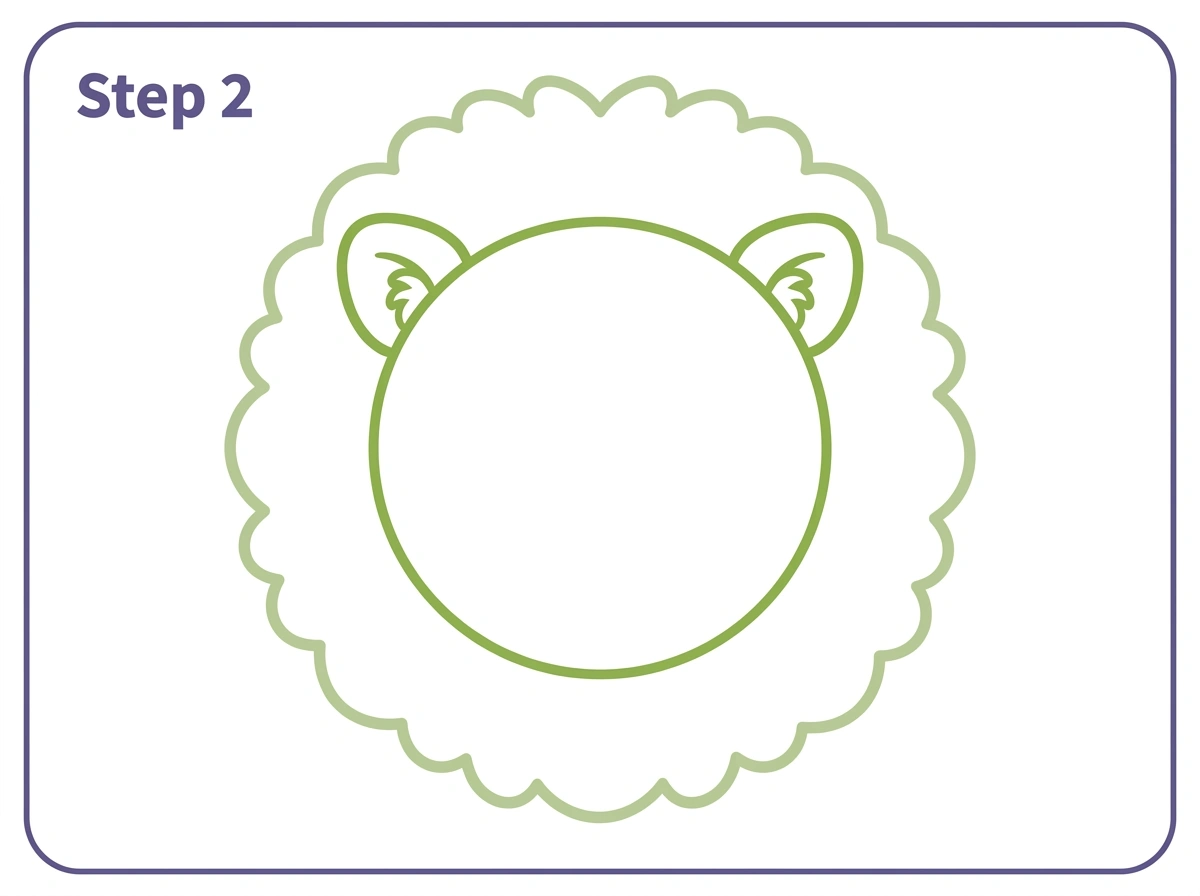
Add a small curved line inside each ear showing the inner ear. This small detail adds polish to the drawing without requiring any additional skill.
Step 3 — Draw the Face Features
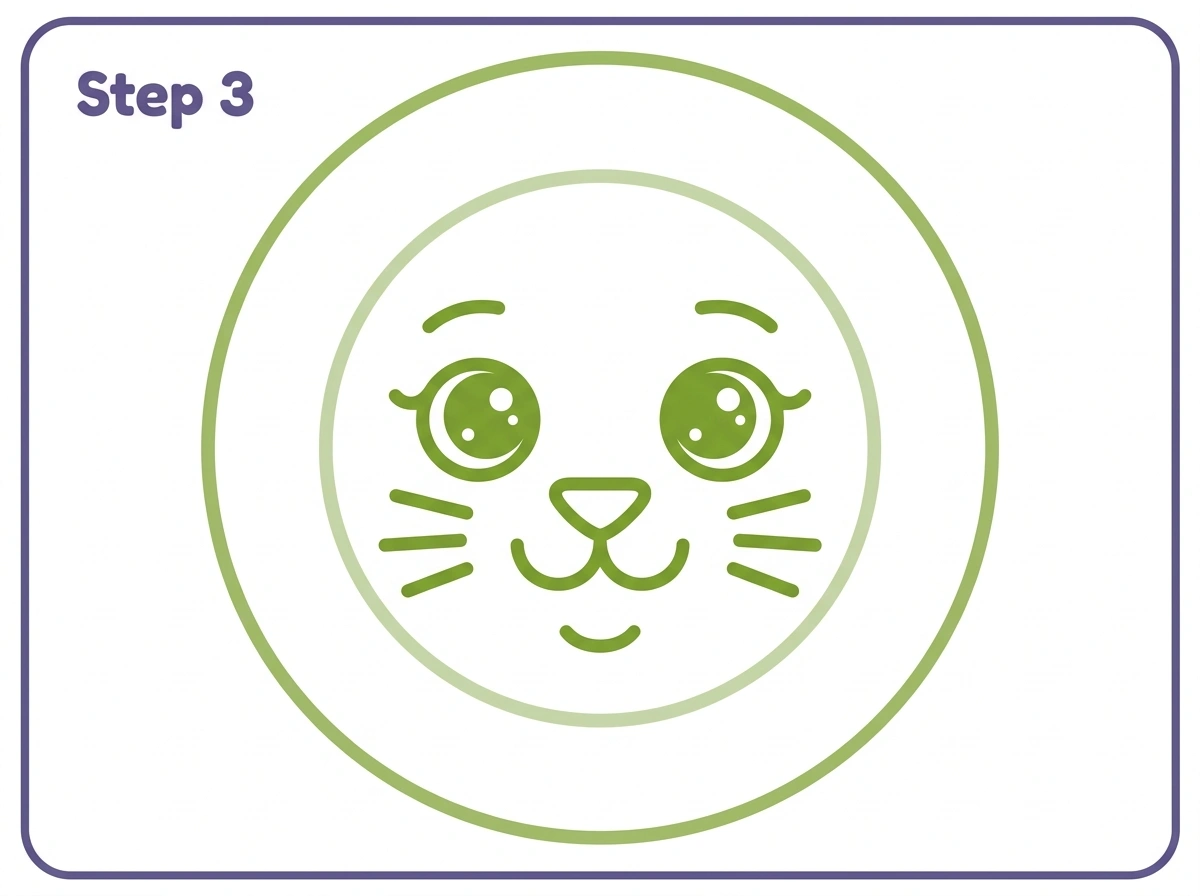
Inside the face circle, add the lion’s features. Position two large round eyes in the upper half of the face circle, each with a circular pupil inside and a tiny white sparkle dot in the upper left of each pupil. The sparkle dot is a small detail that makes a significant difference to how alive the eyes look.
Below and between the eyes, draw a small upside-down triangle for the nose. From the nose, draw a short vertical line downward and then a curved W shape below it for the mouth. The W shape gives the lion a friendly but slightly proud expression that suits the character well.
Add two short curved eyebrow lines above each eye, angled slightly inward toward the center. This gives the lion a focused, dignified expression rather than a blank stare.
Finally, add three short horizontal whisker lines on each cheek extending outward from beside the nose. These complete the lion face and make it immediately readable as a big cat.
Step 4 — Draw the Body, Legs and Tail
Below the mane, draw the lion’s body and legs. Add two short front legs hanging straight down from the base of the mane, each ending in a rounded paw with three small curved toe bumps. Keep the legs short relative to the large mane, as cartoon lion proportions work best when the body is compact beneath a large impressive mane.
Draw a curved belly line connecting the two front legs at the bottom. On either side of the front legs, add small back paws just peeking out behind the front legs to suggest the sitting pose.
Finally, draw a long curved tail extending from the lower right side of the body, curling upward with a small oval fluffy tuft at the tip.
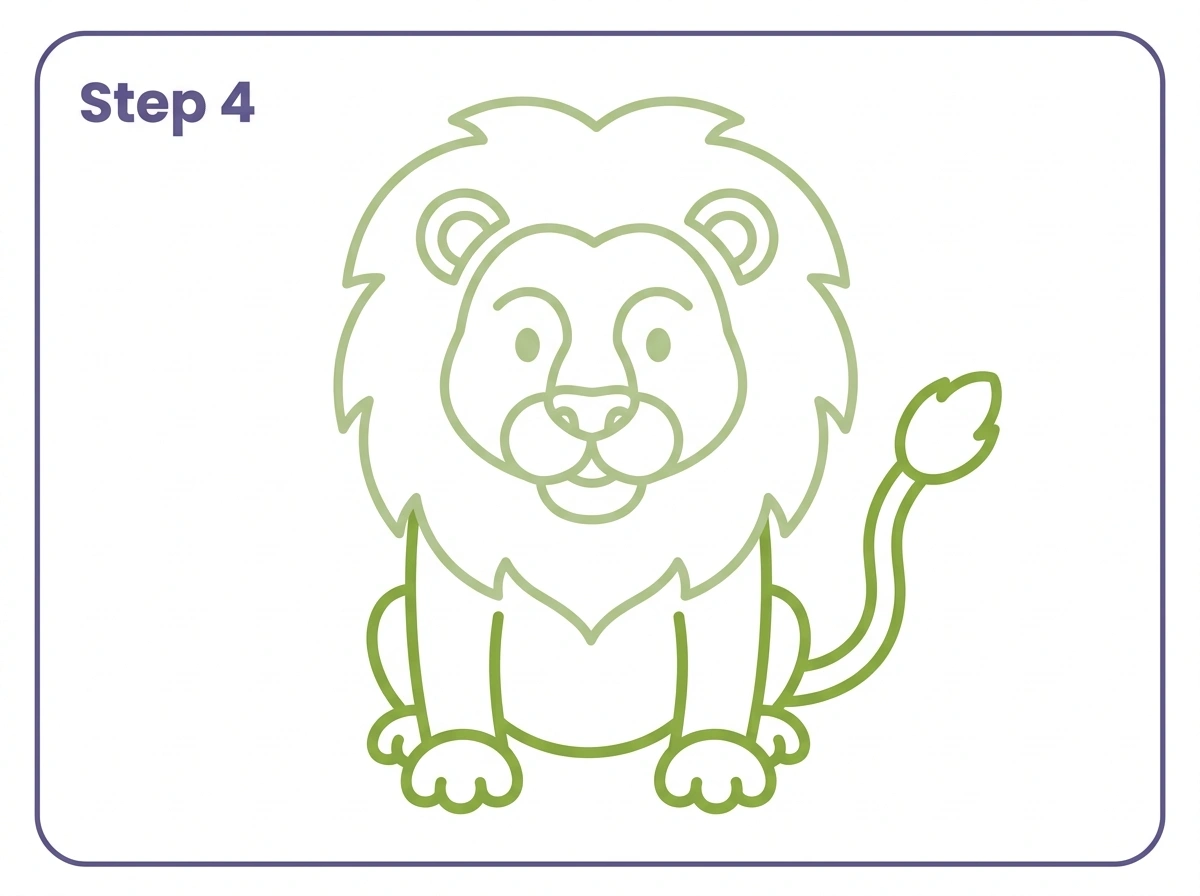
The sitting front-facing pose used in this tutorial is the most stable and recognisable lion drawing position for beginners. It shows the mane to its full advantage while requiring minimal body construction compared to a walking or running pose.
Step 5 — Colour the Lion
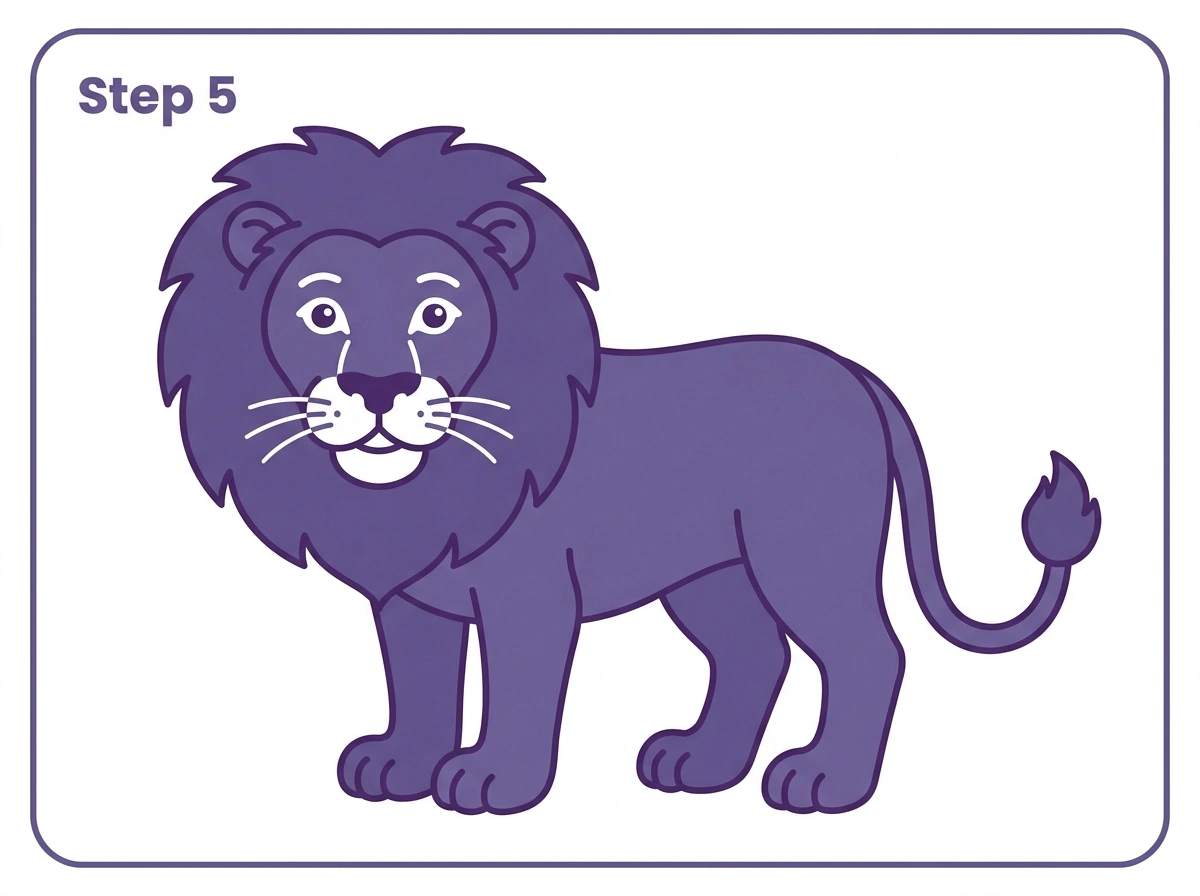
The lion is now fully drawn and ready to colour. The natural coat colour of a lion is a warm tawny golden brown. The mane of a male lion ranges from light golden to deep reddish-brown to almost black depending on the individual lion, age and environment. Older lions tend to have darker manes.
For a cartoon lion, any warm colour combination works well. A golden yellow body with a dark orange or brown mane is the most immediately recognisable combination. A fully purple lion using the site colour, as shown in Step 5, demonstrates how the drawing holds up in any colour scheme.
How to Draw a Lion Face
Drawing just the lion face, without the body, is a popular standalone project and works particularly well as a portrait-style drawing.
Start with a large circle for the face. Add the mane around the outside of the face circle using the same bumpy wavy line described in Step 1, so the face circle sits inside the mane ring. Add two triangle ears peeking from the top of the mane. Then follow Step 3 of this tutorial for all the face features.
The lion face drawing works well as a practice exercise for the full body tutorial because it focuses attention on the most detailed part of the drawing. Once the face feels comfortable, adding the body in Step 4 is straightforward.
For a lion face easy enough for very young children, simplify the mane to a smoother circle, use simple dot eyes and a curved smile rather than the detailed nose and mouth construction, and skip the whiskers. Even this minimal version reads as a lion immediately.
How to Draw a Lion Roaring
A roaring lion has an open mouth showing teeth, which changes the Step 3 face construction. Instead of the W shaped closed mouth, draw a large open oval or wide D shape for the open jaw. Inside the oval, draw the upper row of teeth as a series of connected pointed triangles along the top edge, and the lower row along the bottom edge. Draw a rounded tongue shape filling most of the interior.
The eyebrows on a roaring lion angle downward toward the center more sharply than on the calm version, giving the face a fierce focused expression. The nostrils on a roaring lion may be slightly flared, shown by making the nose triangle slightly wider than usual.
For a cartoon lion roaring, these changes are enough. For a more realistic roaring lion drawing, the entire shape of the face changes, the muzzle protrudes further forward and the cheeks are more pronounced, which is a more advanced drawing challenge.
How to Draw a Lion Cub
A lion cub drawing uses the same basic construction as the adult lion but with exaggerated proportions that communicate youth. The head should be very large relative to the body. The paws should be oversized relative to the legs, as lion cubs do genuinely have disproportionately large paws. The mane on a cub is either absent entirely, since male cubs do not develop their mane until they are about a year old, or shown as a very small fluffy ring rather than the full impressive mane of an adult.
The eyes on a lion cub drawing should be larger relative to the face than on an adult lion. Large eyes in relation to the face is the visual signal that communicates youth across virtually all animal species, which is why illustrations of baby animals and young children always emphasise this proportion.
How to Draw a Lion Full Body Side View
The side view lion is more complex than the front-facing sitting lion in this tutorial but follows a clear construction sequence. Start with two overlapping circles, a smaller one for the head and a much larger one for the body. Add the mane around the head circle. Connect the head and body with a curved neck line. Add four legs shown from the side, with the near legs in the foreground slightly overlapping the far legs visible behind them. The tail extends from the rump and curves upward.
The side view shows the lion’s proportions more accurately than the front view. The body is long and low, the legs are powerful and the tail is long relative to the body length. A walking side view lion has two legs on the ground and two in mid-stride, which requires understanding of which leg pairs move together in a four-legged animal’s gait.
Lion Drawing Tips for Beginners
The mane is the lion’s most distinctive feature and the most forgiving part of the drawing. Wavy bumpy lines for the mane outline look better than a smooth circle, and slight imperfections in the mane outline actually improve the result by making it look more like real fur.
The face features should be positioned in the upper half of the face circle rather than centered in it. This is because the lower portion of a lion’s face is occupied by the muzzle area around the nose and mouth, which projects slightly forward in three dimensions. In a two-dimensional cartoon drawing this is suggested by keeping the eyes in the upper half and giving more vertical space to the nose and mouth area below.
The ears are smaller than most first-time drawers expect. Comparing the ear size to the mane makes them look tiny, but this is accurate. Lion ears are small relative to the size of the head, especially when the mane is fully developed.
Lion Drawing Colour Guide
The classic lion colouring for a cartoon drawing uses three tones. A medium golden yellow for the main body. A darker orange-brown for the mane, inner ears and tip of the tail. A pale cream or white for the chest area, the inside of the ears and around the muzzle.
The eyes of a real lion are typically amber or golden brown, which creates a warm harmonious effect when combined with the golden yellow body. The nose is pink or dark brown. The paw pads, if visible, are a darker pink-brown.
For a more dramatic adult lion, deepening the mane colour to a reddish-brown or dark brown makes the face stand out more prominently against the lighter body colour.
Fun Facts About Lions for Kids
Lions are the only cats that live in social groups called prides. A pride typically consists of several related females, their cubs and a small number of adult males.
Female lions, called lionesses, do most of the hunting for the pride. They are faster than adult males, whose large manes make them easier for prey animals to spot from a distance.
Lions can sleep up to twenty hours a day. They hunt mainly at dawn and dusk when temperatures are cooler and their tawny colouring blends better with the golden light.
A lion’s roar can be heard from up to eight kilometers away. Lions roar to communicate with their pride and to warn rival males to stay away from their territory.
The mane of a male lion continues to develop and darken throughout the lion’s life. A very dark, full mane is a sign of an older, more experienced lion that has survived long enough to develop it fully.
More Animal Drawing Tutorials
Once the lion is comfortable, other big cat and animal drawing tutorials follow naturally. The face construction used in this tutorial shares elements with cat and dog drawings, which makes each new animal tutorial build on skills developed in the previous one.
For more animal drawing ideas from this collection, the same step-by-step method applies to dogs, cats and many other animals. Each tutorial starts with the most basic shapes and adds one detail at a time until a complete drawing appears on the page.
Printable Lion Outline
A printable lion outline based on the finished Step 5 design is available as a free download below. Print it and use it as a colouring page, or place it beside your paper as a reference guide when working through the drawing steps.
For more lion designs to colour, visit our lion coloring pages collection which includes over thirty lion designs from simple designs for toddlers to detailed adult colouring pages. Our full animals coloring pages category covers lions, tigers, elephants, bears and many more.
Explore more Free Printable Coloring Collections
Looking for more engaging activities? Check out these free printable coloring pages fun for kids, useful for teachers, relaxing for adults, and inspiring for designers.
FAQ
What is the easiest way to draw a lion?
Start with a large fluffy circle for the mane, draw a smaller smooth circle inside it for the face, add two small rounded ears at the top, draw the face features inside the face circle and finish with a simple body and legs below the mane. This front-facing sitting pose is the simplest reliable lion drawing method for beginners.
How do you draw a lion for kids in Class 1?
Use the simplified version of this tutorial. Draw the mane as a large bumpy circle. Draw a face circle inside it. Add two round eyes, a triangle nose and a curved smile. Add two stick-like legs below with rounded paws. The completed drawing is recognisably a lion and achievable in a single short session.
How do you draw a realistic lion?
A realistic lion drawing begins with the same circle construction but uses observation of real lion reference photographs to get the proportions right. The mane needs to be studied from reference to capture the direction the fur grows. The face requires specific attention to the muzzle structure and the placement of features. Shading with pencil, moving from light to dark across the form, adds the three-dimensional quality that distinguishes realistic drawings from cartoons.
How do you draw a lion face roaring step by step?
Draw the face circle and mane circle as usual. In the face, draw the eyes with the eyebrows angled sharply downward for a fierce expression. Draw a large open oval for the mouth with pointed teeth along the top and bottom edges and a rounded tongue inside. Add the nose above the open mouth and flare the nostrils slightly. Add whisker dots on the muzzle on either side of the nose.
What is the difference between a lion and a lioness drawing?
The main difference is the mane. A male lion has the large distinctive mane that makes the bumpy circle construction work so well. A lioness drawing starts with a smooth oval head without the mane ring, giving the face a sleeker, more elongated profile. The body of a lioness is also slightly lighter in build than a male of the same age.
Can beginners draw a lion?
Yes. The front-facing sitting lion in this tutorial is specifically designed for beginners. The mane is the most forgiving part because its bumpy outline improves with imperfection. The face features use simple shapes that any child or adult can manage with a little patience. The body construction is minimal, keeping the total difficulty of the drawing low while producing a result that is immediately recognisable.