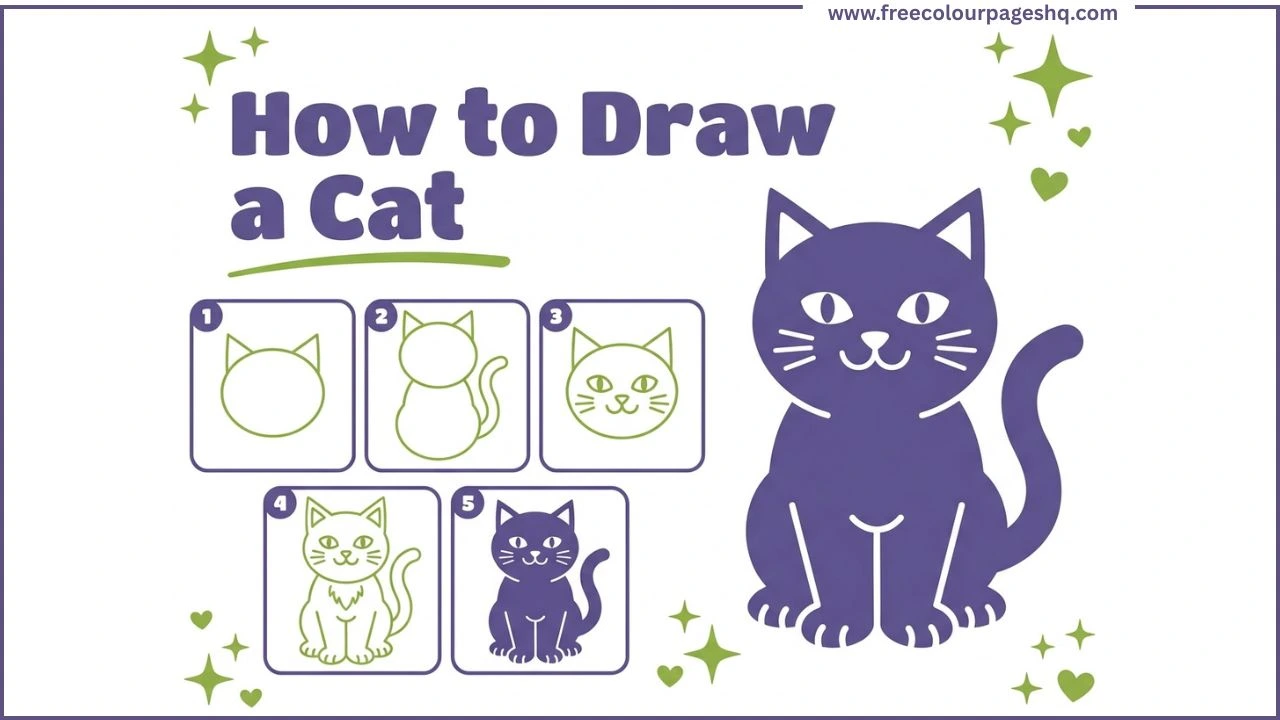
Cats are one of the most drawn animals in the world and also one of the most personally opinionated subjects in drawing. Everyone who loves cats has a specific cat in their head when they pick up a pencil. The orange tabby from childhood. The sleek black cat from a favourite book illustration. The round-faced Persian that looks permanently unimpressed. Getting any of those specific cats onto paper requires knowing the basic construction first, and then adjusting from there.
This tutorial shows how to draw a cute sitting cat step by step in five stages. The method uses a round head with pointed ears, a rounded oval body and a long curved tail to create a front-facing cartoon cat that works for any breed or colour combination. It is designed for complete beginners, for kids in Class 1 and above, and for anyone who wants a reliable cat drawing method they can adapt into different styles. All you need is a pencil, an eraser and something to colour with at the end.
What You Need
Pencil and eraser for the drawing stages. Coloured pencils, crayons or markers for colouring the finished cat. Plain white paper works perfectly. No special art supplies needed.
How to Draw a Cat Step by Step
Step 1 — Draw the Head with Triangle Ears
Start near the upper center of the page and draw a large circle for the cat’s head. Draw it lightly because it is a guide that will be refined as the drawing develops. Make it large enough to fit all the face features comfortably inside.
At the top of the circle, add two sharp pointed triangle ears, one on the upper left and one on the upper right. This is the single most important step in making the drawing look like a cat rather than any other animal. The sharp upright triangle ear is the universal cat signal, instantly recognisable at any age and from any distance. Draw them sitting naturally on top of the head circle rather than at the very tips.
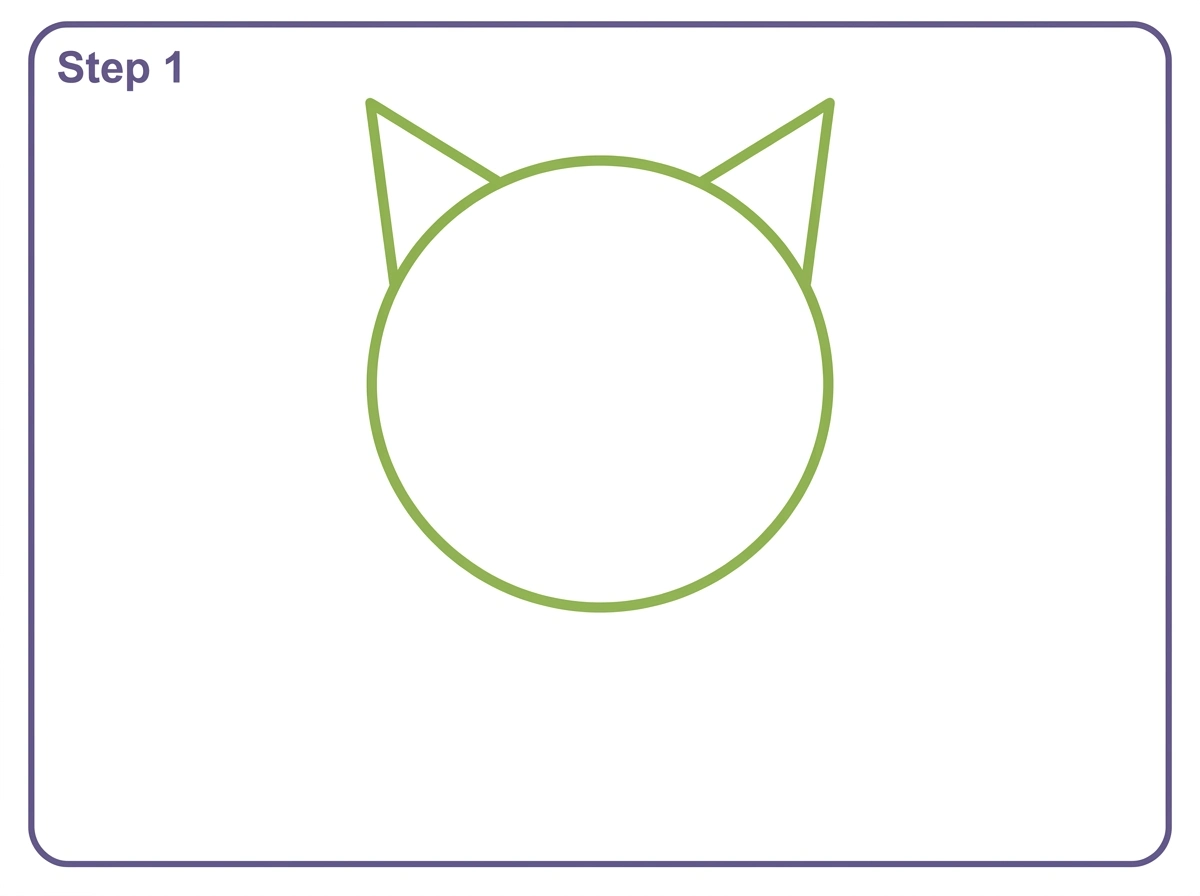
Leave generous space below the head circle for the body. The cat’s body and tail will fill the lower two thirds of the page.
Step 2 — Add the Body and Tail
Below the head circle, draw a large rounded oval body shape. The body should be wider than it is tall and sit just below the head with a short neck connecting them. Two short curved lines on either side of the lower head circle form the neck.
On the right side of the body, draw a long elegant curved tail extending from the lower back area of the body, sweeping outward and then curving back upward. The tail should be roughly as long as the body itself. Cats use their tails for balance and communication, and in a cartoon drawing a gently curved upward tail suggests a calm, curious cat while a tail curled tightly around the body suggests a cat that is settled and content.
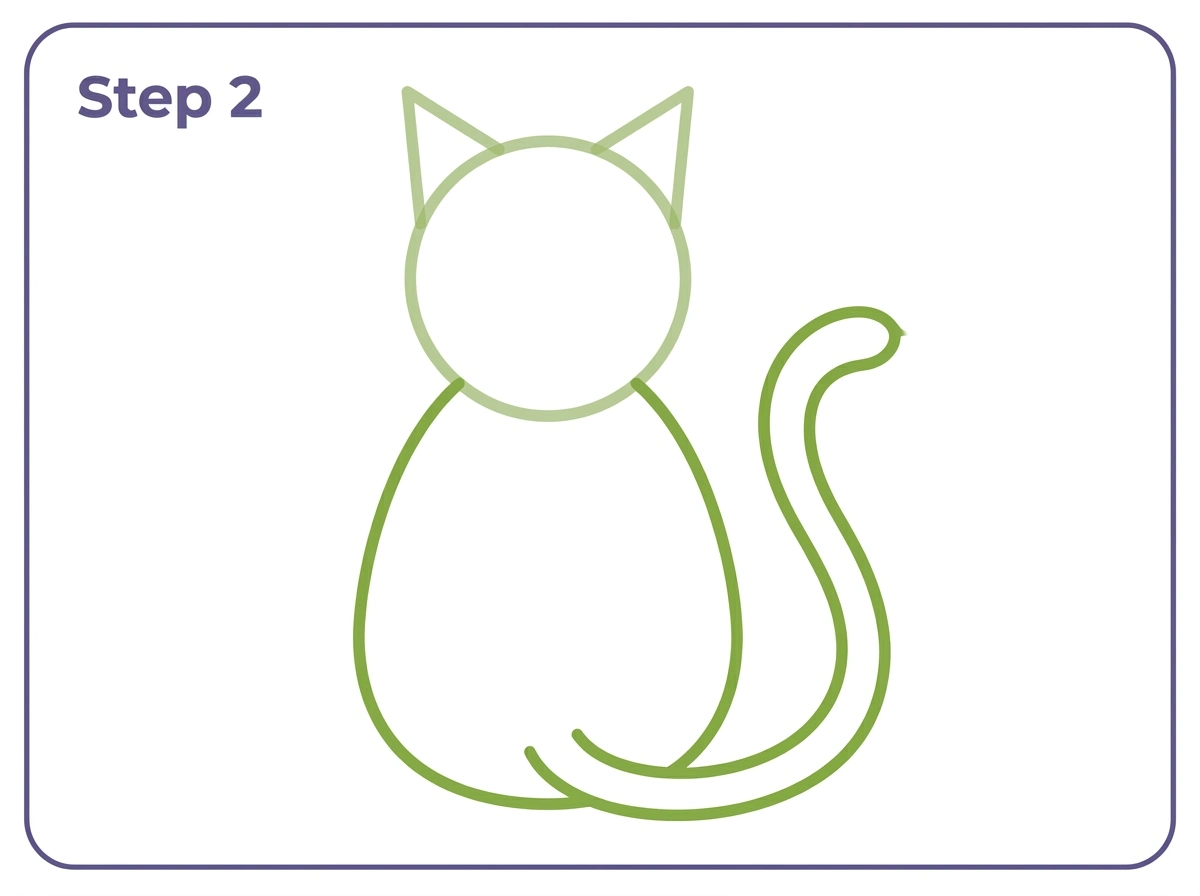
The oval body should feel compact and rounded rather than elongated. A sitting cat presents a much rounder silhouette than a standing cat because the legs fold beneath the body and are mostly hidden.
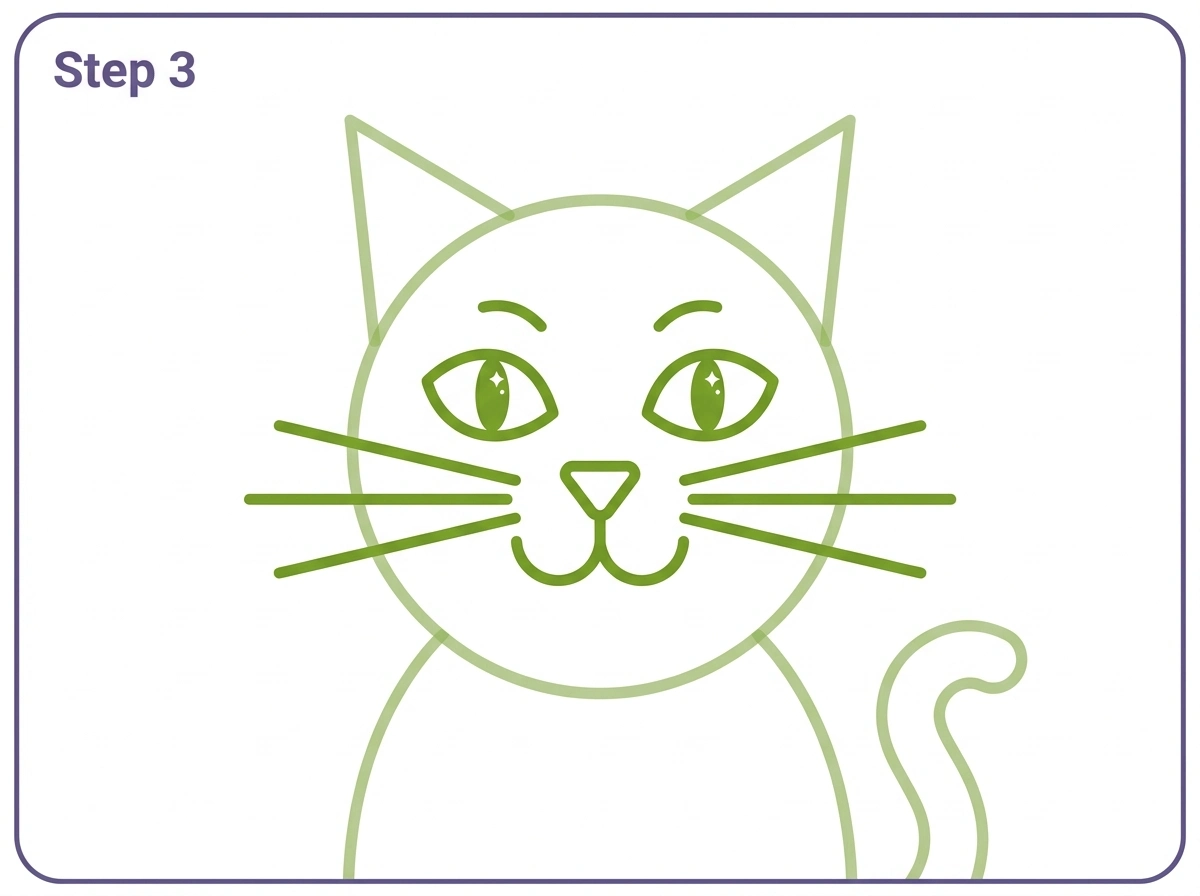
Step 3 — Draw the Face Features and Whiskers
Inside the head circle, add the features that make the cat come to life. Position two almond-shaped eyes in the upper half of the face, each with an oval pupil inside and a tiny white sparkle dot in the upper area of each pupil.
Cat eyes are distinctive from dog eyes in two ways. The pupil shape is more elongated vertically in a cat, particularly in low light, and the overall eye shape is more almond-like than round. In a cartoon cat, the almond eye shape is the clearest visual signal that this is a cat rather than a dog or any other animal.
Below and between the eyes, draw a small upside-down triangle for the nose. From the base of the nose triangle, draw a short vertical line downward and then add a curved W shape below it for the mouth. This W-shaped mouth is slightly different from a dog’s because cats have a more subtle, often slightly disapproving expression in cartoon form compared to the open, enthusiastic expressions typical of cartoon dogs.
Add two short curved eyebrow lines above each eye and three long straight whisker lines extending outward from each cheek. Cat whiskers extend well beyond the width of the face, further than dog whiskers in proportion, which is worth reflecting in the drawing.
Add a small inner triangle line inside each ear to show the inner ear detail. This is a small touch that noticeably improves the finished look of the ears.
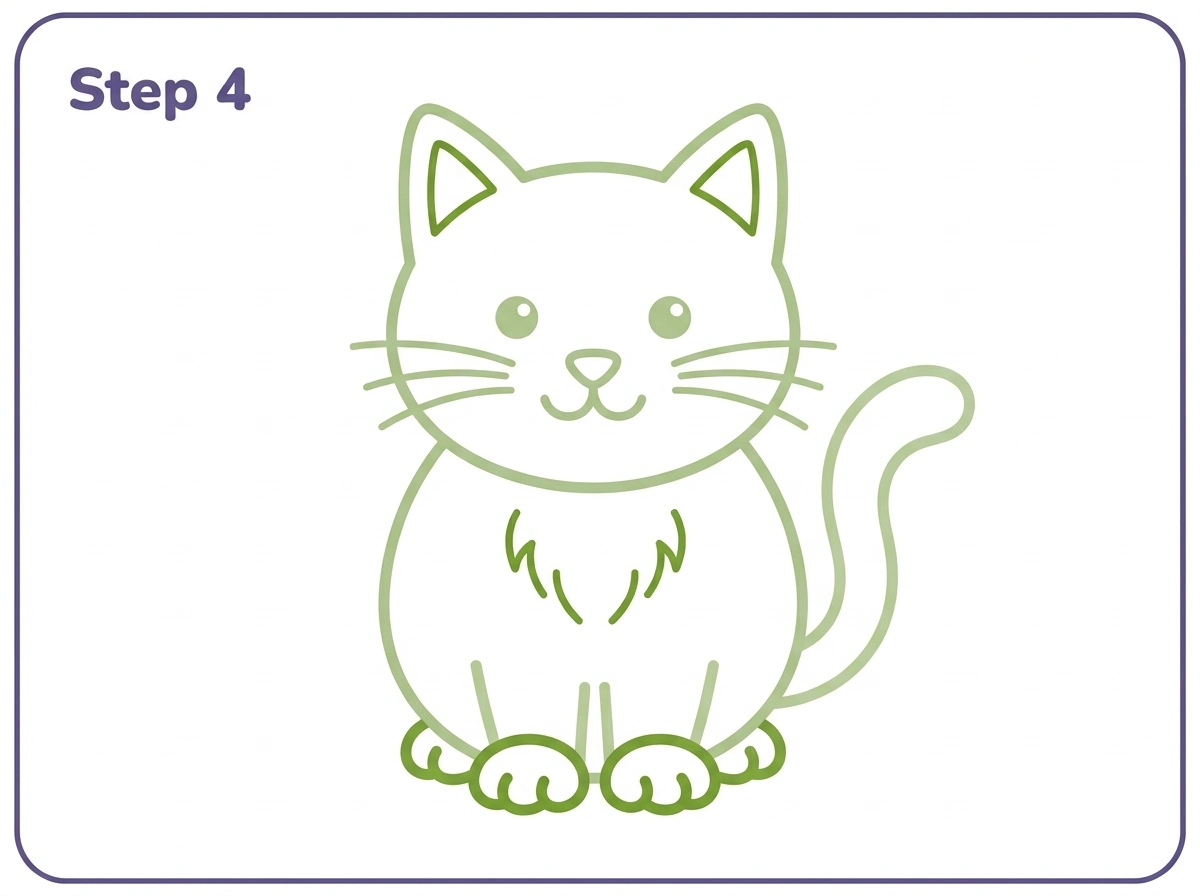
Step 4 — Add the Paws and Chest Fur
Below the oval body, add four small rounded paw shapes. Two front paws sit side by side at the center bottom of the body, each showing three small curved toe bumps across the top. Two small back paws peek out from either side of the front paws.
Add two or three short curved fur lines on the chest area of the body between the front paws. These suggest the slightly fluffier chest fur that most cats have and add texture to what would otherwise be a plain oval shape.
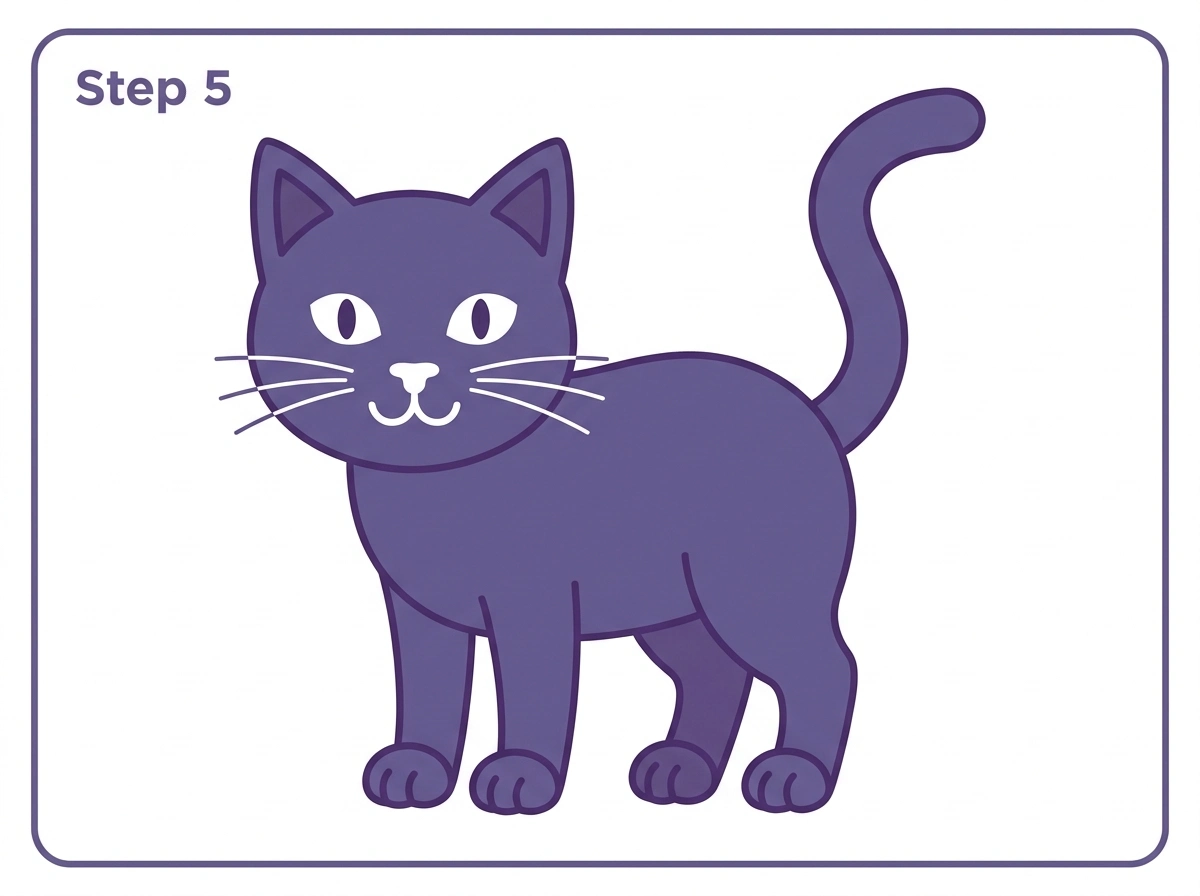
Step 5 — Colour the Cat
The cat is now fully drawn. Colour choices for cats cover an enormous range because domestic cat coat varieties are more diverse than almost any other animal.
A tabby cat uses warm orange or grey as the base with darker stripe markings across the forehead, cheeks and body following the natural direction of fur growth. A black cat uses deep black throughout with a slightly lighter area on the chest. A white cat uses pale grey shading to suggest form while keeping most of the coat white. A tortoiseshell uses patches of orange, black and cream. A calico combines white with patches of orange and black.
For a simple cartoon cat, any single colour works well. The cat drawing holds up strongly in golden yellow, warm orange, grey, black or any colour combination the artist prefers.
How to Draw a Cat Face
Drawing just the cat face as a standalone project is popular and useful for building confidence with the most expressive part of the drawing before adding the body.
Start with the head circle and triangle ears. Fill the face with the eyes, nose, mouth and whiskers as described in Step 3. For a cat face easy enough for young children, use simple oval eyes, a small triangle nose and a curved smile without the W mouth detail. For a more detailed realistic cat face, add the following: the iris of the eye in a warm amber or green with a vertical oval pupil that is darker at the center, fine fur texture lines around the muzzle area in short pencil strokes following the direction the fur grows, and the slightly raised cheekbone area below each eye.
A simple cat face drawing is one of the best exercises for beginners because the face contains all the elements that make the animal recognisable, and mastering the face means the full body drawing becomes considerably easier.
How to Draw a Cat Sitting
The five-step tutorial above produces a sitting cat seen from the front. For a sitting cat seen from the side, the construction changes significantly. The head is shown in profile with one ear visible rather than two. The body is shown from the side, a roughly teardrop shape wider at the chest and narrowing toward the hindquarters. The back legs fold beneath the body with the knee joint visible as a rounded bump at the side, and the front legs extend straight downward in front of the chest.
The tail in a side-view sitting cat is visible curling around the base of the body, with the tip visible on the far side. This tail position is one of the most recognisable cat postures and immediately reads as a calm, settled cat.
How to Draw a Cat Lying Down
A sleeping or lying cat uses a horizontal composition rather than the vertical sitting pose. Draw a long oval for the body placed horizontally across the page. Add the head circle at one end, turned to show the cat’s face from the front or tilted to show a three-quarter view. The front paws extend forward from the front of the body.
A cat lying with its paws tucked underneath, sometimes called the loaf position, is one of the most beloved cat poses. In this position the body oval is shorter and rounder, the paws are invisible beneath the body, and the tail curls around the side. The result is a compact rounded shape with a cat face at one end, which is both very easy to draw and immediately recognisable to anyone who knows cats.
How to Draw a Cat Paw
A cat paw from the front view is a rounded triangular shape with three or four rounded toe bumps visible above it. Draw the main paw pad as a slightly rounded triangle shape. Add three oval toe tips across the upper edge. A small heart-shaped central pad is visible between the toes and adds an appealing detail to the finished paw.
A cat paw print has the same arrangement of pads as the dog paw print but is noticeably smaller and more rounded overall. The central pad in a cat paw print is wider relative to the toe pads than in a dog paw print, and cats retract their claws, so no claw marks appear in a cat paw print the way they do in a dog’s.
How to Draw a Cute Kawaii Cat
A kawaii cat uses the same basic construction but with dramatically exaggerated proportions. The head circle should be very large, taking up about two thirds of the total drawing height. The body is tiny and round, almost like an afterthought below the large head. The eyes take up most of the upper face and have very large sparkle highlights. A tiny mouth, just a small curved line, and rosy circular cheeks complete the kawaii face.
Kawaii cats often have additional decorative elements: a small bow or ribbon between the ears, a tiny object held in the front paws, or simple pattern markings on the face suggesting a specific cat character. The overall effect should read as something between a cat and a soft toy.
How to Draw a Cat Eye
The cat eye is one of the most distinctive features of the animal and one of the most satisfying details to draw well. For a cartoon cat eye, draw an almond shape with a pointed inner and outer corner. Inside the almond, draw an oval iris and a vertical oval pupil darker at the center. Add a white sparkle dot in the upper area of the iris.
For a realistic cat eye, the construction is more complex. The iris shows a radial pattern of fine lines emanating from the pupil, varying in colour from pale yellow-green at the pupil to deeper amber or green toward the outer edge. The pupil in bright light is a very narrow vertical slit. In low light or dilated, it fills most of the iris as a large dark oval. Fine fur lines surround the eye socket, following the direction the fur grows, and the upper eyelid has a slight shadow beneath it.
How to Draw a Black Cat
A black cat uses the same construction as this tutorial but with specific colouring considerations. Pure black filled completely opaque looks flat and loses all the detail of the face and body outline. The most effective approach for a black cat is to use deep charcoal grey as the main body colour, leaving the chest area slightly lighter and adding the face features in white or very pale grey against the dark background.
A Halloween black cat is the most searched black cat drawing subject. The same sitting front-facing pose works well with a few additions: an arched back showing the classic Halloween cat alarm pose, a full moon behind the cat suggesting a night setting, and perhaps a witch’s hat perched between the ears for a seasonal decoration.
How to Draw a Realistic Cat
A realistic cat drawing moves away from circles and ovals toward observed anatomy. The key differences from the cartoon version are: the head shape is wider than it is tall with a flatter skull and a more prominent muzzle; the ears are positioned further apart and slightly to the sides rather than directly on top; the eyes are large relative to the face with detailed iris structure; the body proportions reflect the specific breed being drawn; and fur texture is added through short pencil strokes following the direction of fur growth.
For a realistic cat with pencil, use an H pencil for the initial light construction sketch and a 2B or 4B pencil for the final outlines and shading. Short pencil strokes following the fur direction create a convincing texture that distinguishes a realistic cat drawing from a cartoon one. The area around the muzzle, the chest and the belly typically has shorter, finer fur while the tail and flanks may show longer, more visible strokes.
Cat Breed Drawing Guide
Different cat breeds have distinct visual features that change the construction at key points.
A Persian or long-haired cat has a very round, almost flat face with the nose set very high between the eyes, and a dense fluffy coat that adds significant volume to the body oval. Drawing a Persian requires making the face rounder than usual and adding considerable fur texture around the face.
A Siamese cat has a more elongated triangular face, larger ears and a slender body. The distinctive colour points, dark face, ears, paws and tail against a pale body, are the most immediately recognisable breed feature.
A Maine Coon has a large rectangular body, a full bushy tail and tufted ears with small wisps of fur at the tips. Drawing a Maine Coon requires extending the body oval to be longer than usual and adding significant detail to the tail and ear tufts.
A Scottish Fold has rounded folded ears that bend forward and downward rather than standing upright. Replacing the triangle ears in this tutorial with small forward-folding rounded shapes immediately creates the Scottish Fold appearance.
Fun Facts About Cats for Kids
Cats spend about sixty to seventy percent of their lives sleeping. An average cat sleeps between twelve and sixteen hours each day.
A cat can jump up to six times its own body length in a single leap. This extraordinary jumping ability comes from the powerful muscles in the hindquarters and the flexible spine that allows cats to coil and spring.
Cats have a specialized collarbone that allows them to always land feet-first when they fall, a reflex called the righting reflex that activates within a fraction of a second of falling.
Domestic cats are the only cats that hold their tail vertically when walking. Wild cats hold their tail horizontally or low. This vertical tail is a signal of friendliness that domestic cats developed specifically in their relationship with humans.
A cat’s purr vibrates at between twenty-five and fifty hertz. Studies have found that vibrations in this frequency range promote bone density and healing, which may be one reason why cats purr not only when happy but also when injured or stressed.
Printable Cat Outline PDF
A printable cat outline based on the finished Step 5 design is available as a free download below. Print it on plain white paper and use it as a colouring page, a drawing reference or a craft template. The outline includes all the completed line details from the tutorial and works as a standalone colouring page even for children who have not completed the drawing tutorial.
For more cat designs to colour alongside this tutorial, visit our cat coloring pages collection which includes designs from simple outlines for toddlers to detailed realistic cat portraits for adults. Our full animals coloring pages category covers cats, dogs, lions, tigers and many more.
Explore Free Printable Coloring Collections
Looking for more engaging activities? Check out these free printable coloring pages fun for kids, useful for teachers, relaxing for adults, and inspiring for designers.