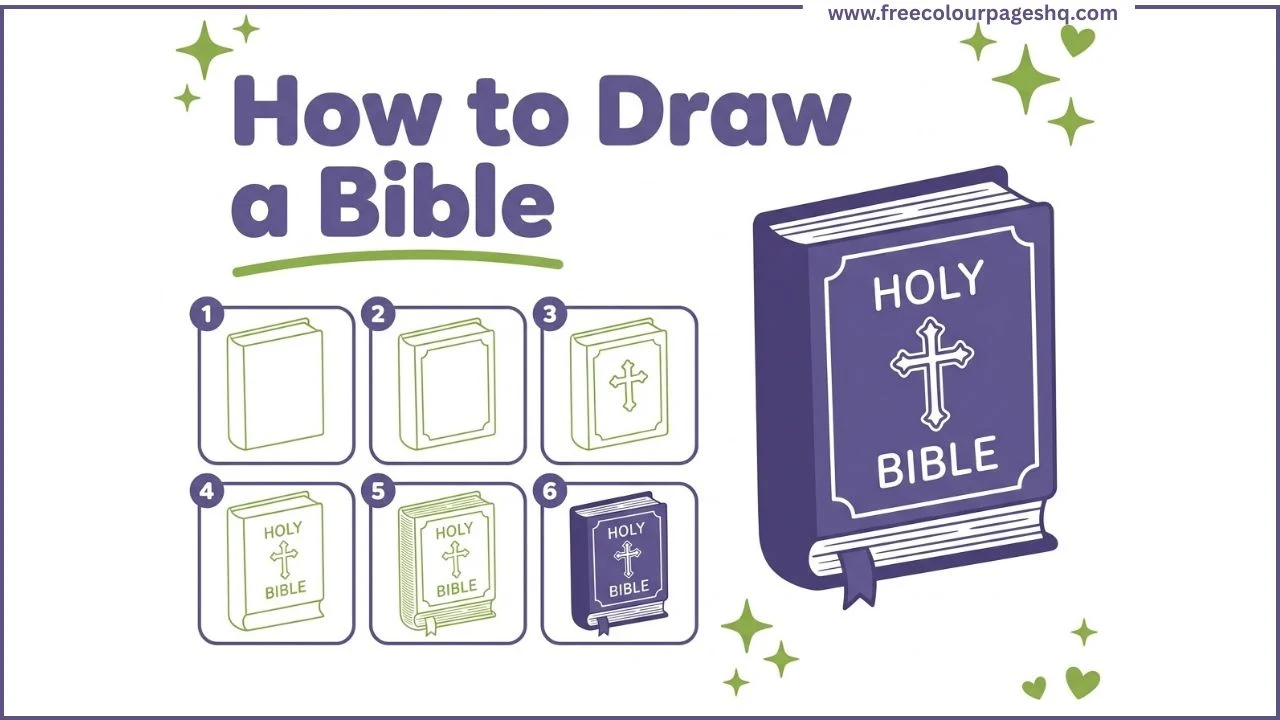
A Bible drawing is one of those subjects that looks more complicated than it actually is. It is essentially a three-dimensional book with a cross on the cover and a few specific details that make it immediately recognisable. Once those elements are broken down into individual steps, the whole thing becomes very manageable.
This tutorial shows how to draw a Bible step by step in six stages. It covers the closed Bible first, then the open Bible as a separate variation. It works for kids, for beginners, and for anyone who needs a Bible drawing for a card, a school project, or an art lesson.
What You Need
A pencil, an eraser, a ruler for the straight lines, and coloured pencils or markers for the finished drawing. A ruler is helpful in Steps 1 and 2 but not essential.
How to Draw a Bible Step by Step
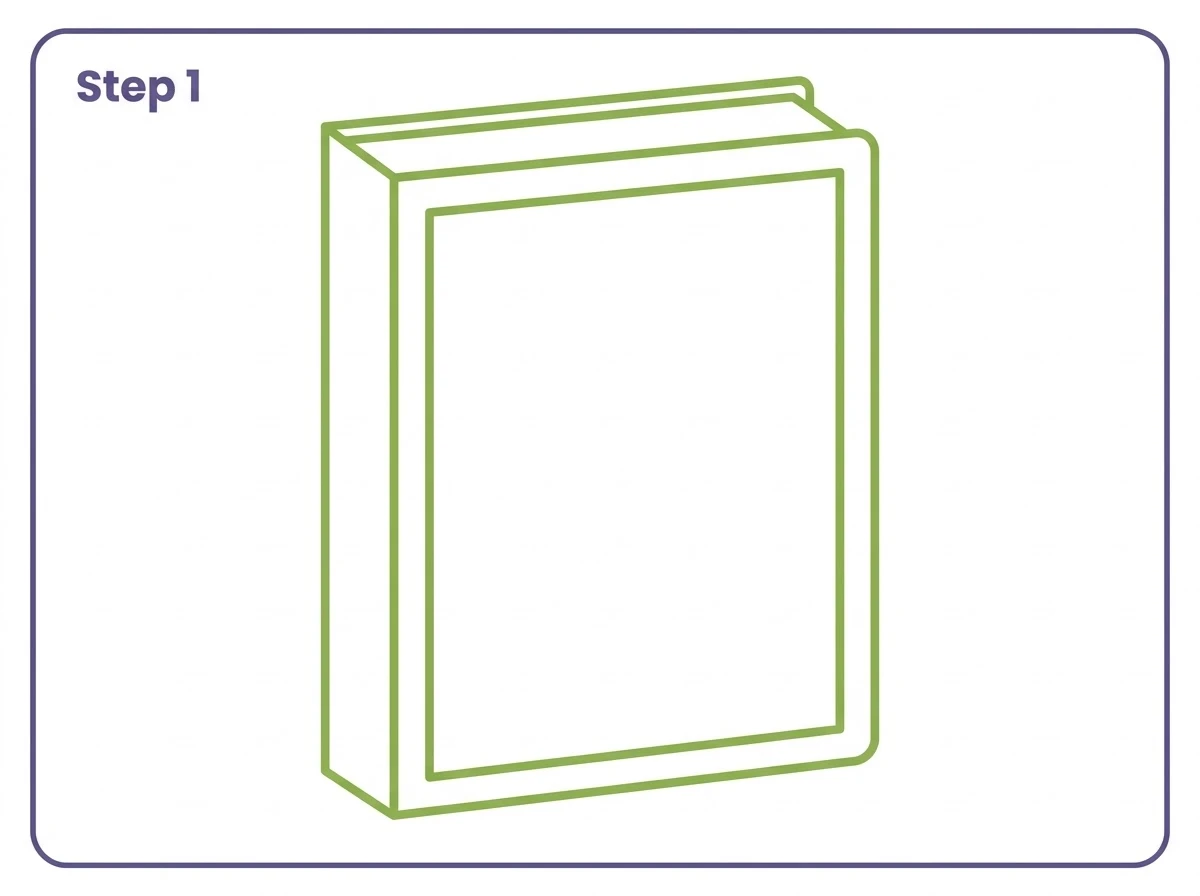
Step 1 — Draw the 3D Book Shape
Start near the center of the page. Draw a large rectangle with slightly rounded corners for the front cover. This rectangle is taller than it is wide, like a portrait-orientation book.
On the left edge of the rectangle, add a narrow vertical rectangle for the spine. The spine is roughly one eighth of the total width of the front cover.
Above both the front cover and spine, draw a thin horizontal band showing the top edge of the book pages. This top edge connects the upper edge of the front cover to the upper edge of the spine.
These three elements together, front cover, spine and top page edge, give the Bible its three-dimensional book shape from the first step.
Step 2 — Add the Cover Border and Corner Details
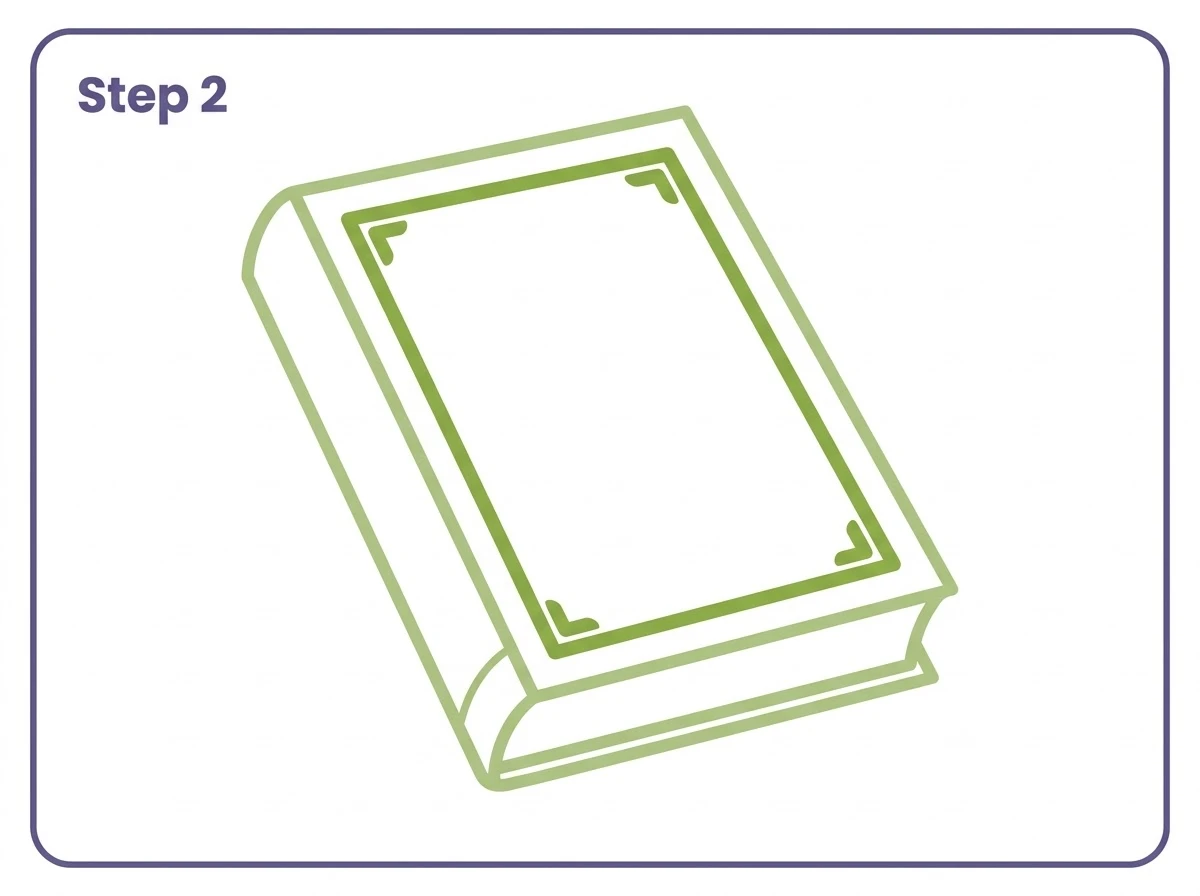
Inside the front cover rectangle, draw a second smaller rectangle following the inner edge of the cover. Leave a consistent margin between the outer cover edge and this inner border frame, roughly the same width as the spine.
At each of the four inner corners of this border frame, add small L-shaped bracket details. These represent the decorative corner pieces often found on classic Bible covers and immediately give the drawing a more finished, authentic look.
Draw a single horizontal line near the base of the spine separating it into upper and lower sections.
Step 3 — Draw the Cross on the Cover
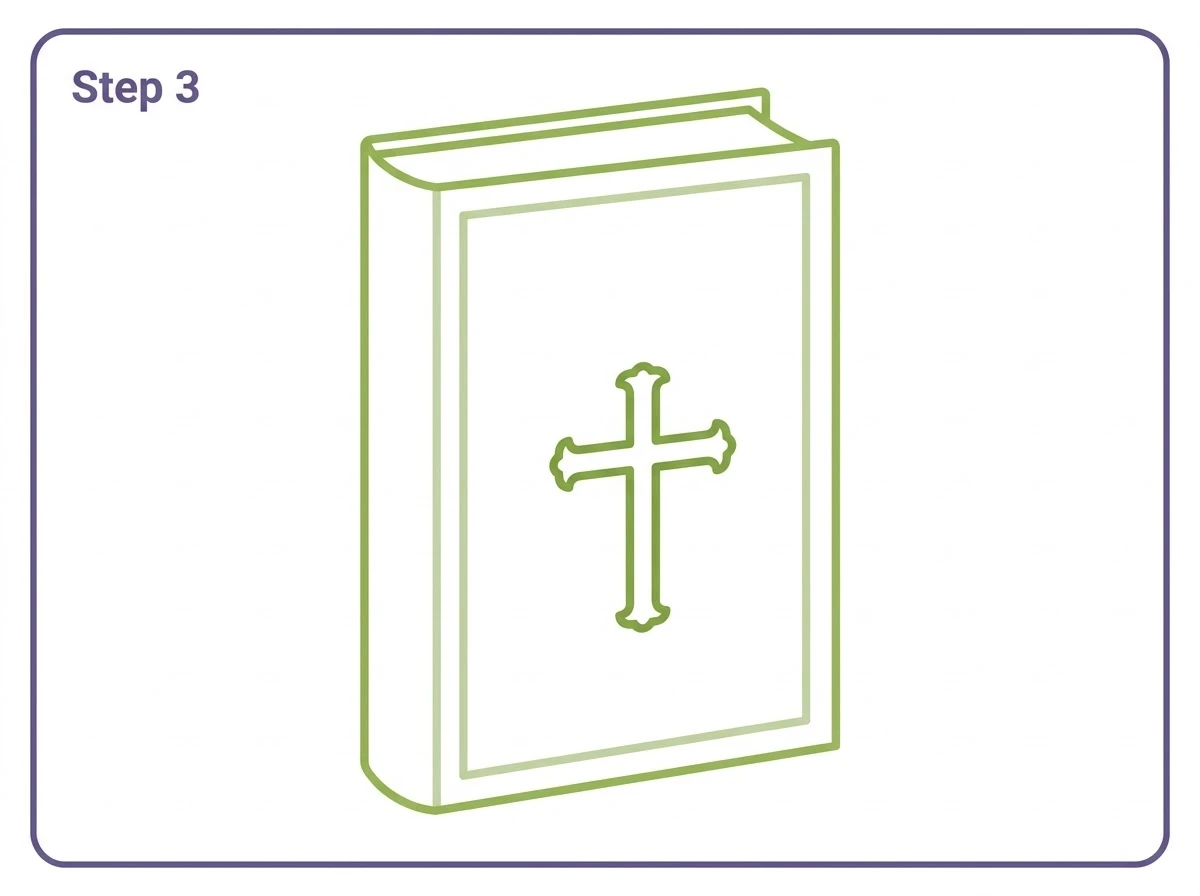
Inside the bordered panel on the front cover, draw a decorative cross in the center lower area. The cross has a vertical bar and a shorter horizontal bar crossing it in the upper third, creating the classic Christian cross proportion.
The ends of both bars have slightly wider, flared tips rather than plain flat ends. This small detail gives the cross a classic engraved quality rather than a plain geometric shape.
The cross should fit comfortably within the inner border frame without touching the frame edges.
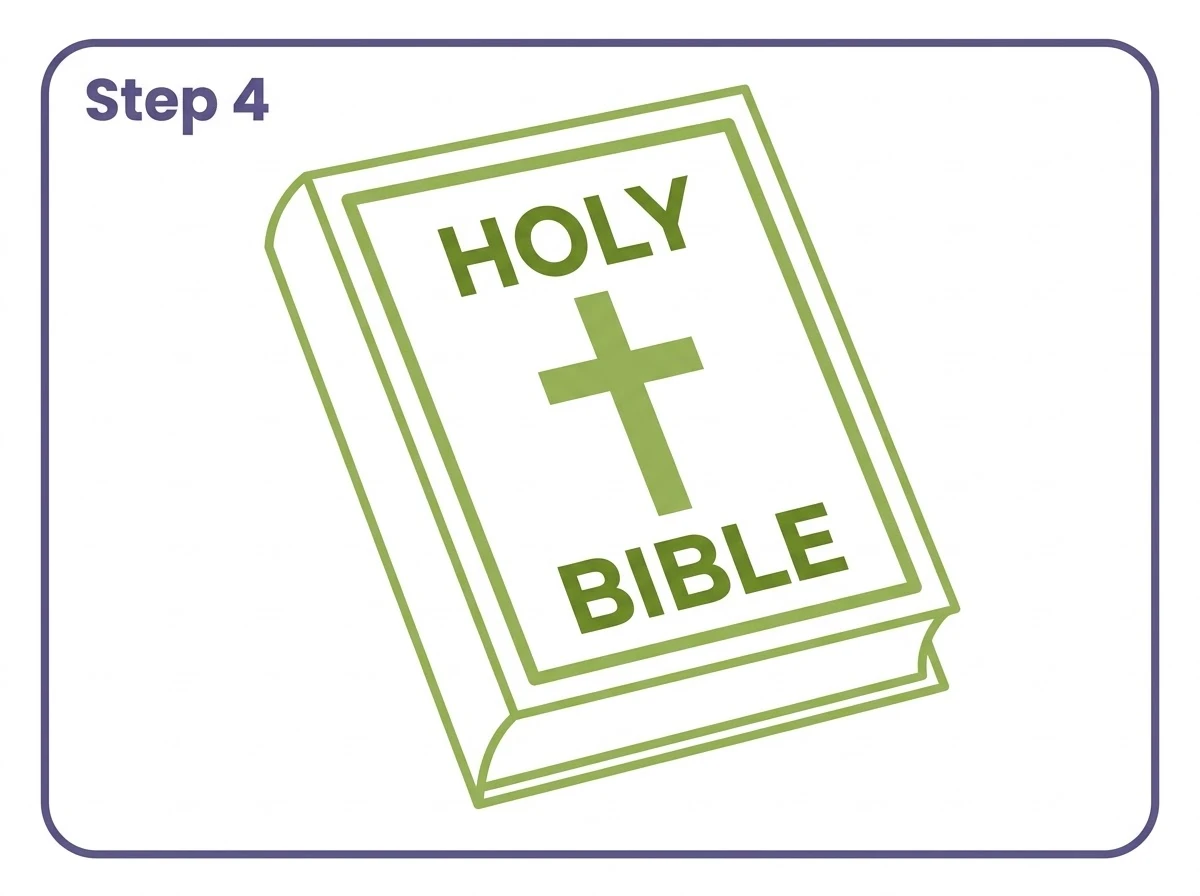
Step 4 — Add the HOLY BIBLE Text
Above the cross in the inner panel, draw the word HOLY in simple capital block letters centered horizontally. Below the cross, draw the word BIBLE in slightly larger capital letters, also centered.
The two words sit on either side of the cross with the cross between them as a visual anchor. Keep the letters simple and clean rather than ornate. This is the most recognisable Bible cover layout and works at any size.
Step 5 — Add Page Edges and Bookmark Ribbon
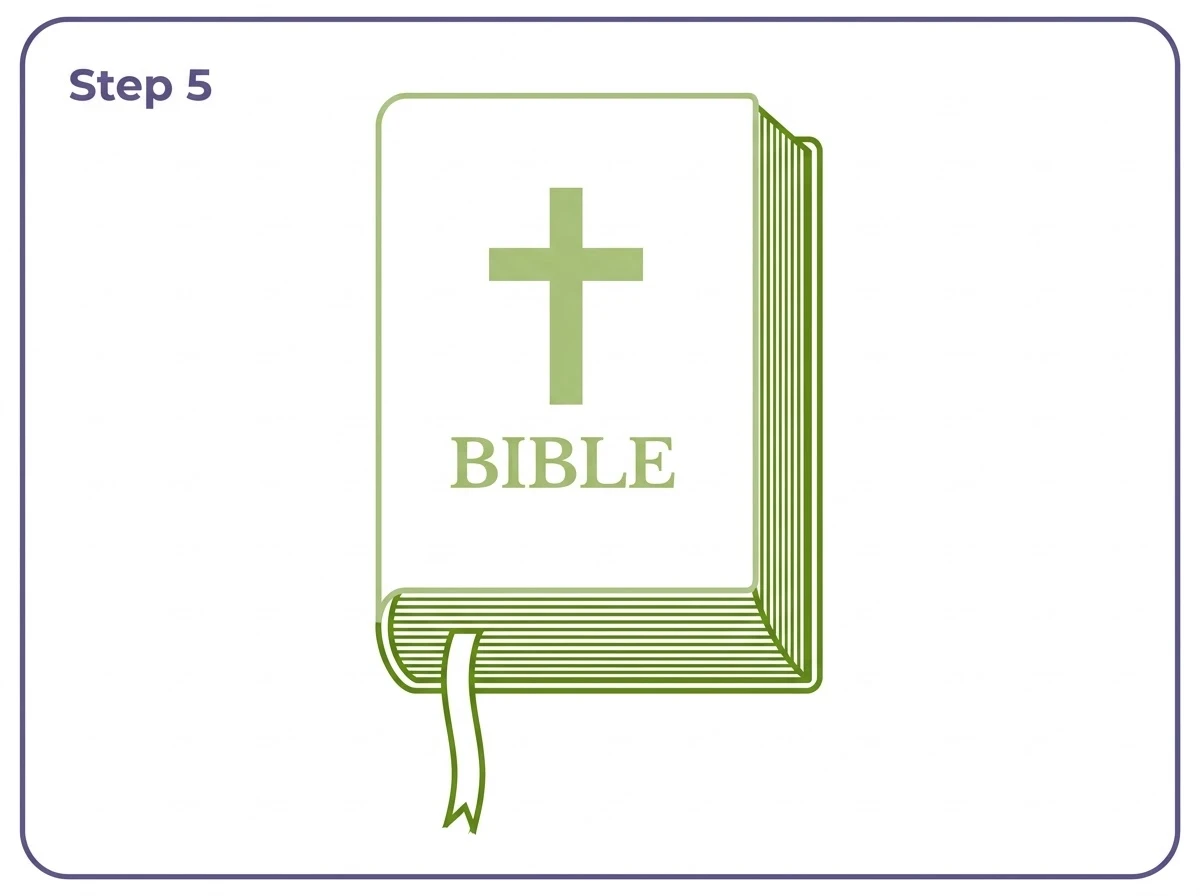
On the right edge of the front cover, the side opposite the spine, draw a series of many fine closely spaced horizontal lines running the full height of the cover. These lines represent the individual pages of the Bible stacked at the page edge. A Bible is a thick book and the page edge should reflect this by having many tightly spaced lines.
From the bottom center of the Bible, draw a thin ribbon bookmark hanging downward. The ribbon should be roughly as long as the Bible itself is tall, with a small pointed or slightly frayed tip at the bottom end.
Step 6 — Colour the Bible
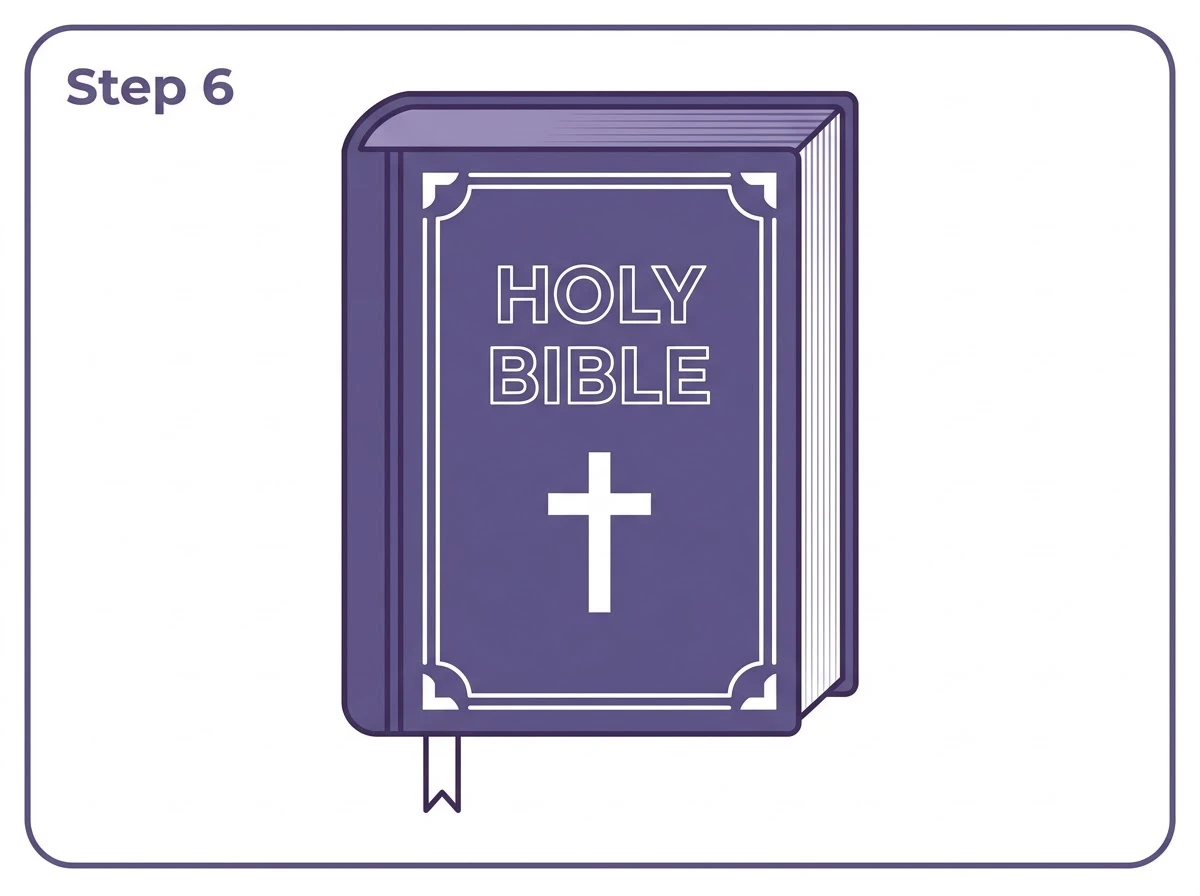
The most traditional Bible colouring uses black for the cover with gold or yellow for the cross, the HOLY BIBLE text and the corner bracket details. This black and gold combination is the most immediately recognisable Bible colour scheme and appears on Bibles worldwide.
Fill the front cover, spine and top page edge with deep black or very dark grey. The cross, the text and the corner brackets are left uncoloured or filled with gold.
The page edge lines on the right side can be coloured gold or left as white, since real Bibles often have gilt-edged pages that appear golden when the book is closed.
The bookmark ribbon is traditionally red, which contrasts well with the black cover.
Alternative colour combinations: deep burgundy cover with gold details. Dark navy with silver details. Rich brown with cream details. All of these are authentic Bible cover colours that appear on real Bibles.
How to Draw a Bible Easy for Kids
A simplified Bible easy enough for young children reduces the tutorial to four elements. A rectangle with rounded corners for the cover. A small rectangle attached to the left for the spine. A simple cross in the center of the cover. The letters HOLY BIBLE above and below the cross.
This four-element version takes about five minutes and is immediately recognisable. Skip the border frame, corner brackets, page edge lines and bookmark for the simplest version.
How to Draw an Open Bible
An open Bible uses a completely different construction from the closed Bible above.
Start with a horizontal oval or ellipse for the spine curve at the bottom center of the composition. This spine curve is the lowest point of the open book.
From each end of the oval, draw two curved lines sweeping upward and outward to form the left page and right page of the open book. Each page is a roughly rectangular shape that curves slightly inward at the center where it meets the spine. The pages are shown from a slight above-and-front perspective, so their top edges angle slightly downward toward the spine.
Add thin curved horizontal lines across each page suggesting the lines of printed text. The text lines curve very slightly to follow the gentle curve of the page surface.
Draw a small cross and the words HOLY BIBLE on the bottom of the left page visible at the inner edge near the spine. Add a bookmark ribbon coming out from the spine at the bottom.
An open Bible drawing works particularly well with a ray of light coming from above, drawn as radiating straight lines extending outward from the book. This detail is common in religious illustration and gives the open Bible drawing its characteristic sacred quality.
How to Draw a Simple Bible
For the simplest possible Bible that still reads clearly as a Bible: draw a rectangle for the cover. Draw a cross slightly above center. Draw the letters HOLY above and BIBLE below the cross. Done.
This three-element approach works at very small sizes, for children aged five and under, and for any context where the Bible needs to be quickly sketched without detailed construction.
Tips for a Better Bible Drawing
The most common mistake in Bible drawings is making the page edge lines too few and too widely spaced. A Bible is very thick relative to other books and its page edge should show dozens of closely packed lines. When the lines are sparse the book looks thin.
The cross is the most important identifying detail on the cover. Spending extra time getting the cross proportions right, with the horizontal bar crossing the vertical bar in the upper third rather than the middle, makes the drawing immediately recognisable as a Bible rather than a generic religious book.
The corner bracket details in Step 2 are optional but they add a quality that distinguishes the drawing from a plain rectangle with a cross on it. They take thirty seconds to add and make the finished Bible look significantly more detailed.
Fun Facts About the Bible
The Bible is the best-selling book of all time. The Guinness Book of World Records estimates that between five and seven billion copies have been printed, which is approximately one copy for every person alive on Earth.
The Bible contains 66 books in total, divided into two main sections: the Old Testament with 39 books and the New Testament with 27 books. The shortest verse in the Bible is John 11:35, which reads simply “Jesus wept” in English translation, making it the shortest two-word verse in any widely read religious text.
The word Bible comes from the Greek word biblia, which means books or scrolls. The Bible is therefore literally “the books” rather than a single unified volume, reflecting its nature as a collection of texts written over roughly 1,500 years.
Bibles have been printed in over 700 languages. The Gutenberg Bible, produced around 1455, was the first major book to be printed using movable type and is considered the starting point of the age of the printed book.
Printable Bible Outline PDF
A printable Bible outline based on the finished Step 6 design is available as a free download below. Use it as a colouring page for a Sunday school class, a church activity, a religious studies project or a personal art activity.
Explore more Free Printable Coloring Collections
Looking for more engaging activities? Check out these free printable coloring pages, fun for kids, useful for teachers, relaxing for adults, and inspiring for designers.
FAQ
What is the easiest way to draw a Bible?
Draw a tall rectangle with slightly rounded corners for the cover. Add a narrow rectangle on the left for the spine and a thin band along the top for the page edges. Draw a cross in the center of the cover and the words HOLY and BIBLE above and below it. Add a bookmark ribbon at the bottom. This six-step method works for all ages.
How do you draw a Bible easy for kids?
Draw a rectangle. Add a cross in the center. Write HOLY above the cross and BIBLE below it. This three-element version takes under five minutes and is immediately recognisable as a Bible.
How do you draw an open Bible?
Draw a horizontal oval for the spine curve at the bottom center. Draw two page shapes sweeping upward and outward from each end of the oval. Add horizontal text lines curving across each page. Add a small cross and text at the inner lower edge of one page near the spine.
What colour is a Bible cover in drawing?
The most traditional Bible drawing uses black cover with gold cross and text. Burgundy with gold, dark navy with silver and brown with cream are all authentic alternatives. The page edge and bookmark ribbon are often shown as gold and red respectively.
How do you draw a 3D Bible?
The six-step tutorial above produces a 3D Bible. The three-dimensional effect comes from drawing three visible faces: the front cover, the spine on the left side and the top page edge above. These three faces meeting at the top left corner create the solid book illusion.